
前言
這邊紀錄一下我學到的RestFul Web Api的基本技巧與知識
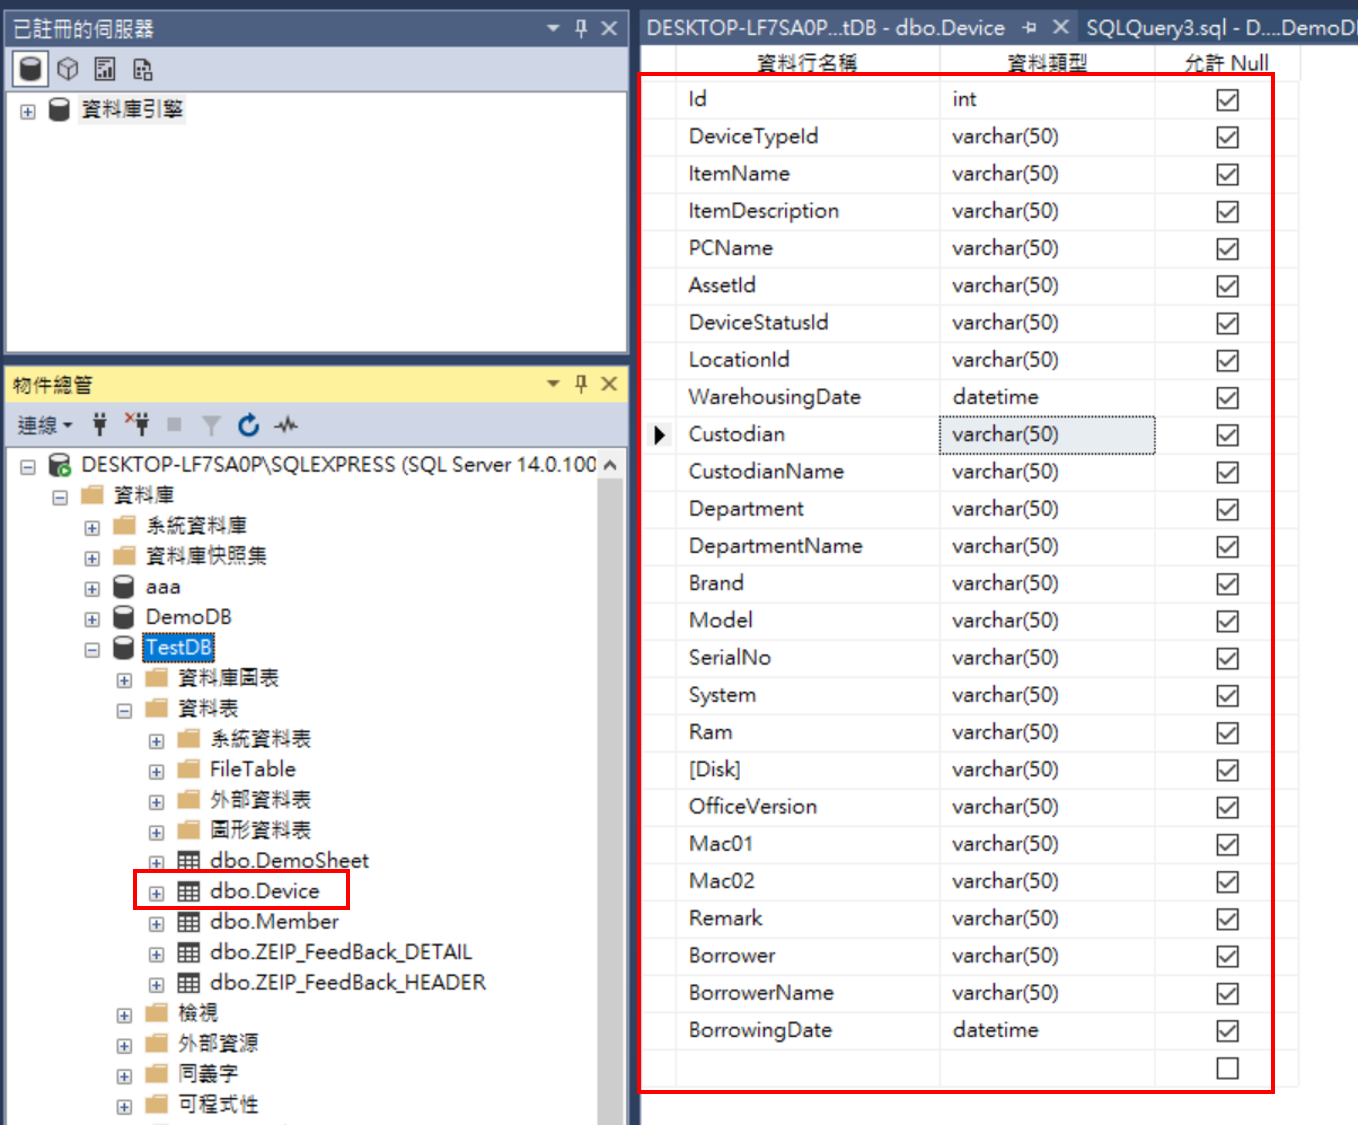
情境說明
假設有個儲存設備資訊的資料表, 如圖所示
備註:後面會用到DTO,所以這邊資料表若欄位不多,將無法彰顯DTO的意義
API基本觀念
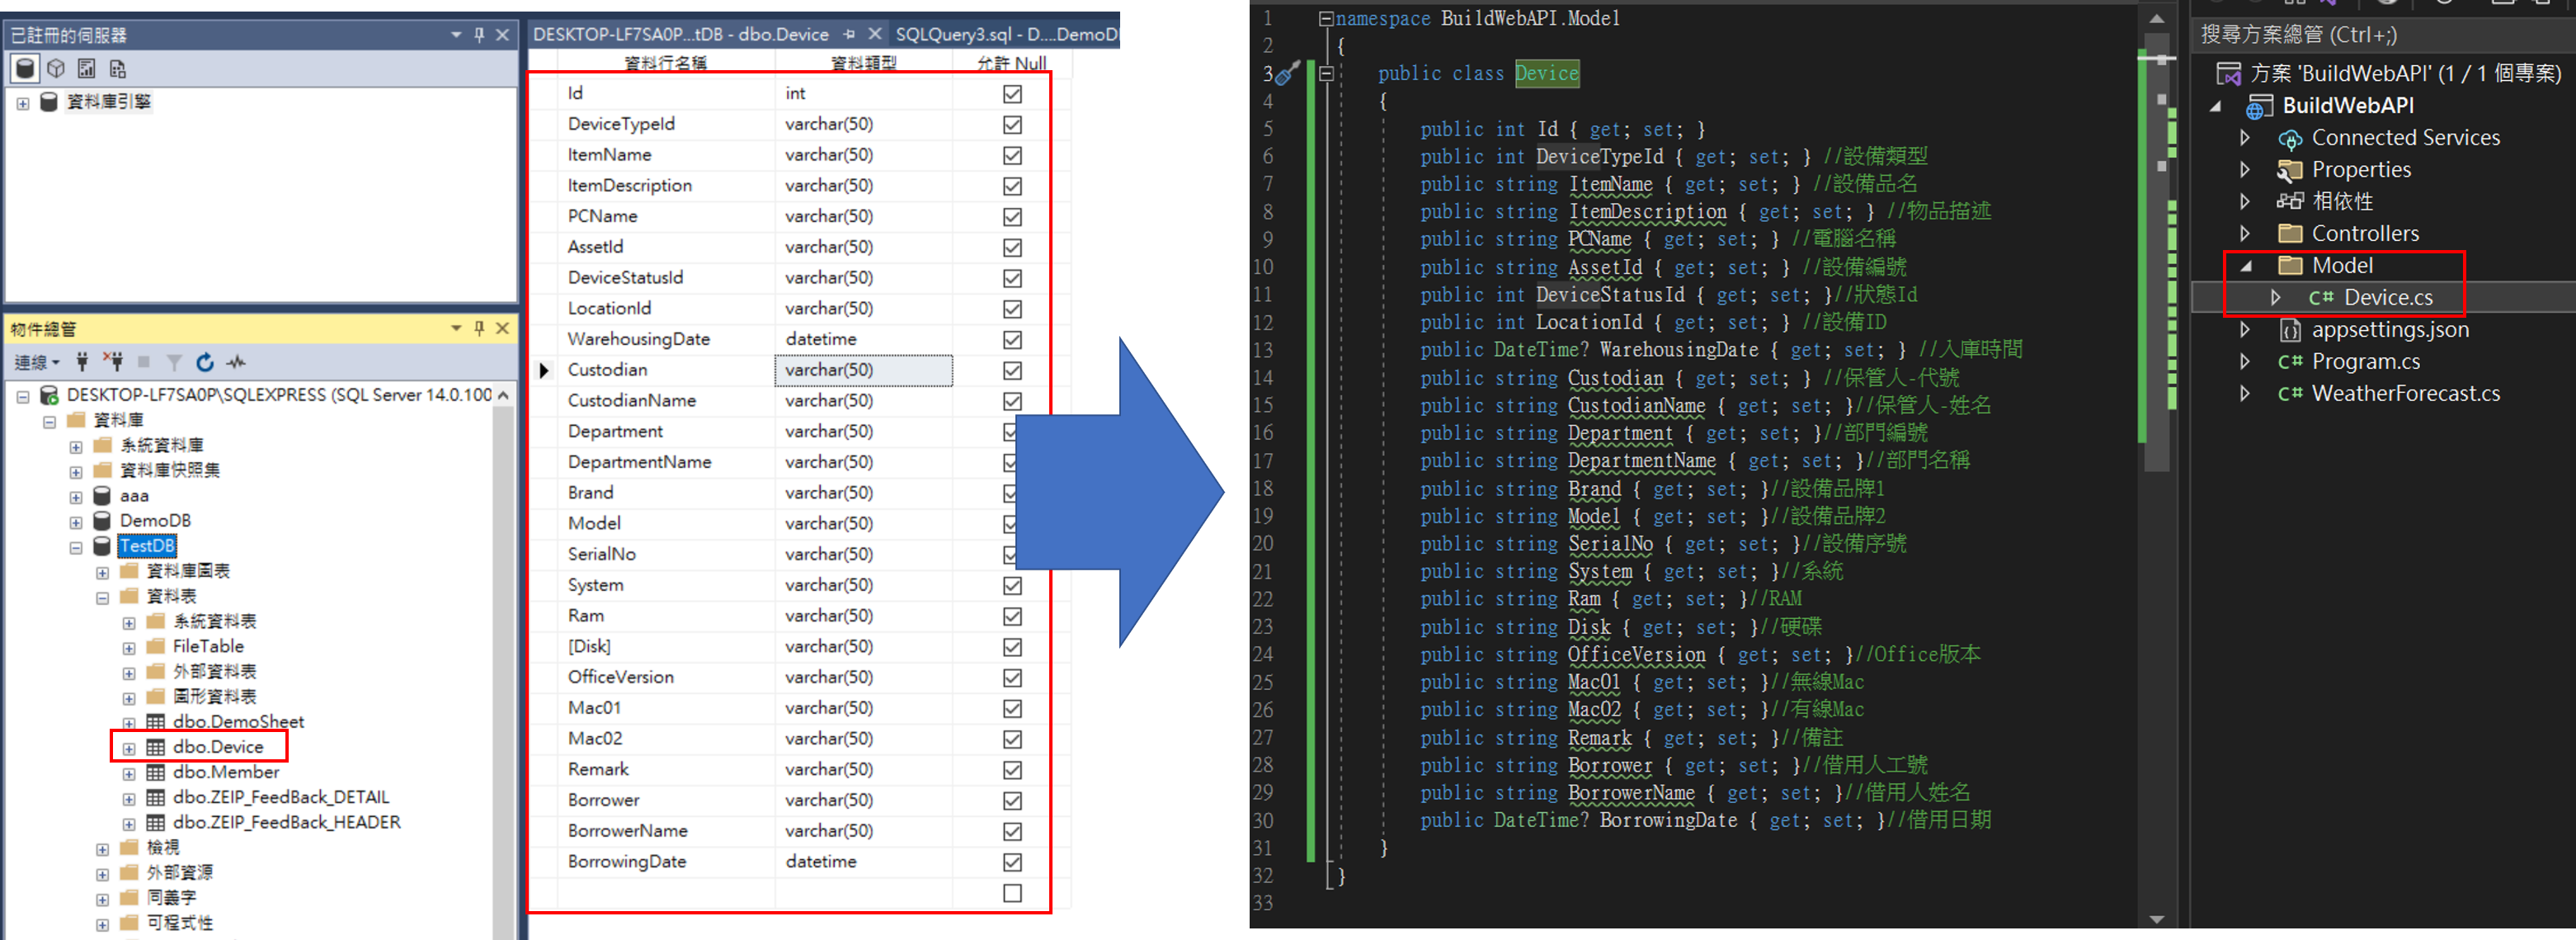
新增Model資料夾,在裡面新增Device.cs
1
2
3
4
5
6
7
8
9
10
11
12
13
14
15
16
17
18
19
20
21
22
23
24
25
26
27
28
29
public class Device
{
    public int Id { get; set; }
    public int DeviceTypeId { get; set; } //設備類型
    public string ItemName { get; set; } //設備品名
    public string ItemDescription { get; set; } //物品描述
    public string PCName { get; set; } //電腦名稱
    public string AssetId { get; set; } //設備編號
    public int DeviceStatusId { get; set; }//狀態Id
    public int LocationId { get; set; } //設備ID
    public DateTime? WarehousingDate { get; set; } //入庫時間
    public string Custodian { get; set; } //保管人-代號
    public string CustodianName { get; set; }//保管人-姓名
    public string Department { get; set; }//部門編號
    public string DepartmentName { get; set; }//部門名稱
    public string Brand { get; set; }//設備品牌1
    public string Model { get; set; }//設備品牌2
    public string SerialNo { get; set; }//設備序號
    public string System { get; set; }//系統
    public string Ram { get; set; }//RAM
    public string Disk { get; set; }//硬碟
    public string OfficeVersion { get; set; }//Office版本
    public string Mac01 { get; set; }//無線Mac
    public string Mac02 { get; set; }//有線Mac
    public string Remark { get; set; }//備註
    public string Borrower { get; set; }//借用人工號
    public string BorrowerName { get; set; }//借用人姓名
    public DateTime? BorrowingDate { get; set; }//借用日期
}
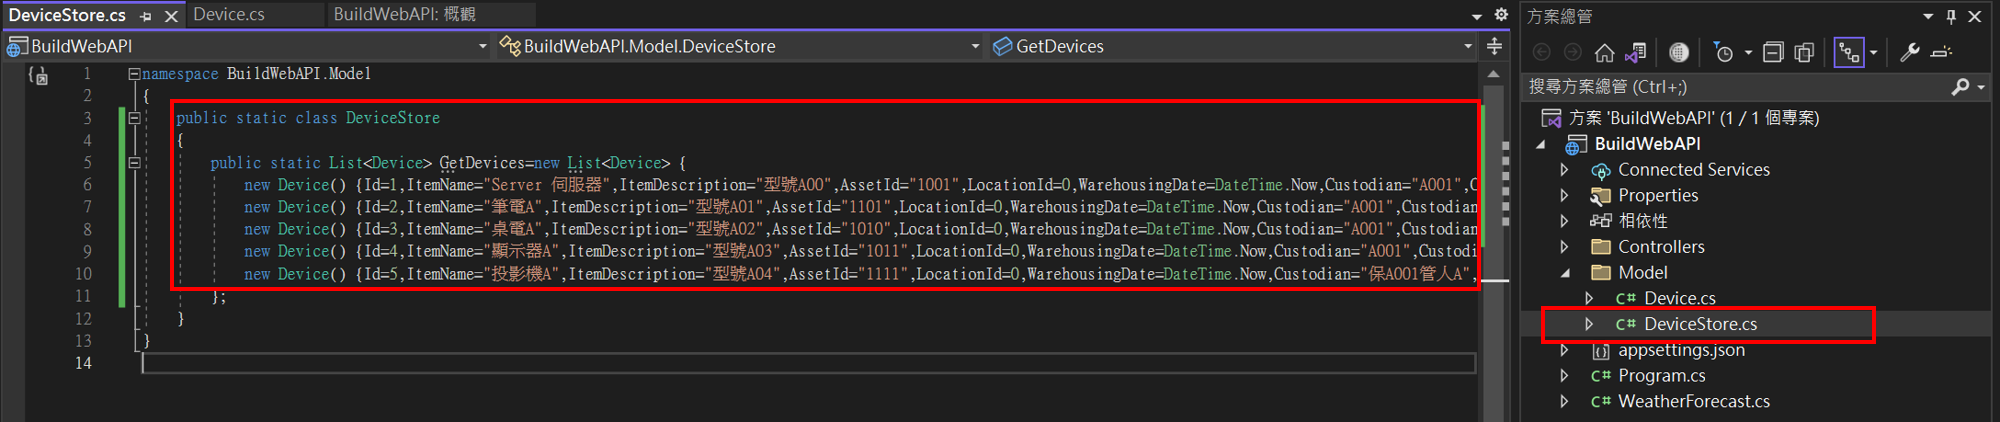
建立靜態資料
建立靜態List,先用靜態資料用來代替資料庫撈取
因為我想要東西放在Git載下來的時候,不會需要再重新設定資料庫
1
2
3
4
5
6
7
8
9
10
public static class DeviceStore
{
    public static List<Device> GetDevices=new List<Device> {
        new Device() {Id=1,ItemName="Server 伺服器",ItemDescription="型號A00",AssetId="1001",LocationId=0,WarehousingDate=DateTime.Now,Custodian="A001",CustodianName="保管人A",Brand="",Model="",SerialNo="",System="",Ram="",Disk="",OfficeVersion="",Mac01="",Mac02="",Remark="",Borrower="",BorrowerName="",Department="",DepartmentName="",PCName="" },
        new Device() {Id=2,ItemName="筆電A",ItemDescription="型號A01",AssetId="1101",LocationId=0,WarehousingDate=DateTime.Now,Custodian="A001",CustodianName="保管人A",Brand="",Model="",SerialNo="",System="",Ram="",Disk="",OfficeVersion="",Mac01="",Mac02="",Remark="",Borrower="",BorrowerName="",Department="",DepartmentName="",PCName="" },
        new Device() {Id=3,ItemName="桌電A",ItemDescription="型號A02",AssetId="1010",LocationId=0,WarehousingDate=DateTime.Now,Custodian="A001",CustodianName="保管人A",Brand="",Model="",SerialNo="",System="",Ram="",Disk="",OfficeVersion="",Mac01="",Mac02="",Remark="",Borrower="",BorrowerName="",Department="",DepartmentName="",PCName="" },
        new Device() {Id=4,ItemName="顯示器A",ItemDescription="型號A03",AssetId="1011",LocationId=0,WarehousingDate=DateTime.Now,Custodian="A001",CustodianName="保管人A",Brand="",Model="",SerialNo="",System="",Ram="",Disk="",OfficeVersion="",Mac01="",Mac02="",Remark="",Borrower="",BorrowerName="",Department="",DepartmentName="",PCName="" },
        new Device() {Id=5,ItemName="投影機A",ItemDescription="型號A04",AssetId="1111",LocationId=0,WarehousingDate=DateTime.Now,Custodian="保A001管人A",CustodianName="保管人A",Brand="",Model="",SerialNo="",System="",Ram="",Disk="",OfficeVersion="",Mac01="",Mac02="",Remark="",Borrower="",BorrowerName="",Department="",DepartmentName="",PCName="" }
    };
}
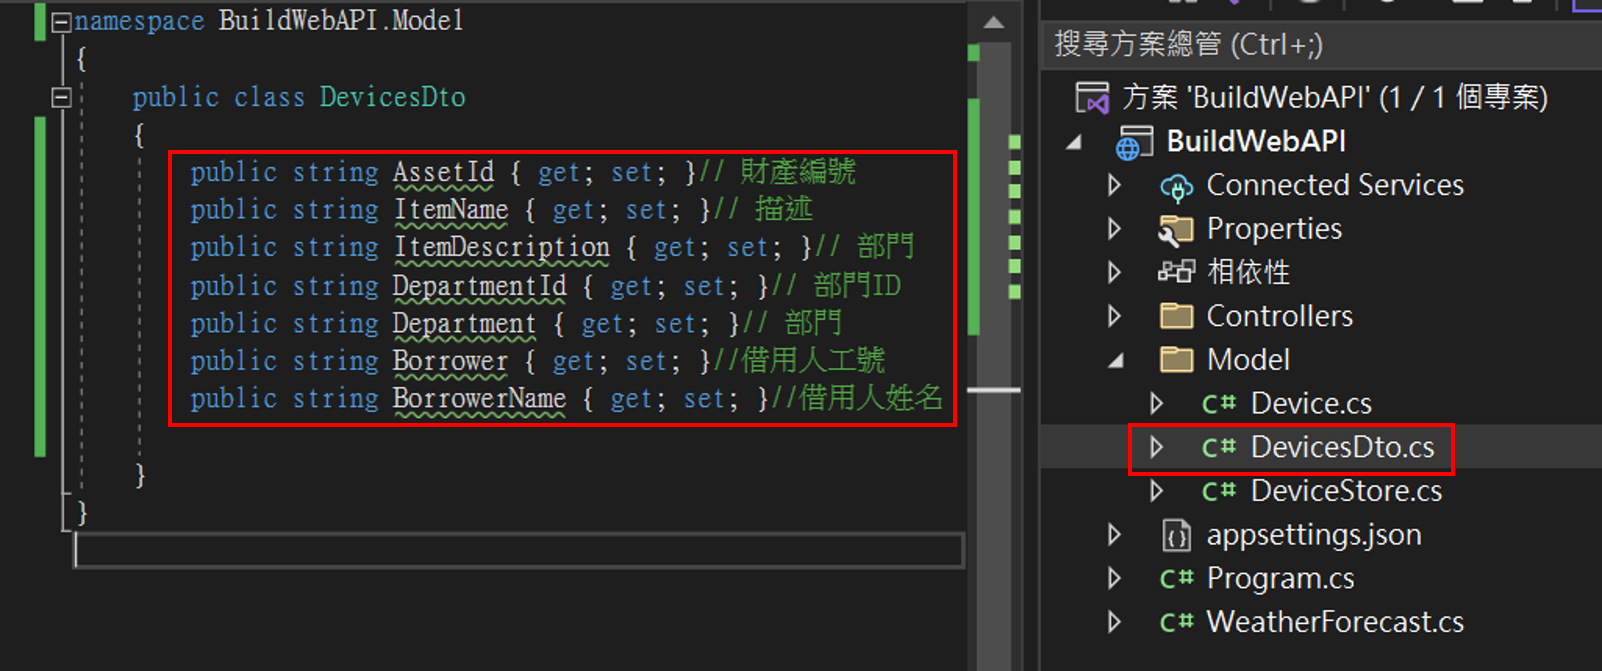
建立DTO
新增DeviceDto.cs,在DeviceDto中,建立實際上要開放給外部進行CRUD的欄位,且屬性名稱與Device要一樣
1
2
3
4
5
6
7
8
9
10
11
public class DevicesDto
{
    public string AssetId { get; set; }// 財產編號
    public string ItemName { get; set; }// 描述
    public string ItemDescription { get; set; }// 部門
    public string DepartmentId { get; set; }// 部門ID
    public string Department { get; set; }// 部門
    public string Borrower { get; set; }//借用人工號
    public string BorrowerName { get; set; }//借用人姓名

}
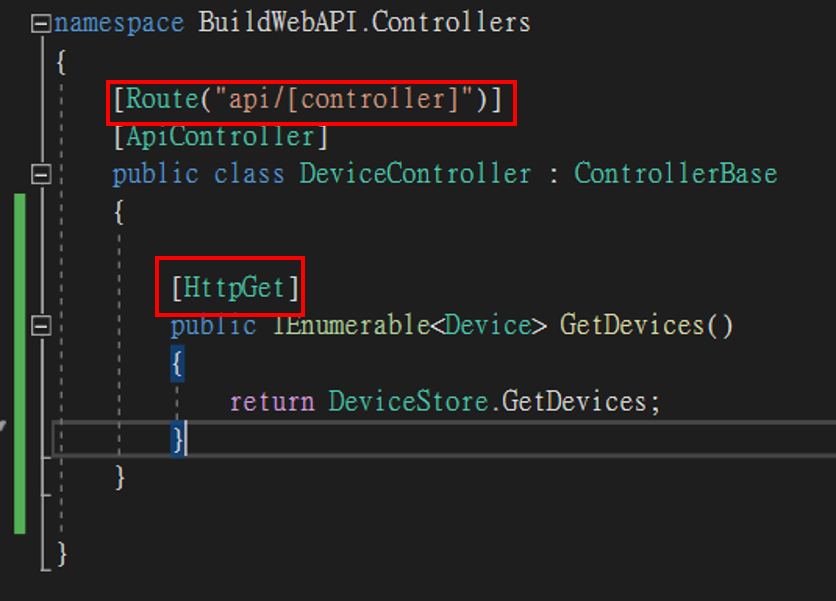
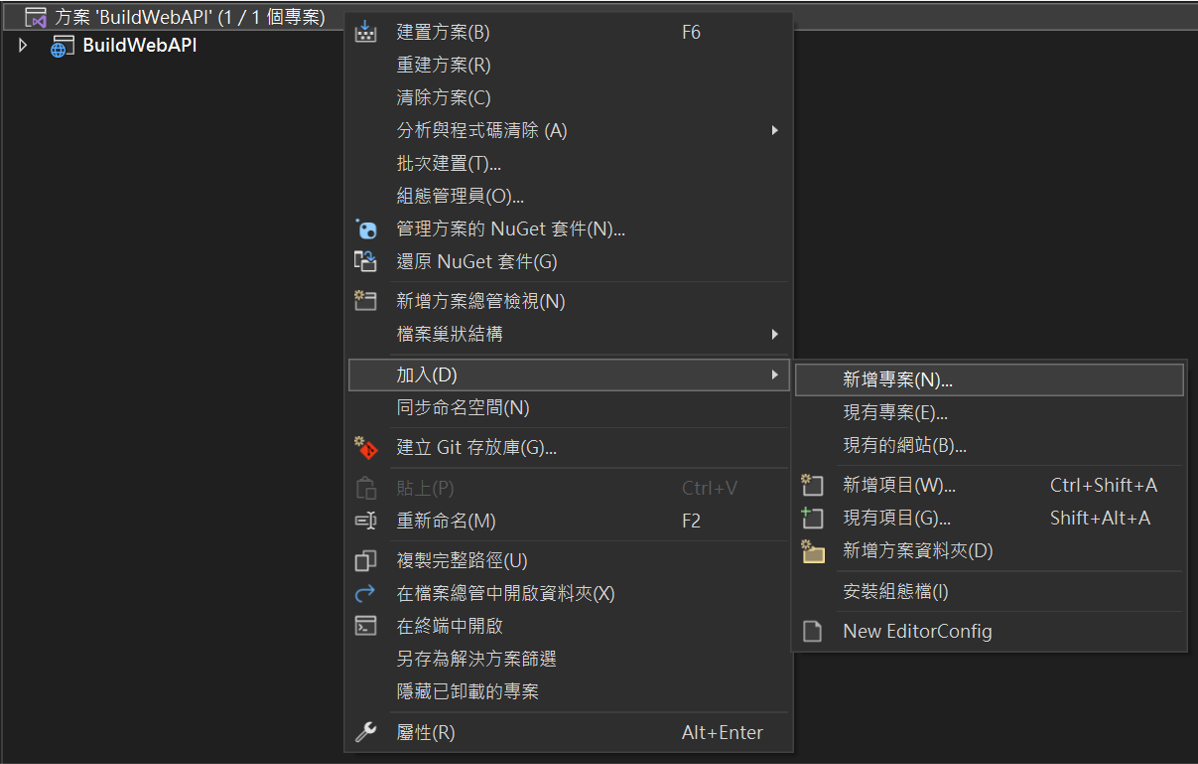
新增API Controller
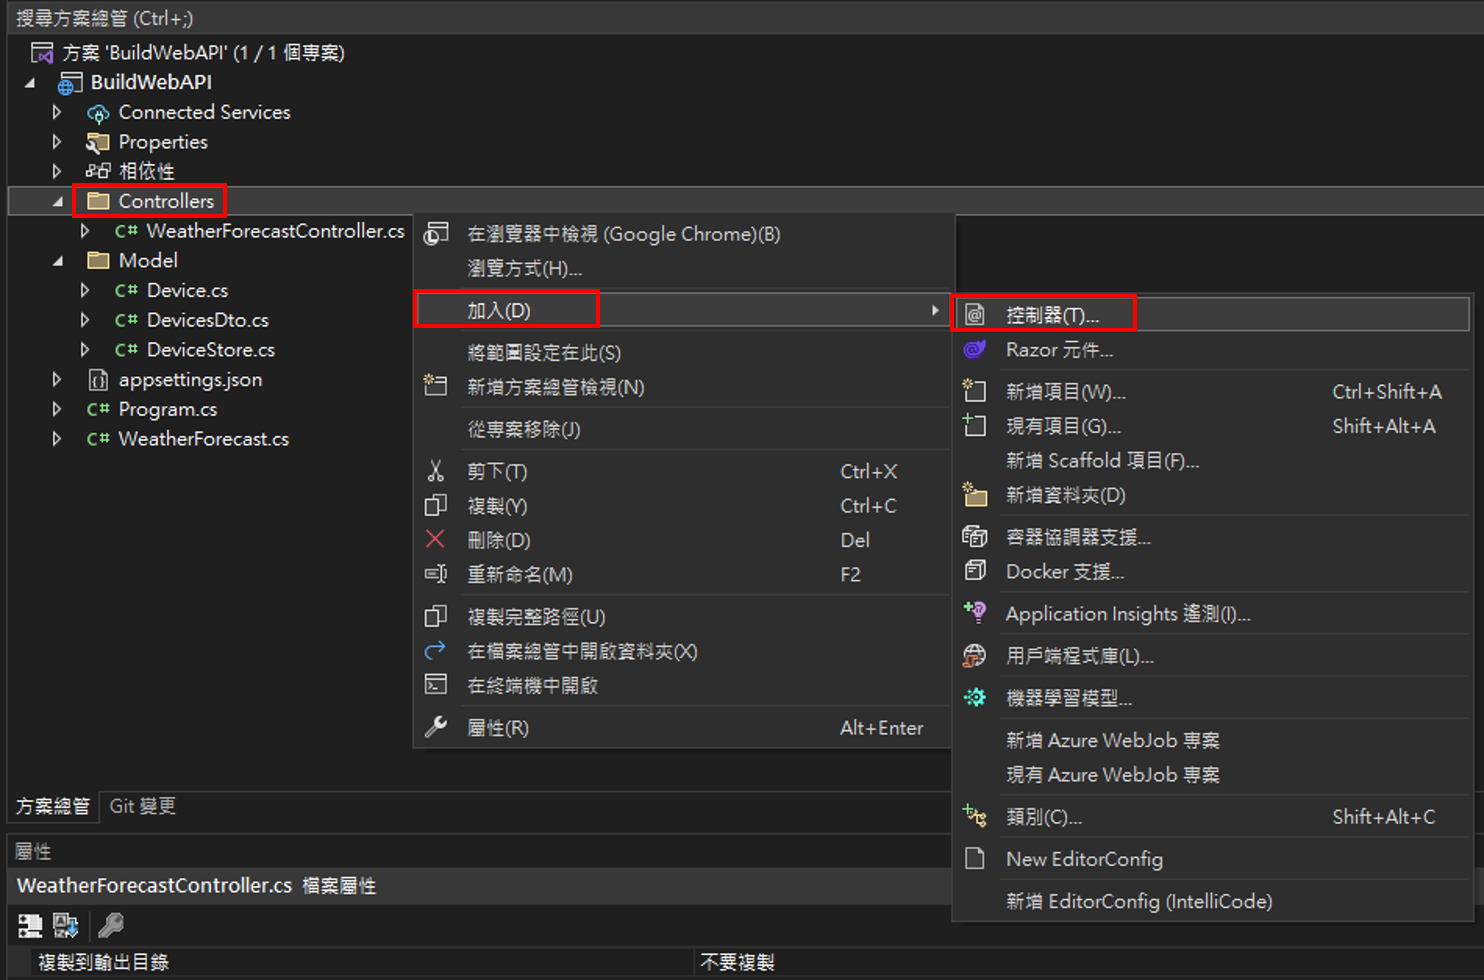
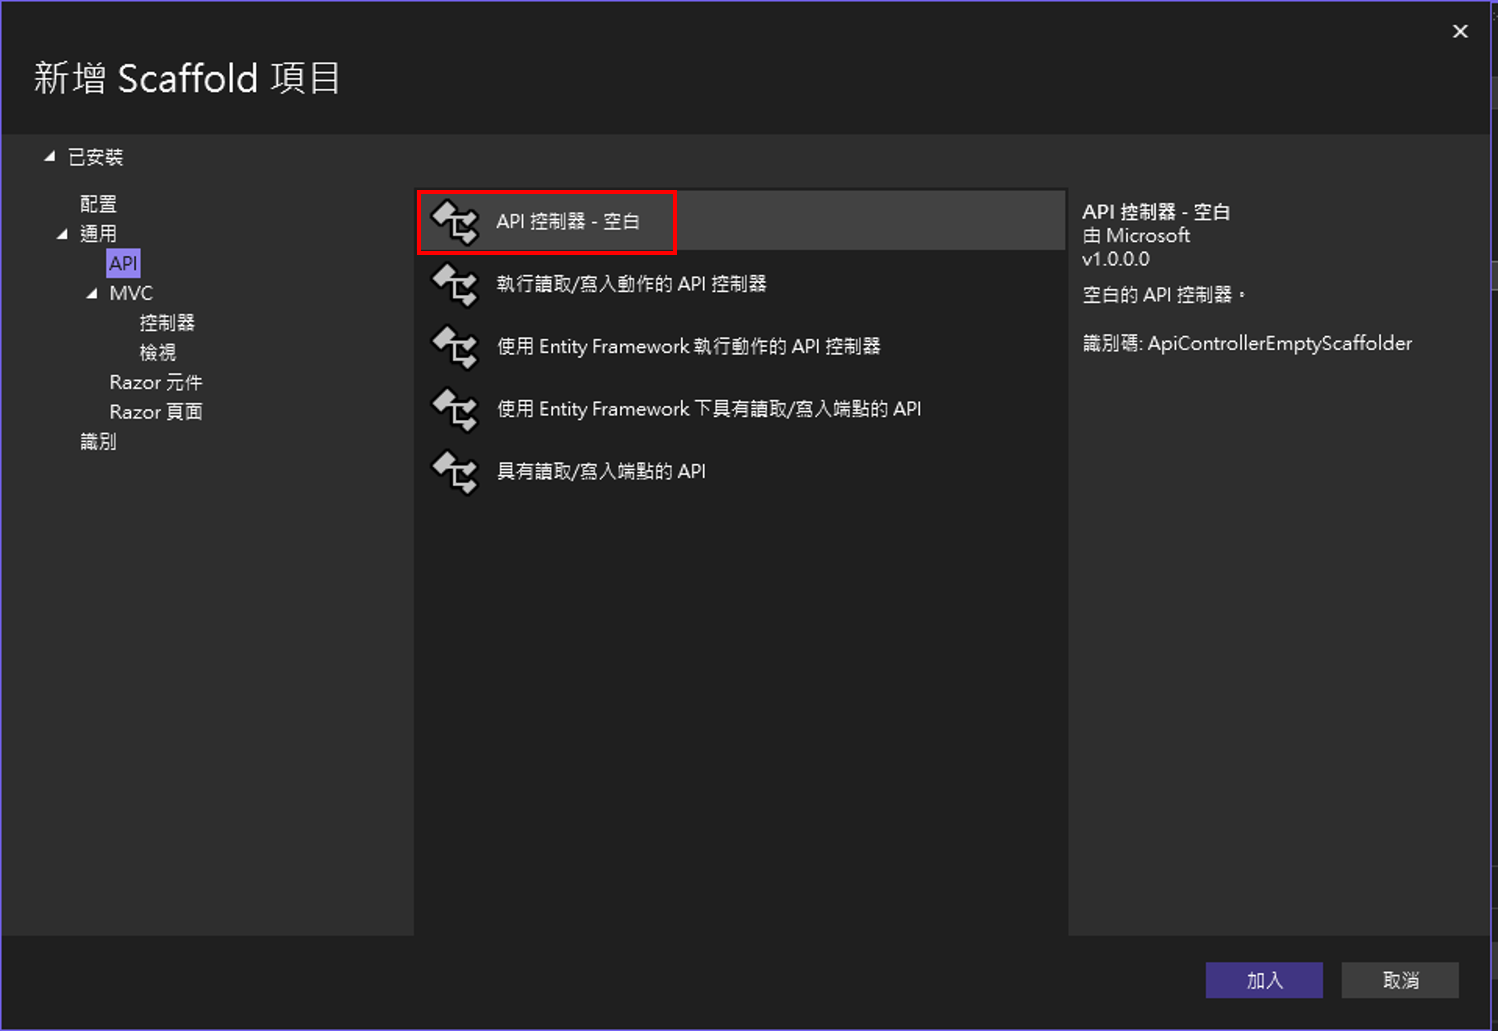
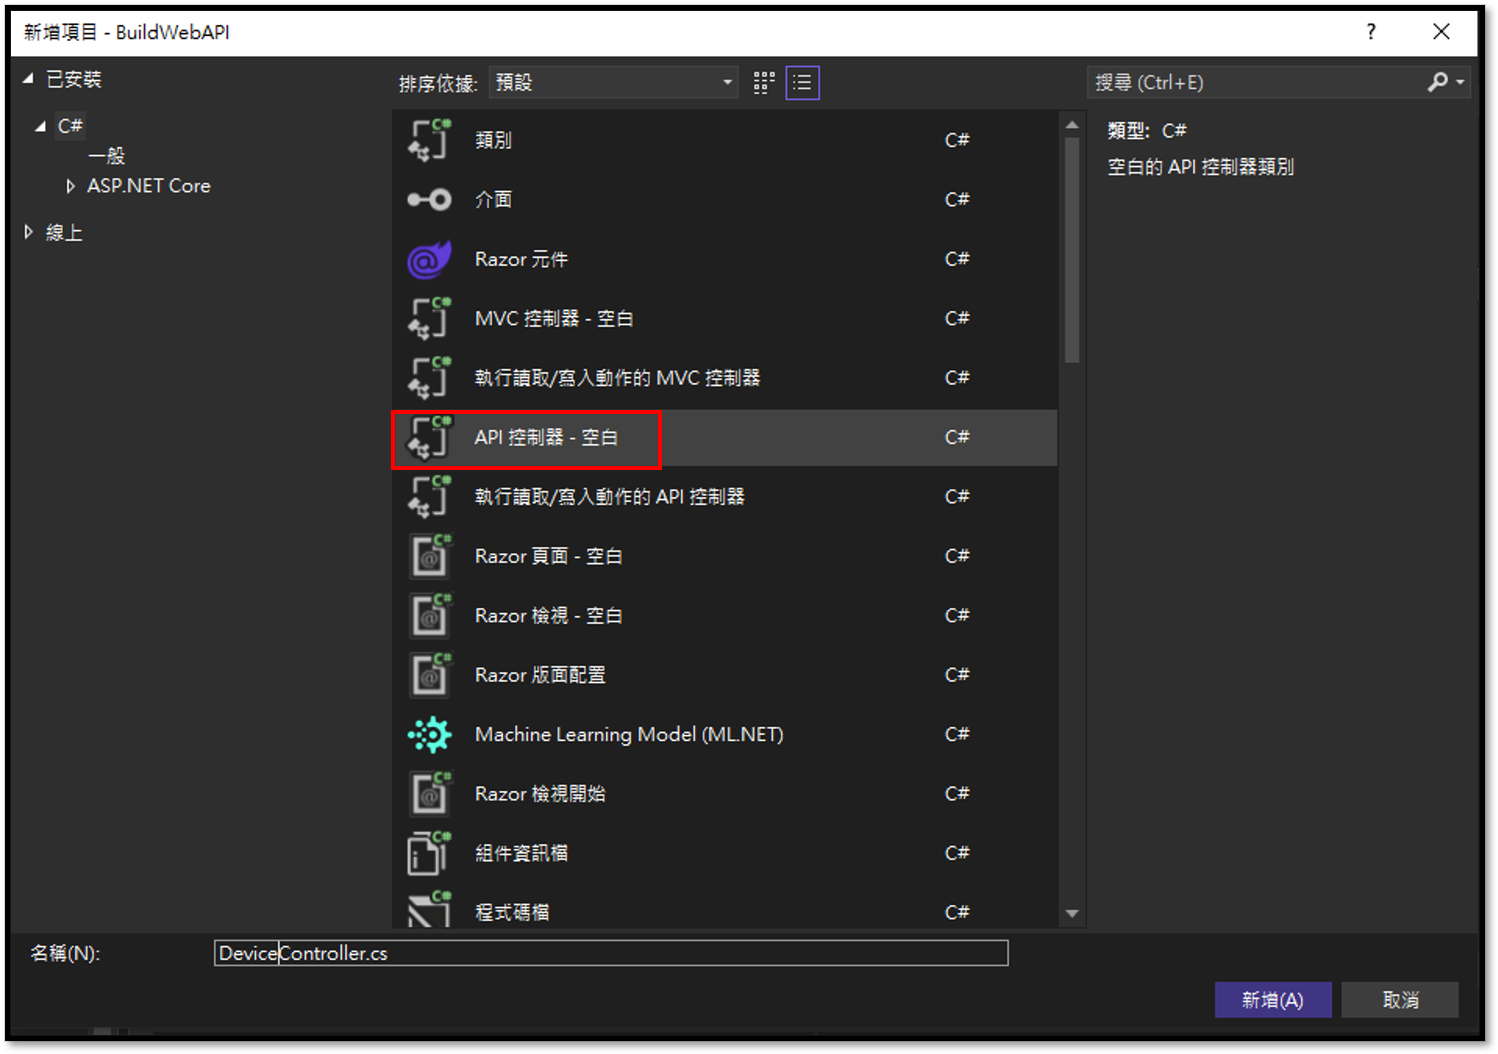
定義Route和Http Type
Controller上方要定義Route
Method上方要定義Http的類型
改用DTO儲存資料
DTO是篩選後,最終可以呈現給使用者看得欄位

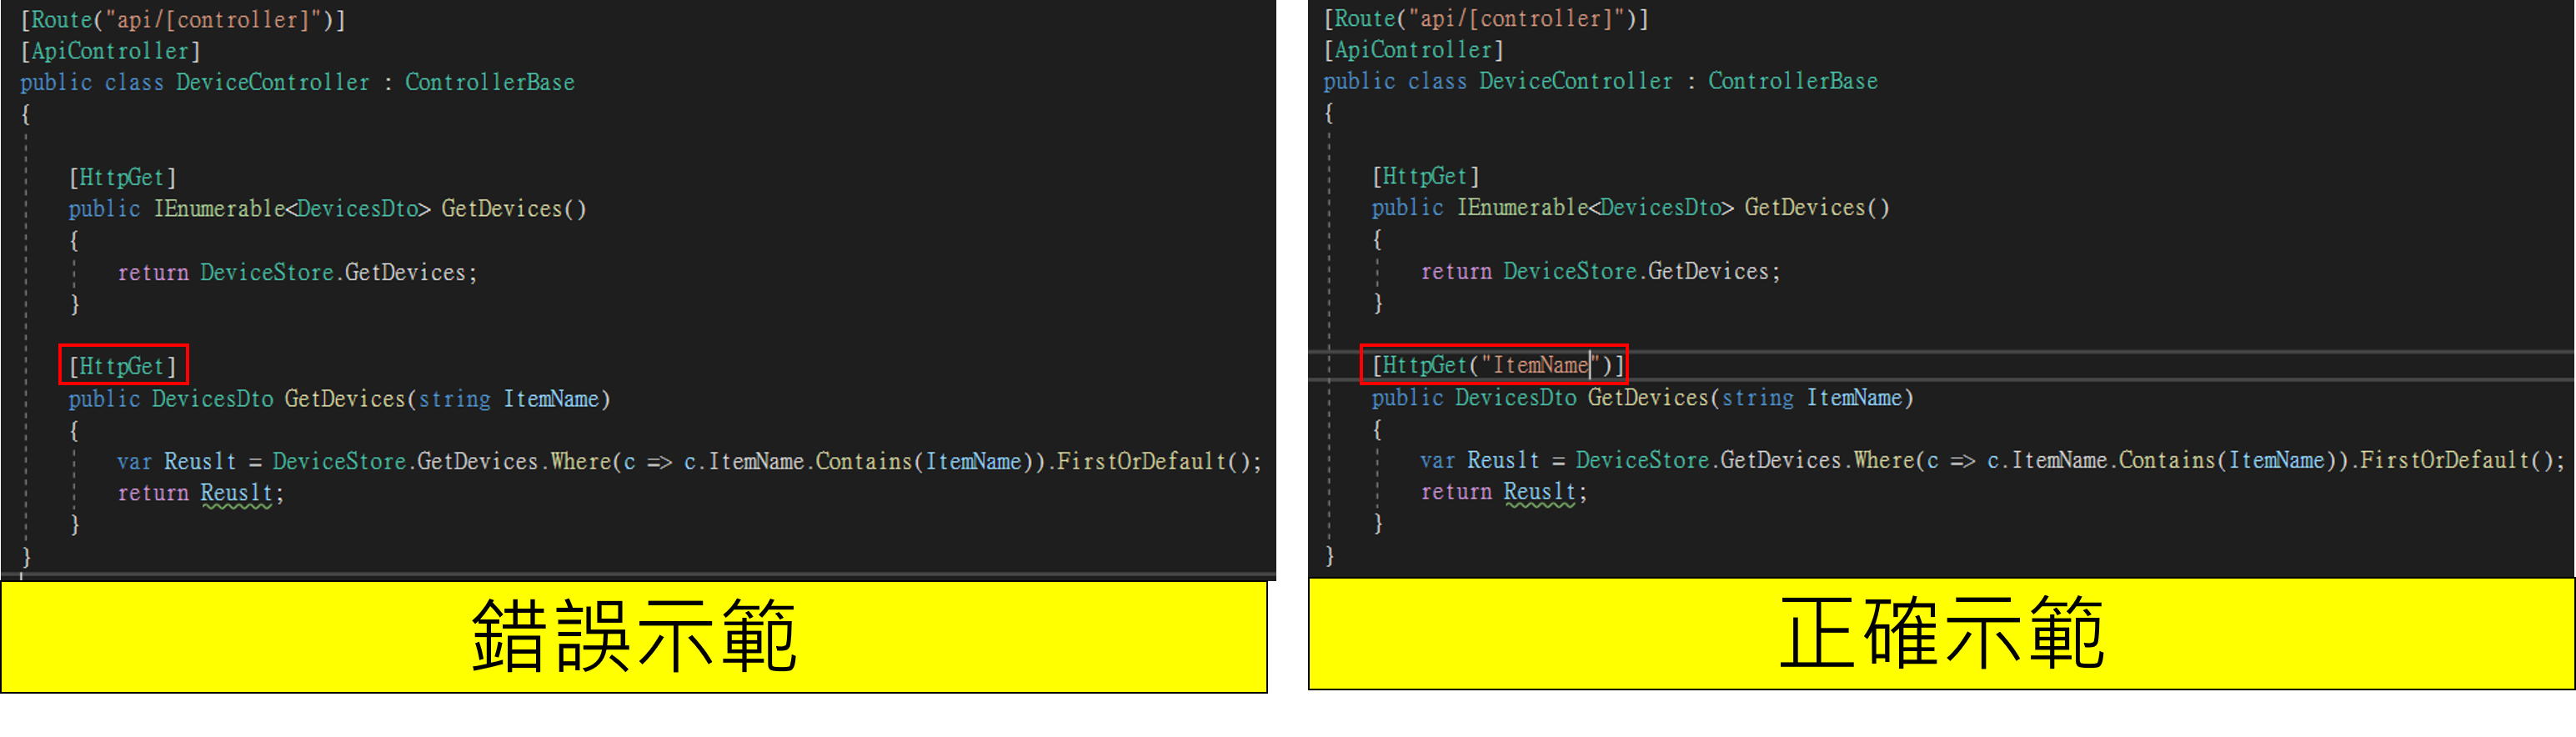
Method have Parameter
假設有兩個一樣的Method名稱,但一個回傳陣列,一個回傳陣列內容
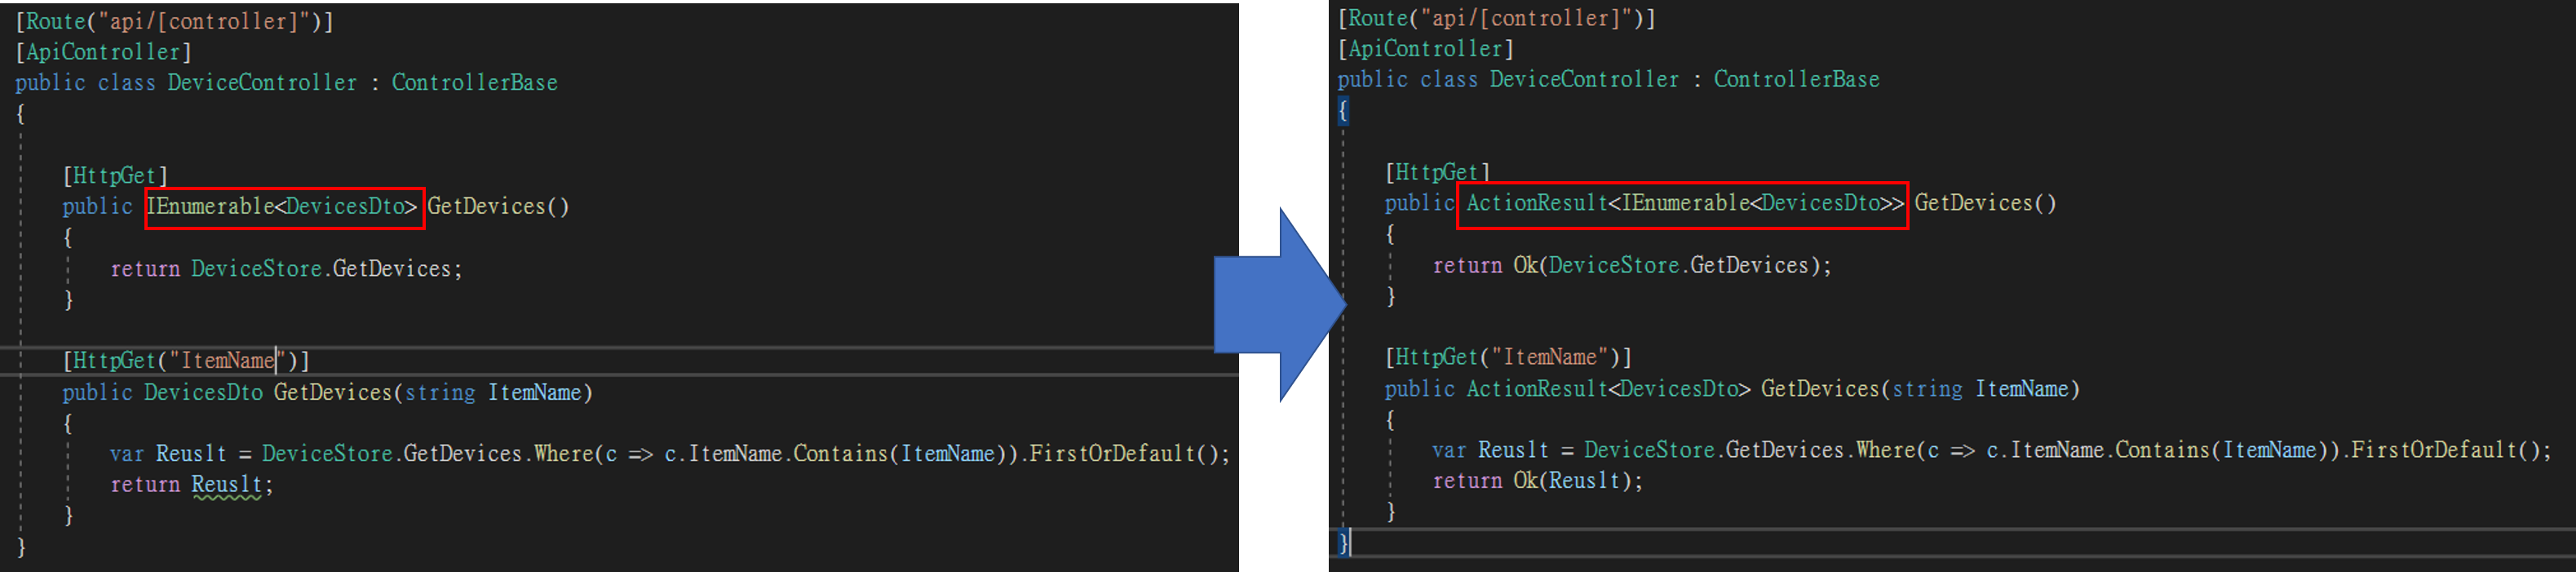
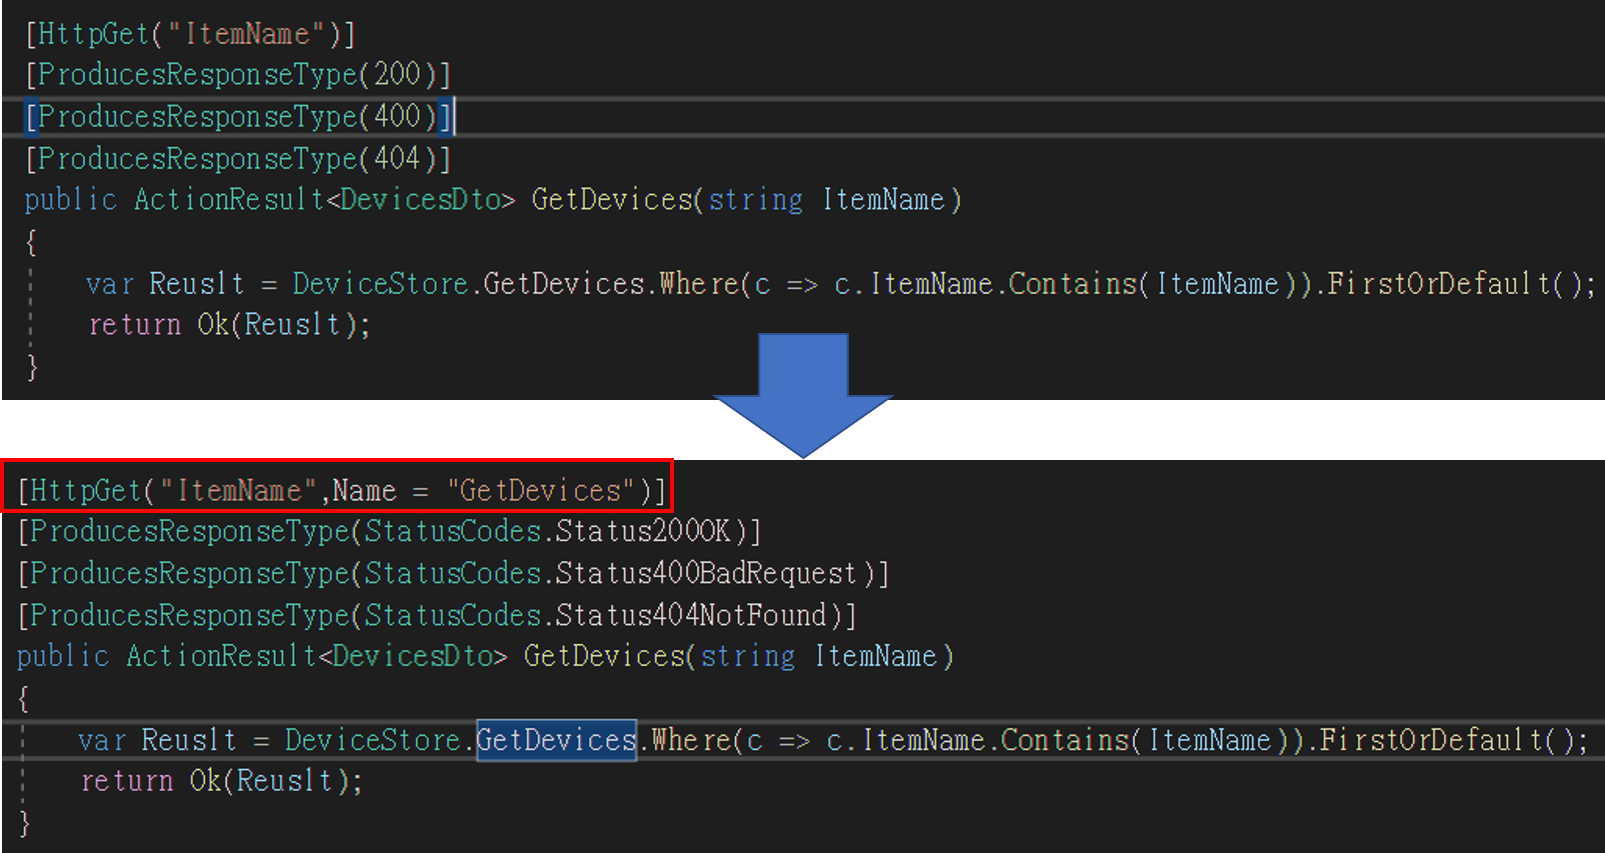
定義回傳狀態
使用ActionResult將類型包起來
有無使用ActionResult及ProducesResponseType的執行差別
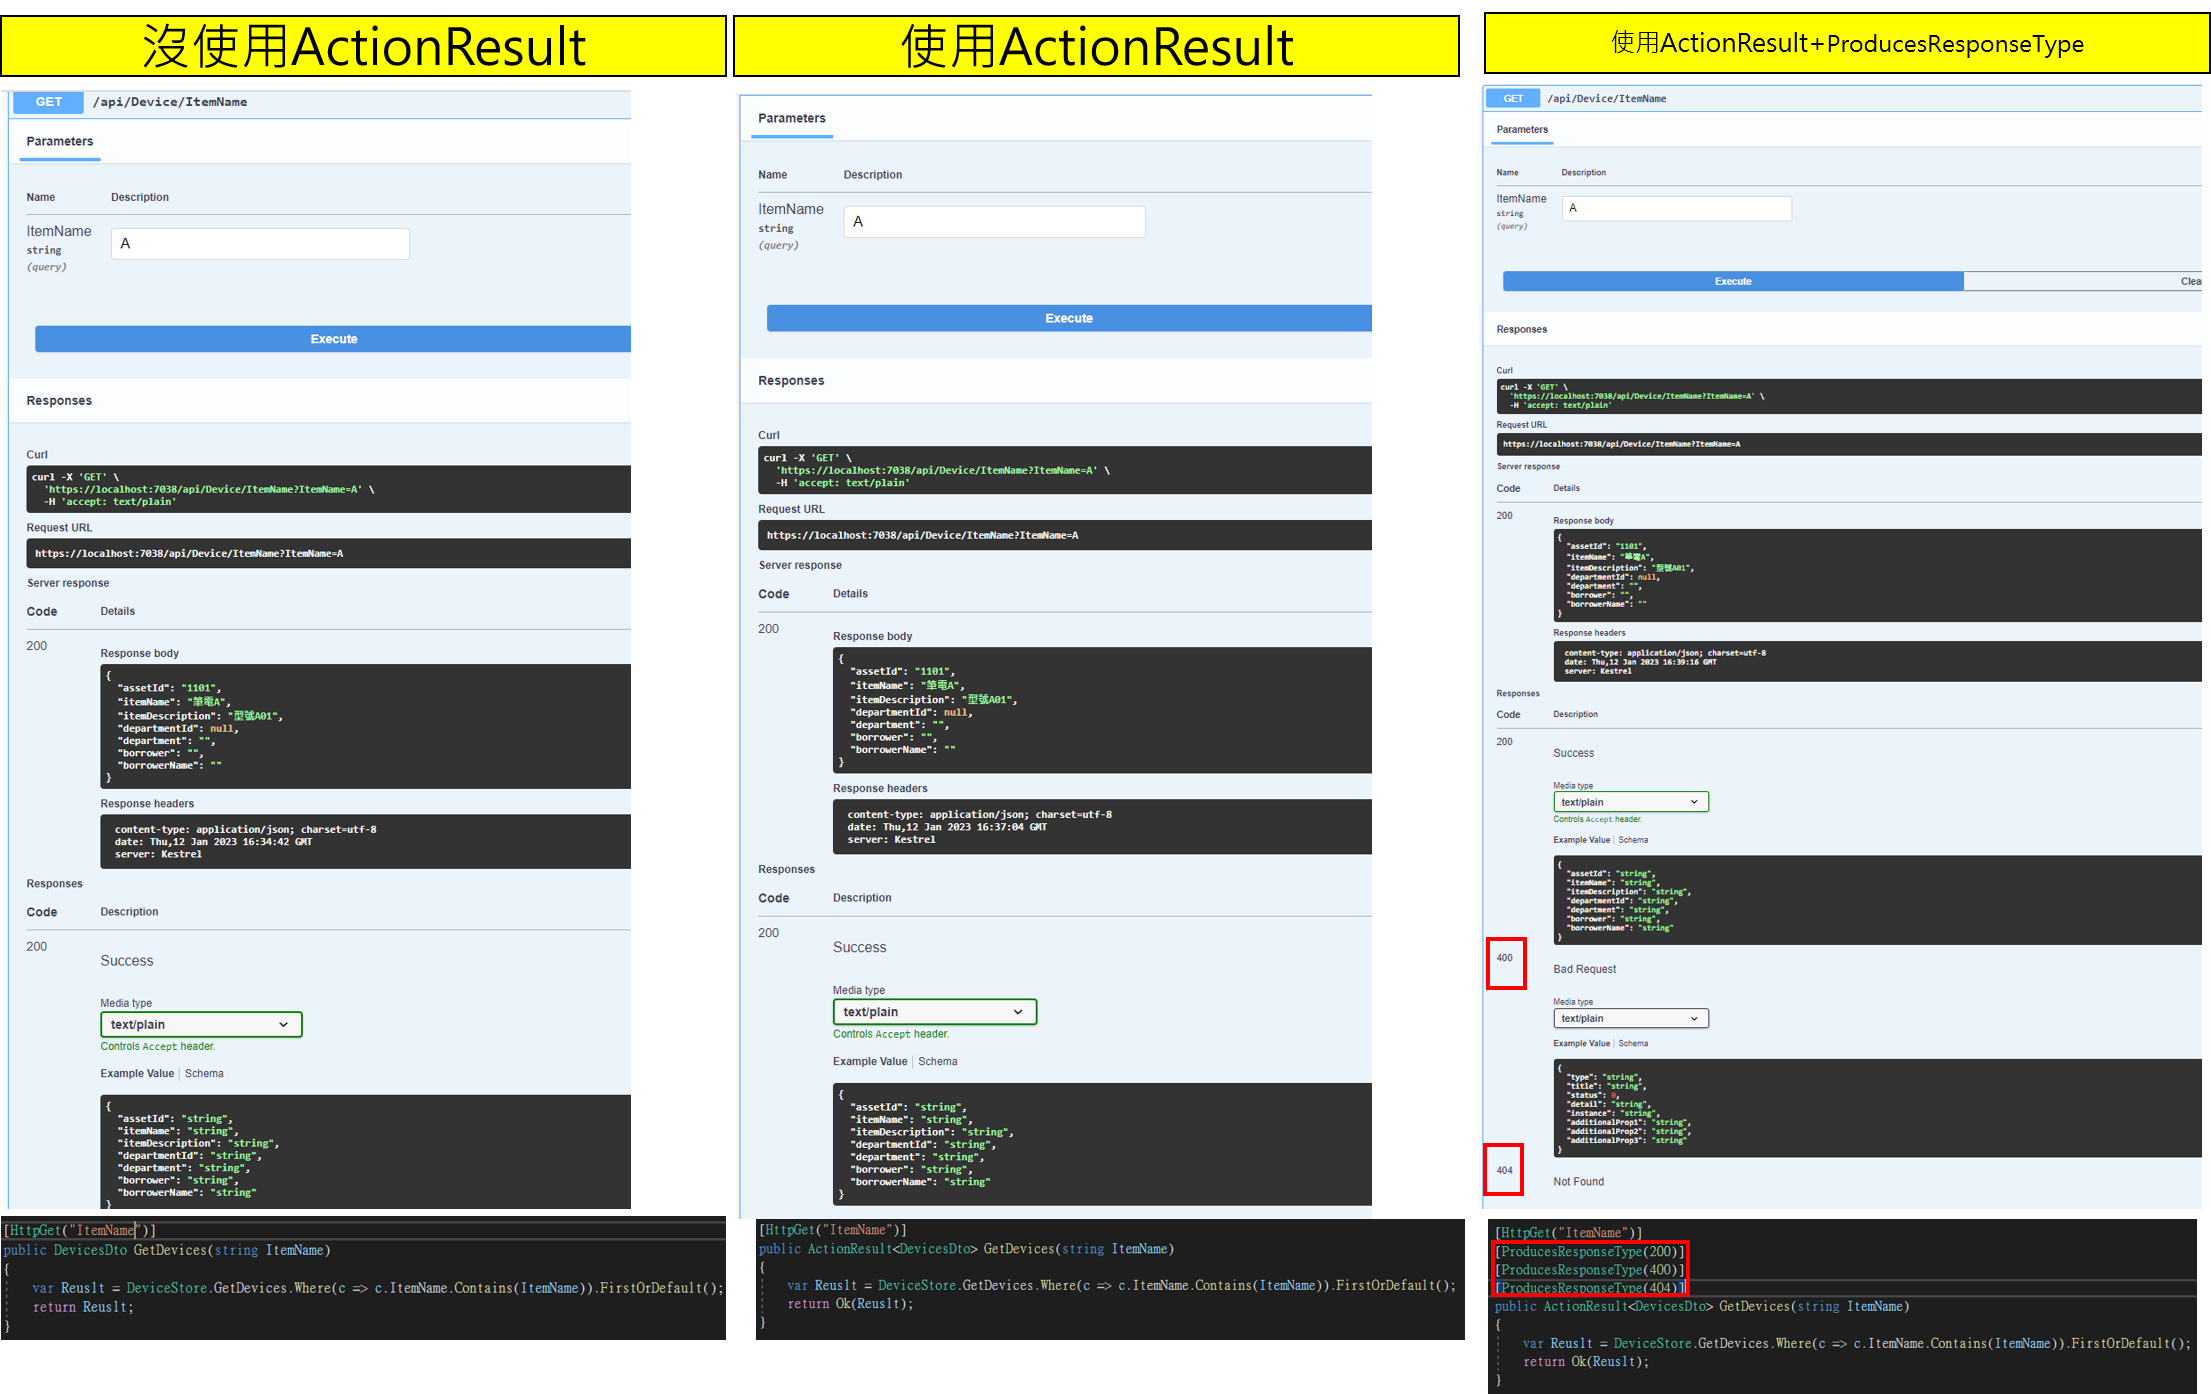
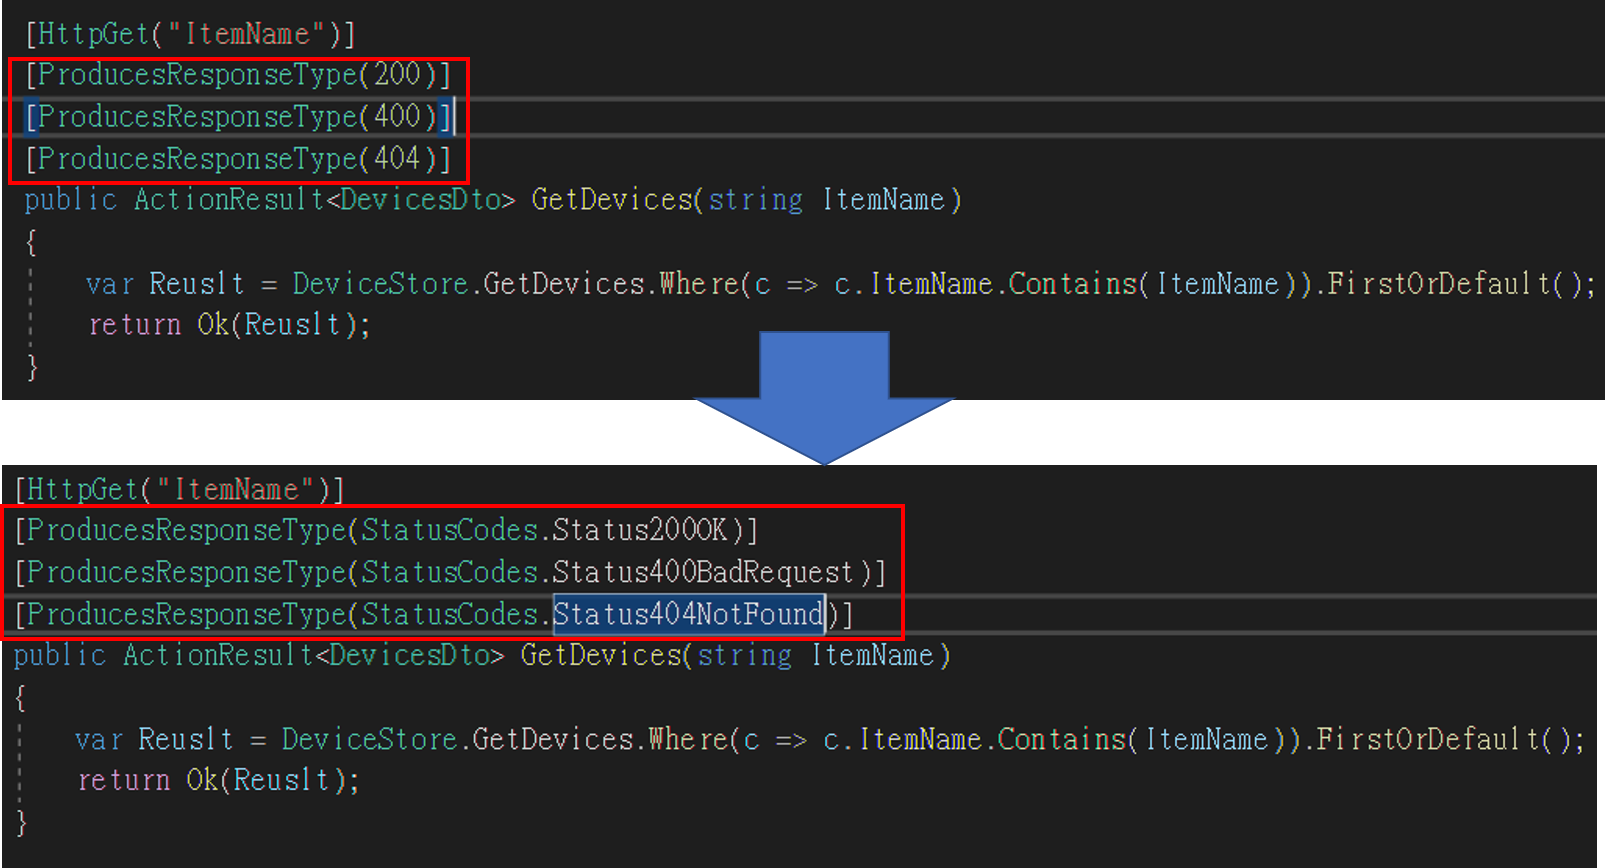
重新定義ProducesResponseType
1
2
3
[ProducesResponseType(StatusCodes.Status200OK)]
[ProducesResponseType(StatusCodes.Status400BadRequest)]
[ProducesResponseType(StatusCodes.Status404NotFound)]
HttpPost
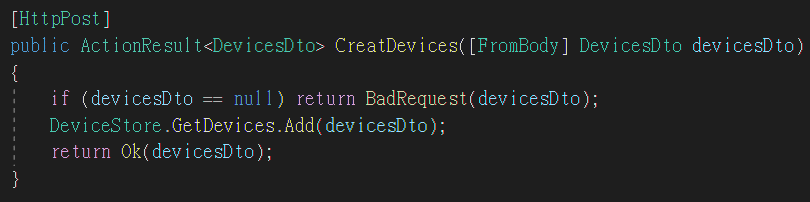
CreatedAtRoute
若要使用CreatedAtRoute以便在HttpPost完成之後,導向到HttpGet的function
首先HttpGet的function要設定指向到其路徑的參數
首先HttpPost改成回傳CreatedAtRoute,並設定只向的HttpGet路徑
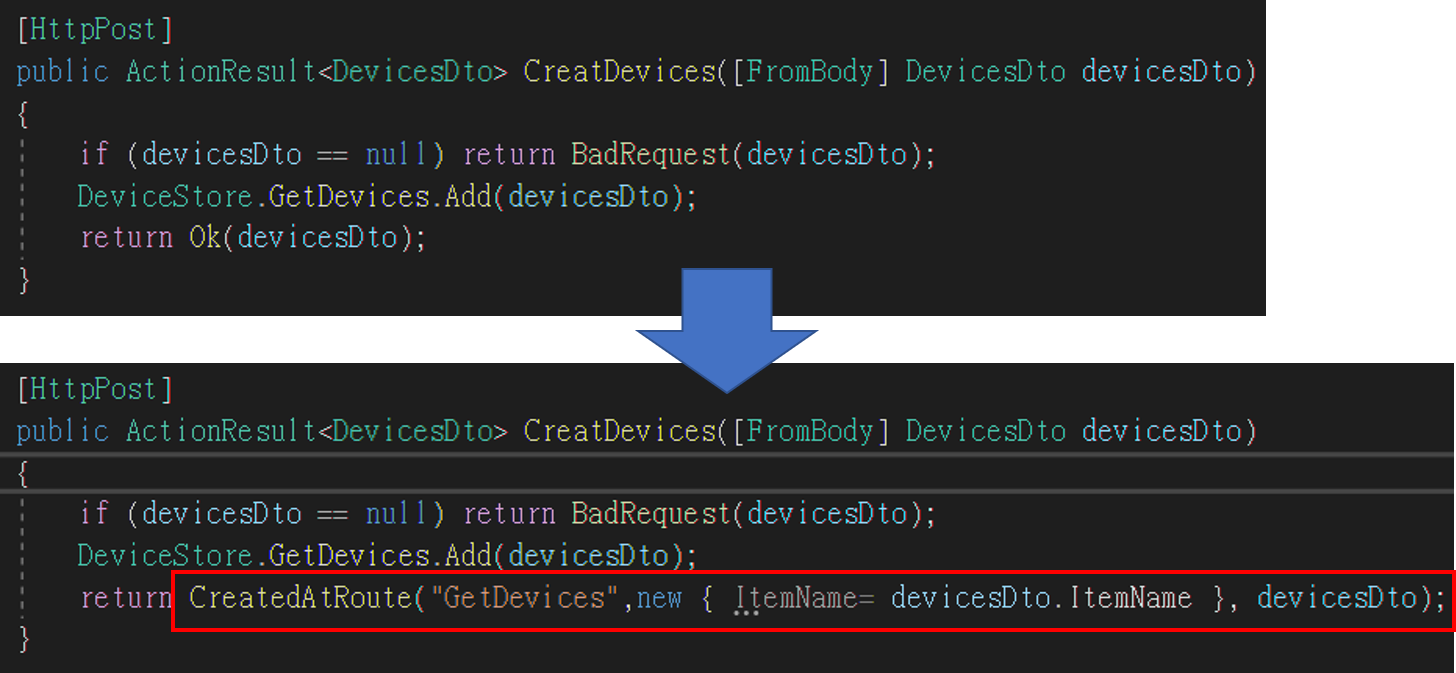
備註CreatedAtRoute成功會回傳Code201,添加ProducesResponseType

Post驗證資料的方式
首先在Model上面進行描述,例如限制一定要輸入就用Request,限制資料長度就用MaxLength
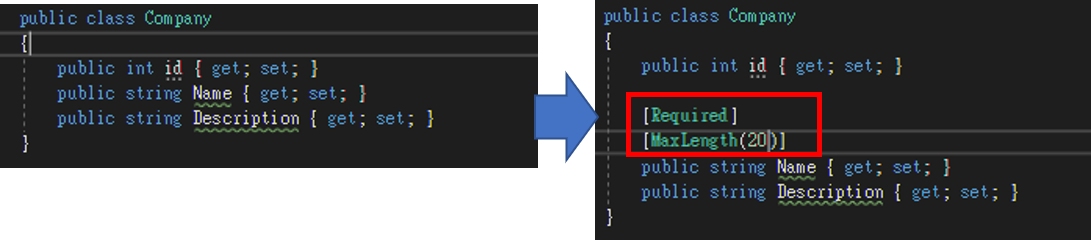
然後再Controller 使用ModelState.IsValid進行驗證
備註Controller有加上ApiController的描述會自動進行驗證,否則得用ModelState.IsValid觸發驗證
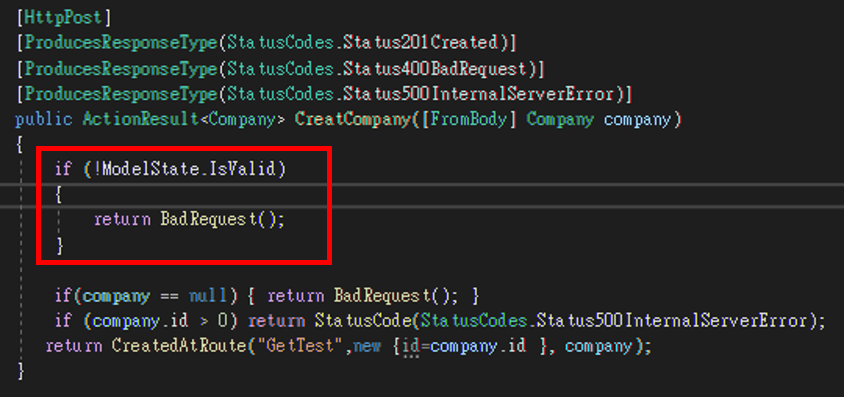
1
if (!ModelState.IsValid) { }
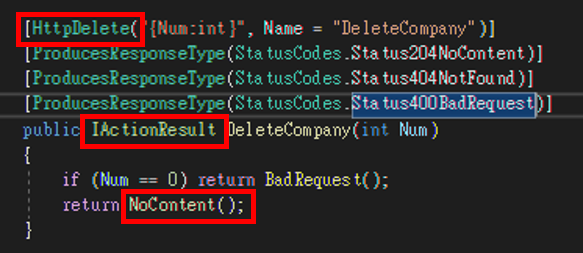
HttpDelete
備註1:刪除資料的時候可以用HttpDelete
備註2:因為刪除資料後不想返回任何資訊,可以用IActionResult與NoContent
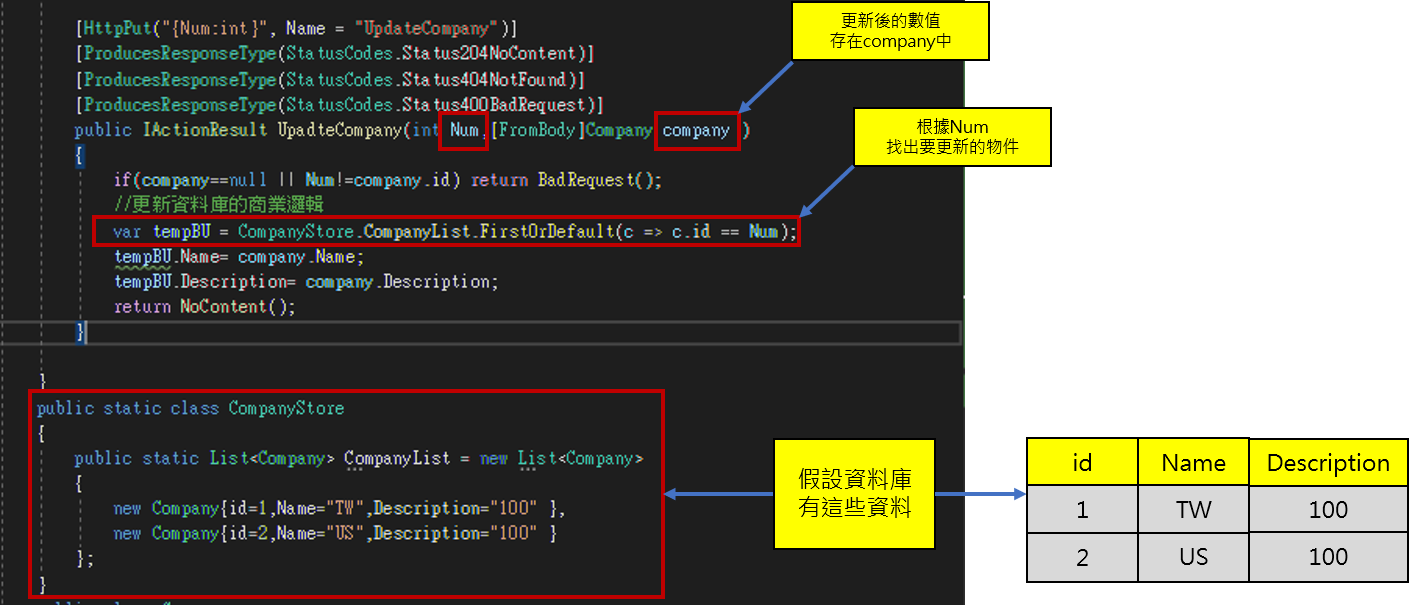
更新資料的 HttpPut
使用httpPut可以紀錄完整的更新資訊
1
2
3
4
5
6
7
8
9
10
11
12
13
[HttpPut("{Num:int}", Name = "UpdateCompany")]
[ProducesResponseType(StatusCodes.Status204NoContent)]
[ProducesResponseType(StatusCodes.Status404NotFound)]
[ProducesResponseType(StatusCodes.Status400BadRequest)]
public IActionResult UpadteCompany(int Num,[FromBody]Company company )
{
    if(company==null || Num!=company.id) return BadRequest();
    //更新資料庫的商業邏輯
    var tempBU = CompanyStore.CompanyList.FirstOrDefault(c => c.id == Num);
    tempBU.Name= company.Name;
    tempBU.Description= company.Description;
    return NoContent();
}
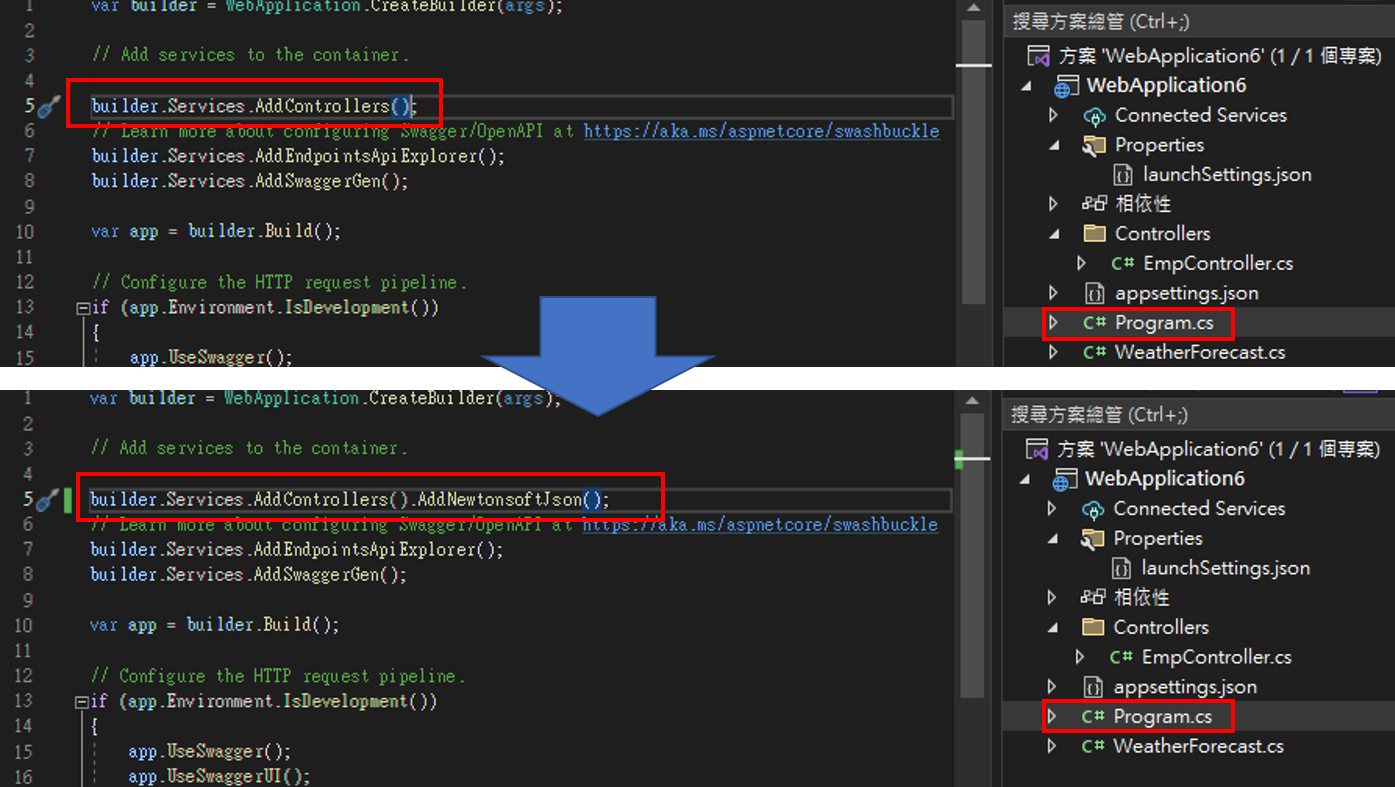
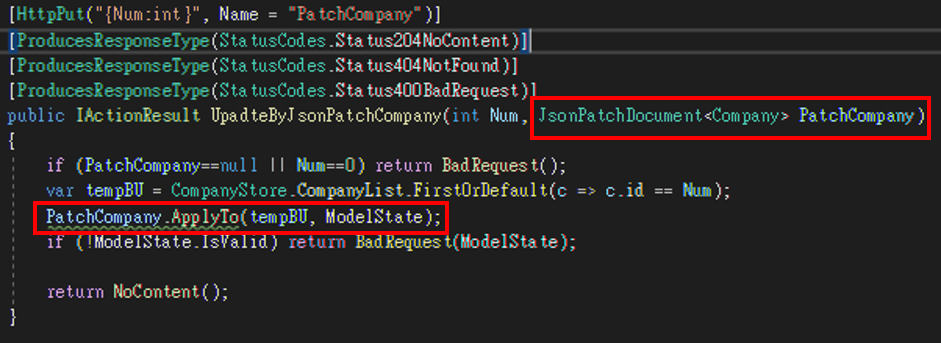
更新資料的 HttpPatch
使用httpPatch只更新完整資料表中的其中一個欄位的資料
使用JsonPath
1
NuGet\Install-Package JsonPath.Net -Version 0.3.1
以及Mvc.NewtonsoftJson
啟動時追加AddNewtonsoftJson
實際調用Patch的方式
1
2
3
4
5
6
7
8
9
10
11
12
13
[HttpPut("{Num:int}", Name = "PatchCompany")]
[ProducesResponseType(StatusCodes.Status204NoContent)]
[ProducesResponseType(StatusCodes.Status404NotFound)]
[ProducesResponseType(StatusCodes.Status400BadRequest)]
public IActionResult UpadteByJsonPatchCompany(int Num, JsonPatchDocument<Company> PatchCompany)
{
    if (PatchCompany==null || Num==0) return BadRequest();
    var tempBU = CompanyStore.CompanyList.FirstOrDefault(c => c.id == Num);
    PatchCompany.ApplyTo(tempBU, ModelState);
    if (!ModelState.IsValid) return BadRequest(ModelState);

    return NoContent();
}
依據Update、Create需求,建立更多Dto
可以從原本的專案中,延伸出Creat或Update甚至是Read專用的Dto,因為
Creat或Update所需的欄位與驗證方式可能都不盡相同

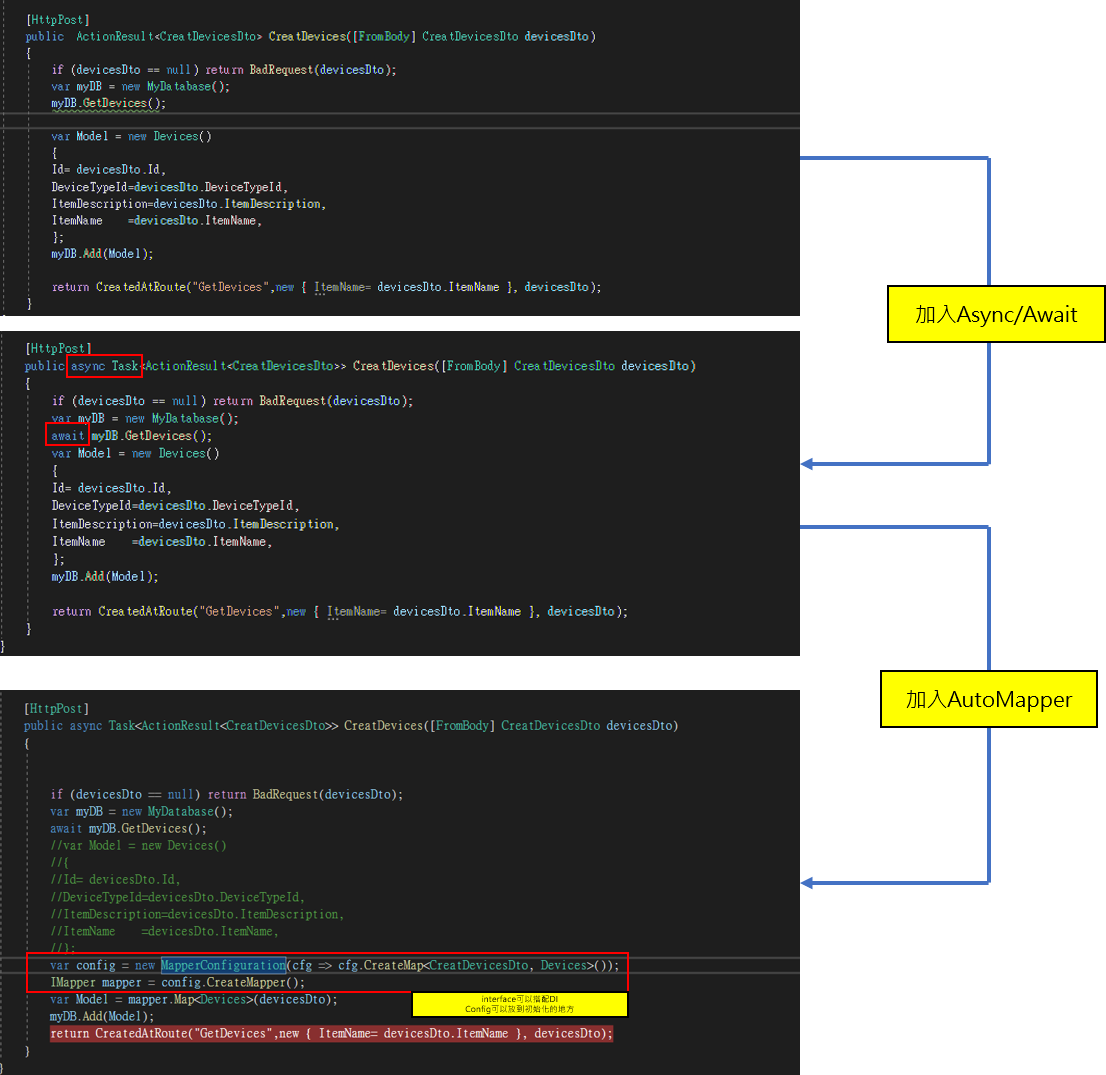
Sync to Async
除了前贅需要+Async之外,要記得使用Task把原本的回傳型態包起來

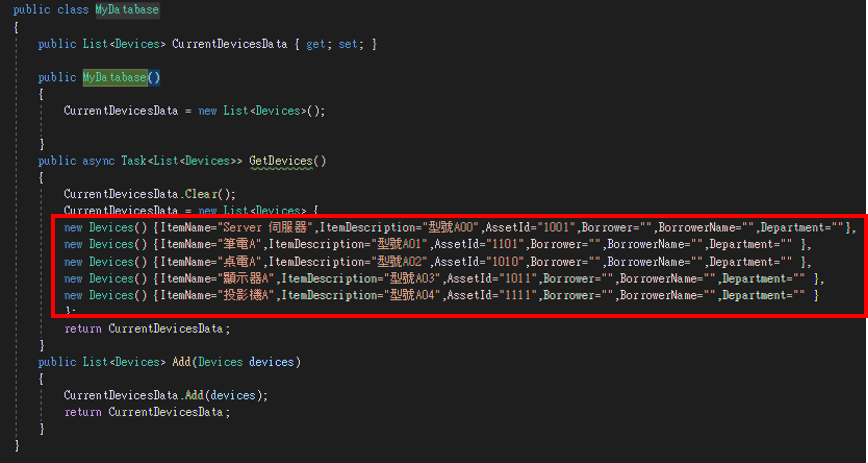
AutoMapper And Dto
假設這是我的資料庫,可以透過function得到當前資料,並使用Add追加新的資料
加入await async 也是為了Demo使用非同步處理資料庫
實際使用過程
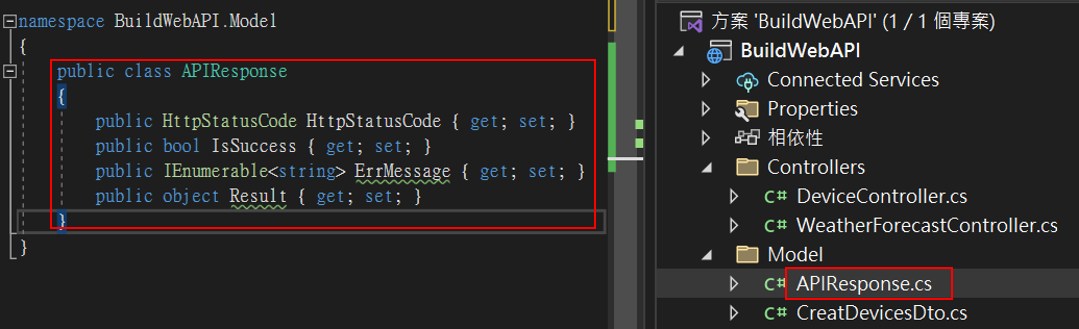
標準API回傳類型
建立標準API回傳類型
當使用Get/Post之後,總不可能每次都不告知Request是否正常
首先建立新的Class 用來儲存API Request
Class可以長這樣
1
2
3
4
5
6
7
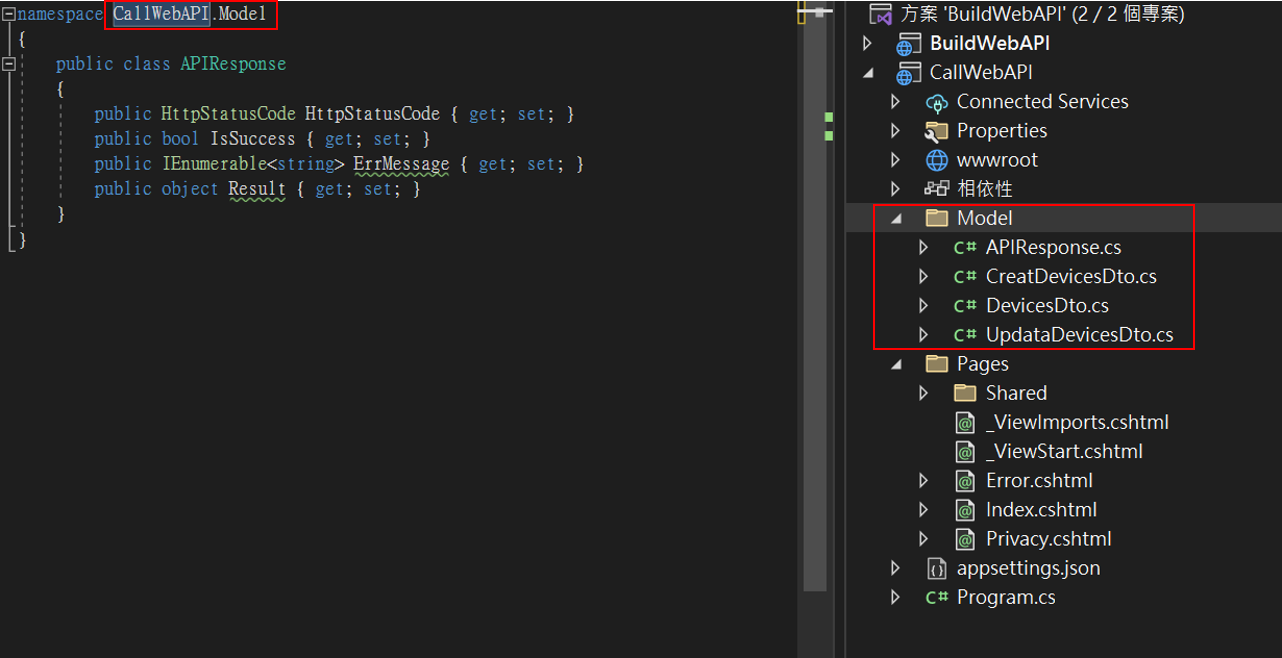
public class APIResponse
{
public HttpStatusCode HttpStatusCode { get; set; }
public bool IsSuccess { get; set; } = true;
public IEnumerable<string> ErrMessage { get; set; }
public object Result { get; set; }
}
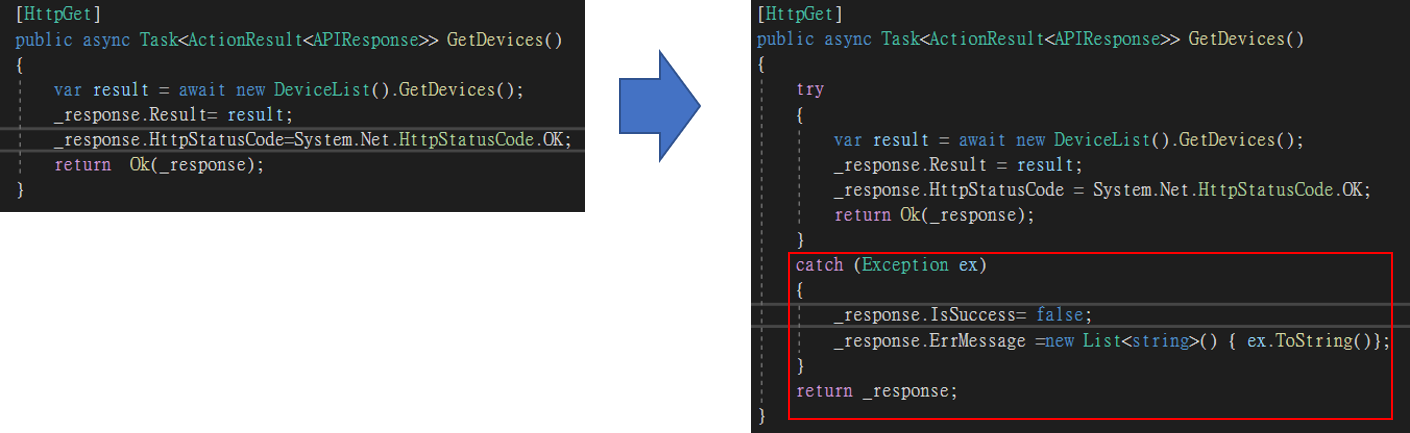
使用標準API回傳類型
先宣告變數
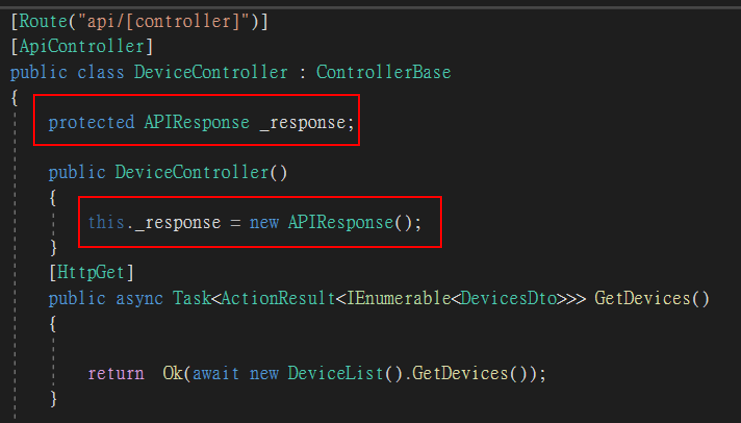
變更回傳類型
將原本的回傳資料,放到APIResponse的Result裡面

加入TryCatch
為了避免調用資料有甚麼意外狀況,所以要加入TryCatch
建立API專案中,並實現Token驗證
一般來說使用別人的API時,別人會提供Token以便進行身分驗證,畢竟毫無限制地讓任何都能操作CRUD
這邊DEMO自己生成Token並進行驗證的方式,以便了解相關知識
備註: 實際上需要與資料庫串接,但這邊我只想練習DEMO與Token相關的技巧,所以讀取資料庫的操作,會就直接用靜態List來代替
所以假設這List裡面的資料,是資料庫裡面的資料

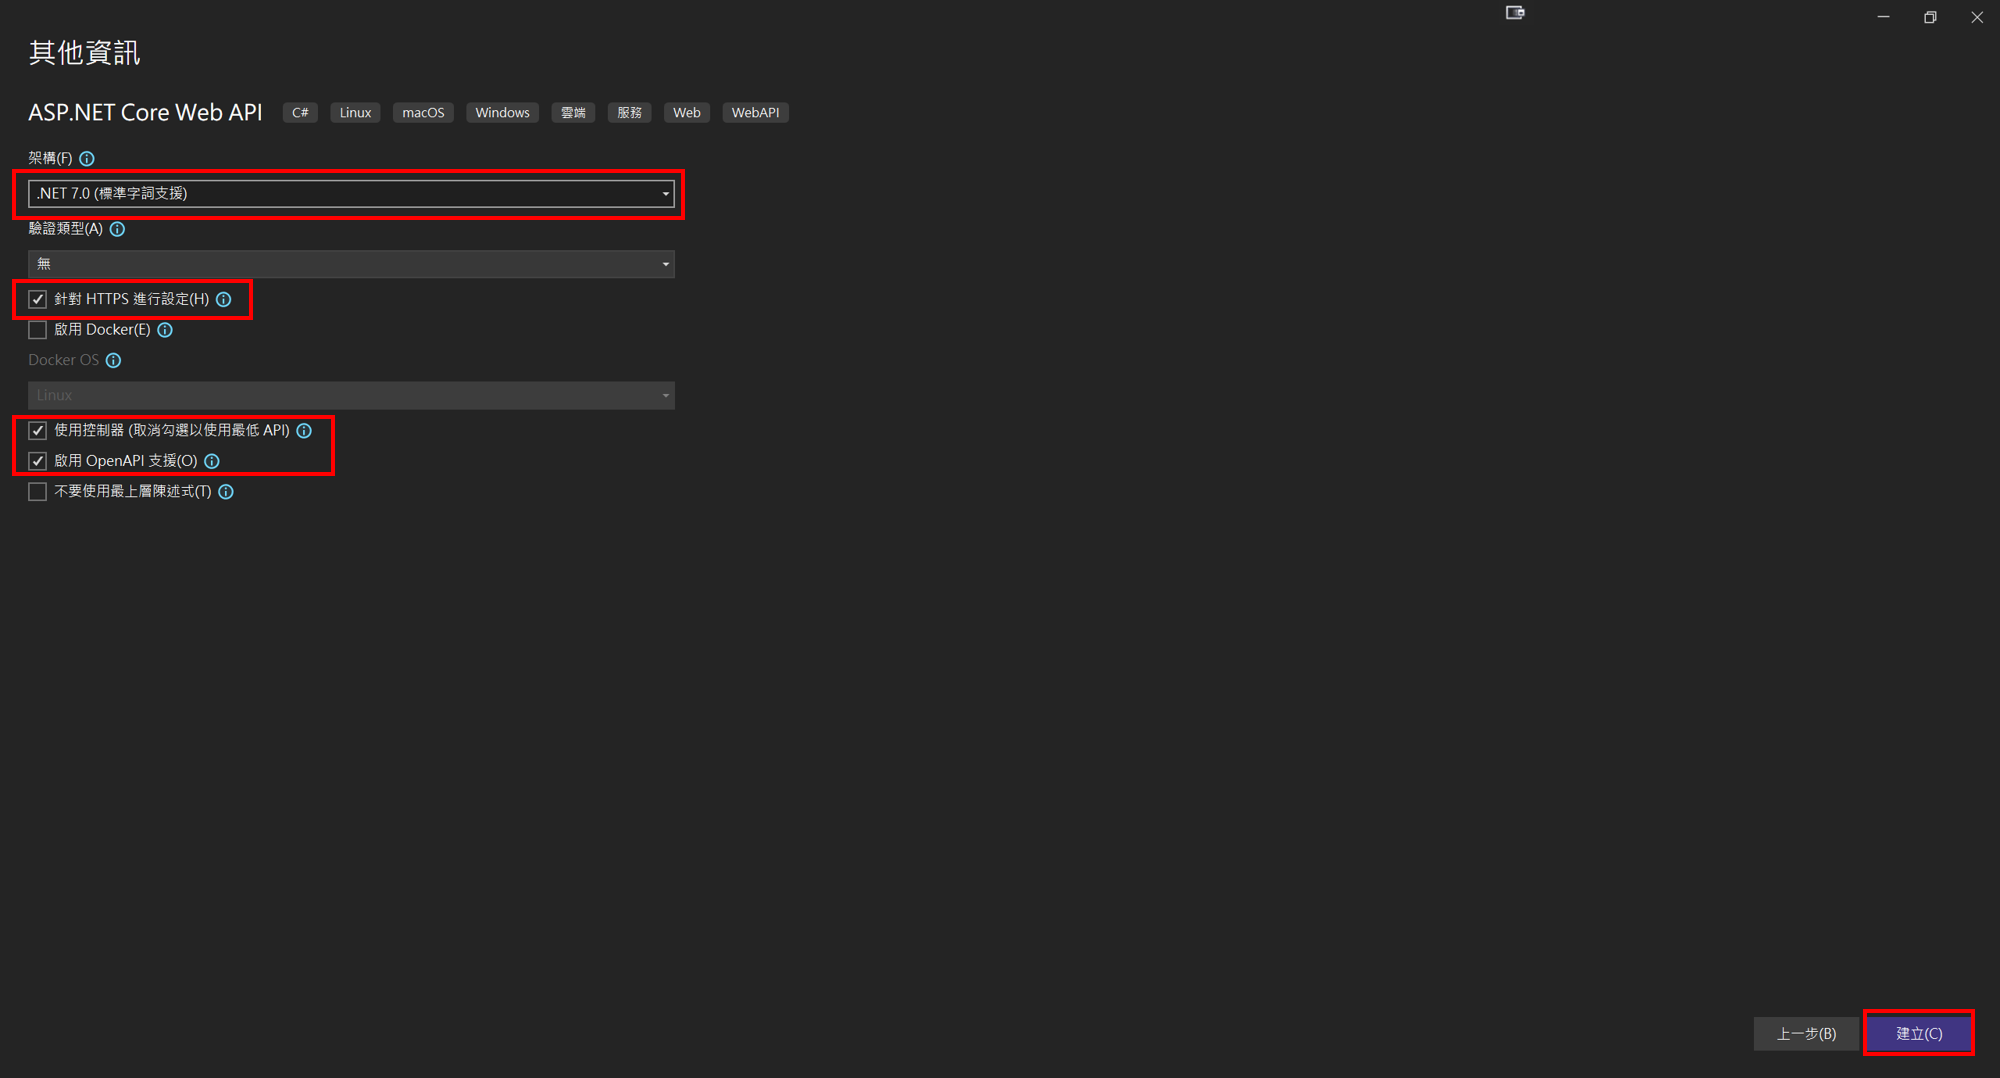
建立API專案
選擇建立API
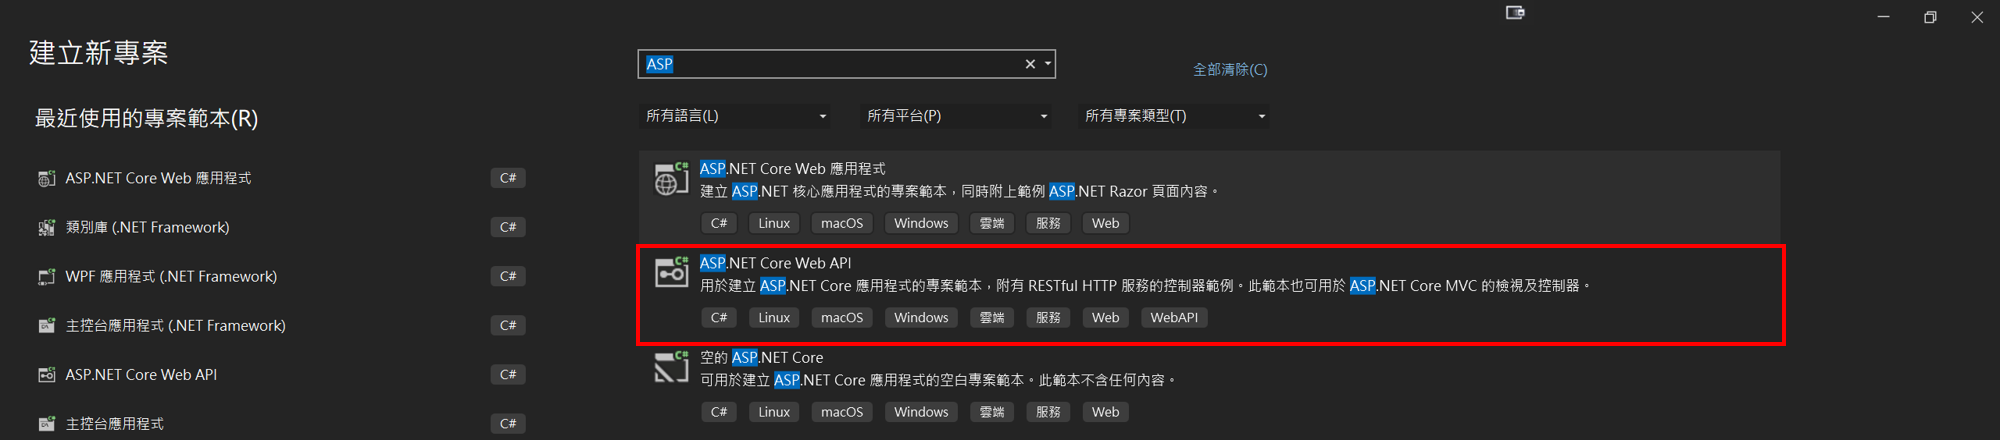
設定完後建立
建立商業邏輯Dto
如下
1
2
3
4
5
6
7
8
9
10
11
12
13
14
15
16
17
18
19
20
21
22
23
24
25
26
27
28
29
30
31
32
33
34
35
36
37
38
39
40
41
42
43
44
45
46
47
48
49
//CreatDevicesDto.cs
public class CreatDevicesDto
{
    public int Id { get; set; }
    public int DeviceTypeId { get; set; } //設備類型
    public string ItemName { get; set; } //設備品名
    public string ItemDescription { get; set; } //物品描述
}
//Devices.cs
public class Devices
{
    public int Id { get; set; }
    public int DeviceTypeId { get; set; } //設備類型
    public string ItemName { get; set; } //設備品名
    public string ItemDescription { get; set; } //物品描述
    public string PCName { get; set; } //電腦名稱
    public string AssetId { get; set; } //設備編號
    public int DeviceStatusId { get; set; }//狀態Id
    public int LocationId { get; set; } //設備ID
    public DateTime? WarehousingDate { get; set; } //入庫時間
    public string Custodian { get; set; } //保管人-代號
    public string CustodianName { get; set; }//保管人-姓名
    public string Department { get; set; }//部門編號
    public string DepartmentName { get; set; }//部門名稱
    public string Brand { get; set; }//設備品牌1
    public string Model { get; set; }//設備品牌2
    public string SerialNo { get; set; }//設備序號
    public string System { get; set; }//系統
    public string Ram { get; set; }//RAM
    public string Disk { get; set; }//硬碟
    public string OfficeVersion { get; set; }//Office版本
    public string Mac01 { get; set; }//無線Mac
    public string Mac02 { get; set; }//有線Mac
    public string Remark { get; set; }//備註
    public string Borrower { get; set; }//借用人工號
    public string BorrowerName { get; set; }//借用人姓名
    public DateTime? BorrowingDate { get; set; }//借用日期
}
//DevicesDto.cs
public class DevicesDto
{
    public string AssetId { get; set; }// 財產編號
    public string ItemName { get; set; }// 描述
    public string ItemDescription { get; set; }// 部門
    public string DepartmentId { get; set; }// 部門ID
    public string Department { get; set; }// 部門
    public string Borrower { get; set; }//借用人工號
    public string BorrowerName { get; set; }//借用人姓名
}
建立商業邏輯假資料
如下
1
2
3
4
5
6
7
8
9
10
11
12
13
14
//DeviceStore.cs
public class DeviceList
{
    public async Task<List<DevicesDto>> GetDevices()
    {
        return  new List<DevicesDto> {
        new DevicesDto() {ItemName="Server 伺服器",ItemDescription="型號A00",AssetId="1001",Borrower="",BorrowerName="",Department=""},
        new DevicesDto() {ItemName="筆電A",ItemDescription="型號A01",AssetId="1101",Borrower="",BorrowerName="",Department="" },
        new DevicesDto() {ItemName="桌電A",ItemDescription="型號A02",AssetId="1010",Borrower="",BorrowerName="",Department="" },
        new DevicesDto() {ItemName="顯示器A",ItemDescription="型號A03",AssetId="1011",Borrower="",BorrowerName="",Department="" },
        new DevicesDto() {ItemName="投影機A",ItemDescription="型號A04",AssetId="1111",Borrower="",BorrowerName="",Department="" }
        };
    }
}
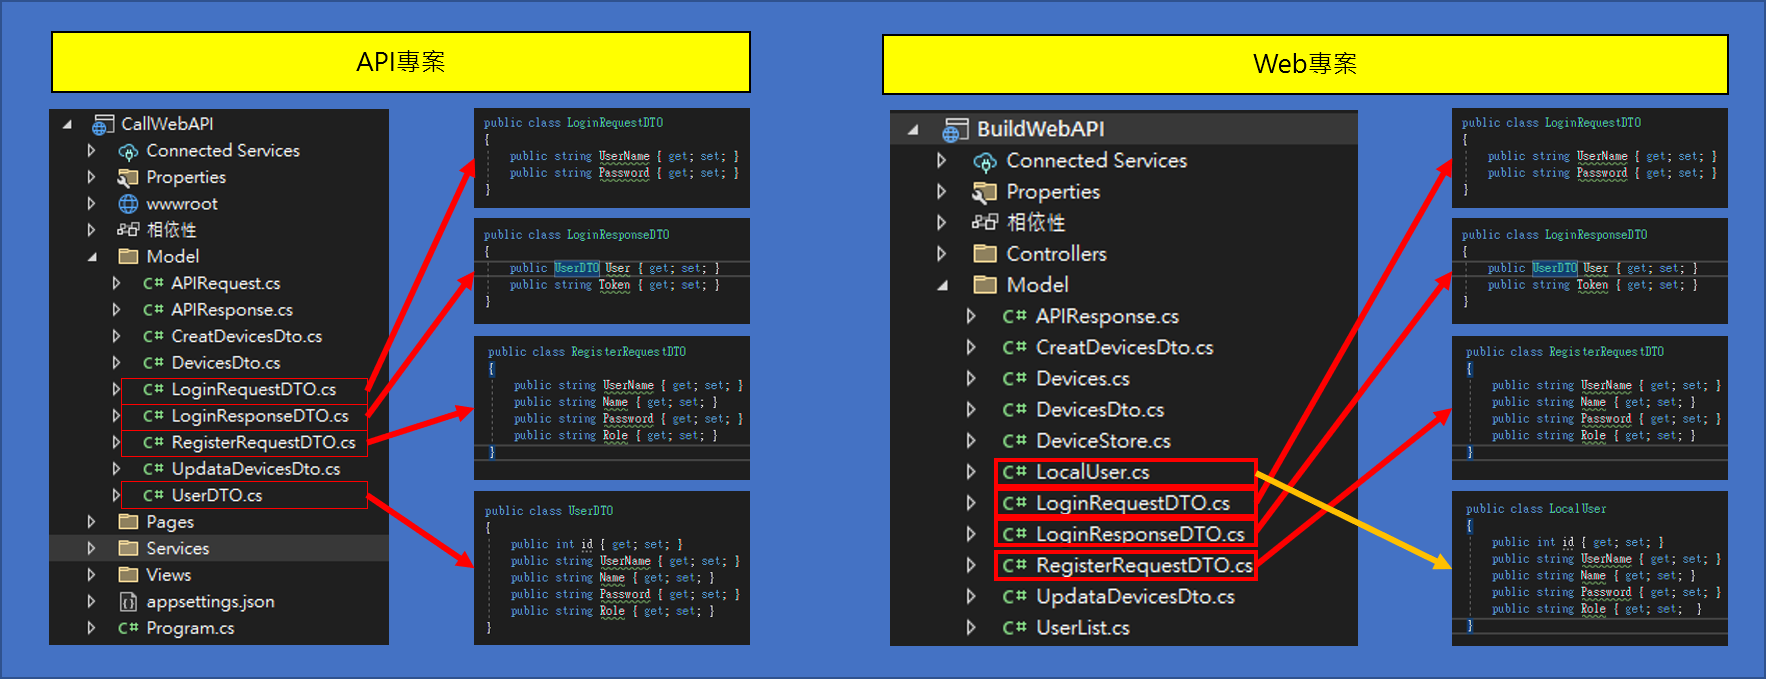
建立登入系統
1
2
3
4
5
6
7
8
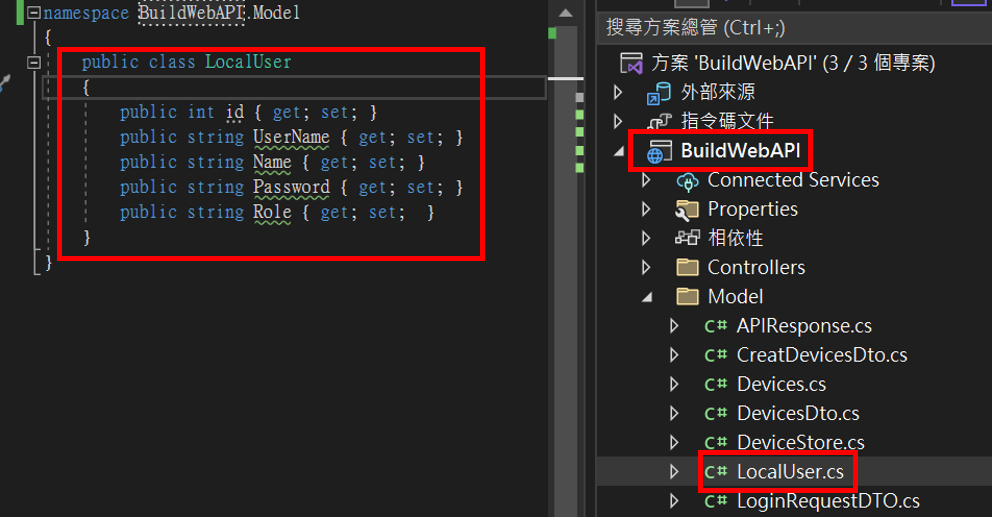
public class LocalUser
{
public int id { get; set; }
public string UserName { get; set; }
public string Name { get; set; }
public string Password { get; set; }
public string Role { get; set; }
}
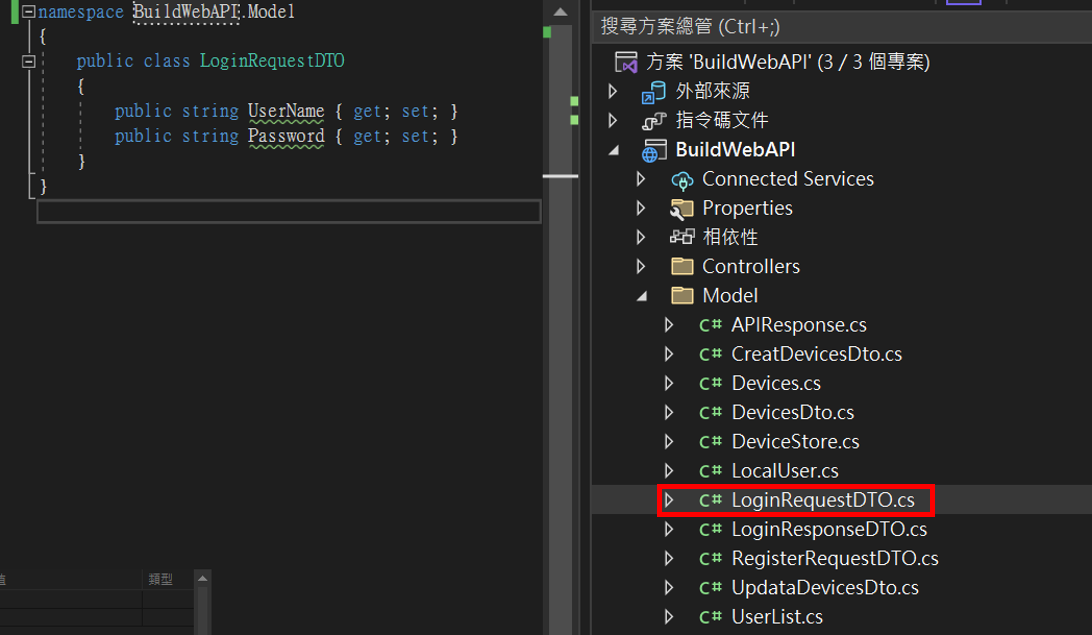
登入請求
1
2
3
4
5
public class LoginRequestDTO
{
    public string UserName { get; set; }
    public string Password { get; set; }
}
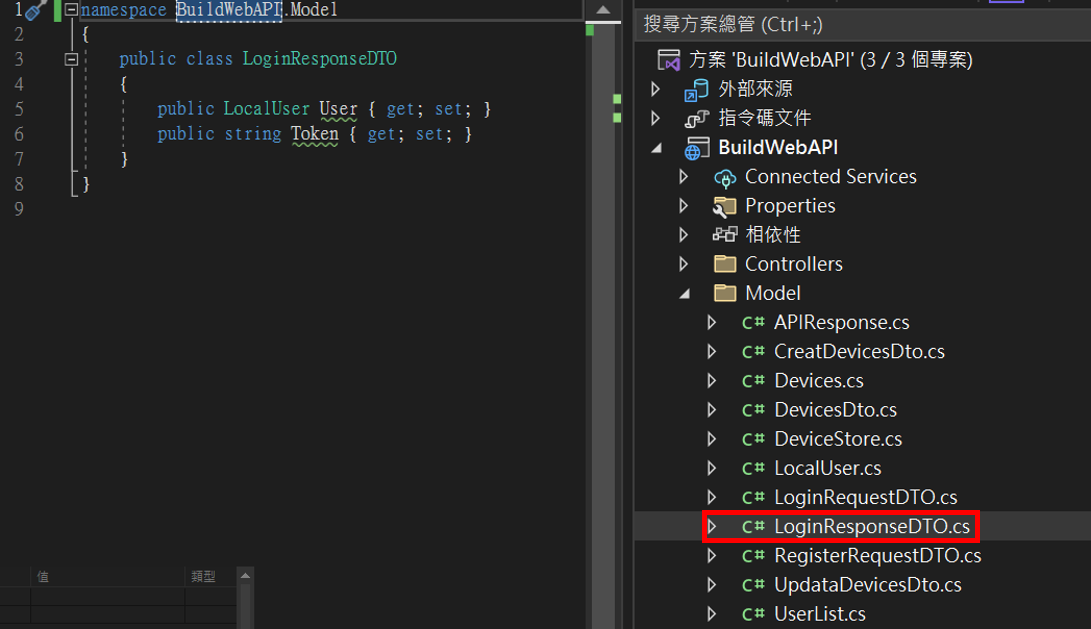
登入響應
1
2
3
4
5
public class LoginResponseDTO
{
    public LocalUser User { get; set; }
    public string Token { get; set; }
}
註冊請求
1
2
3
4
5
6
7
public class RegisterRequestDTO
{
    public string UserName { get; set; }
    public string Name { get; set; }
    public string Password { get; set; }
    public string Role { get; set; }
}
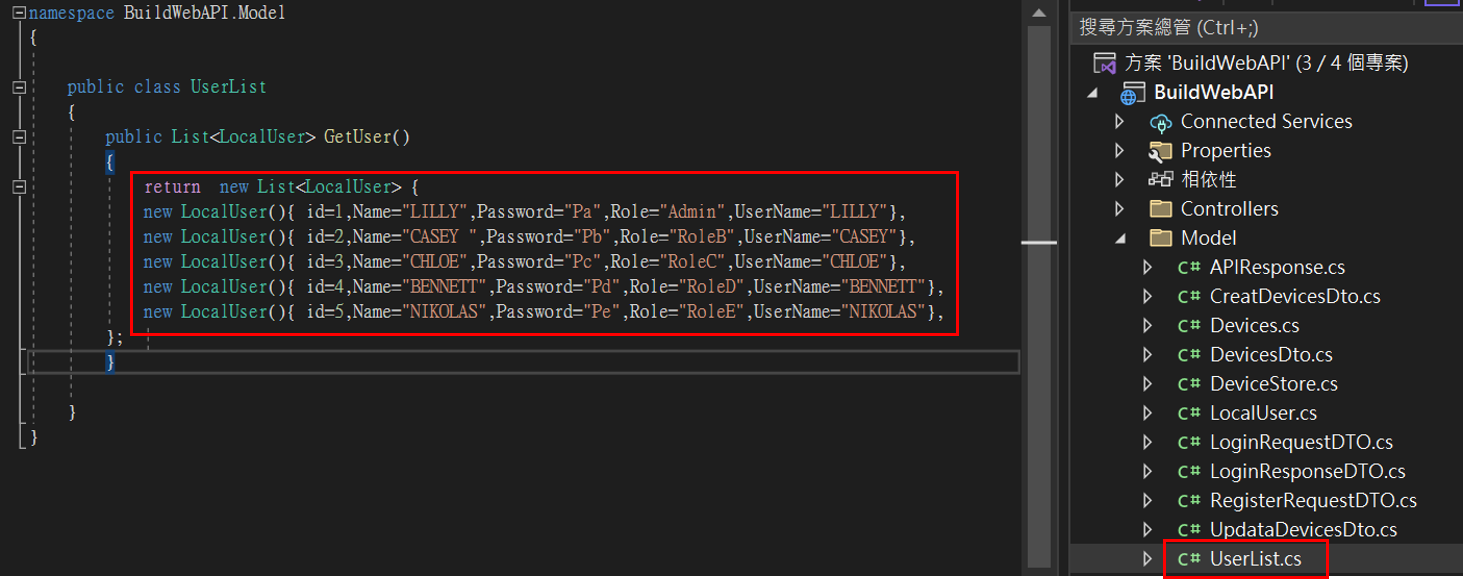
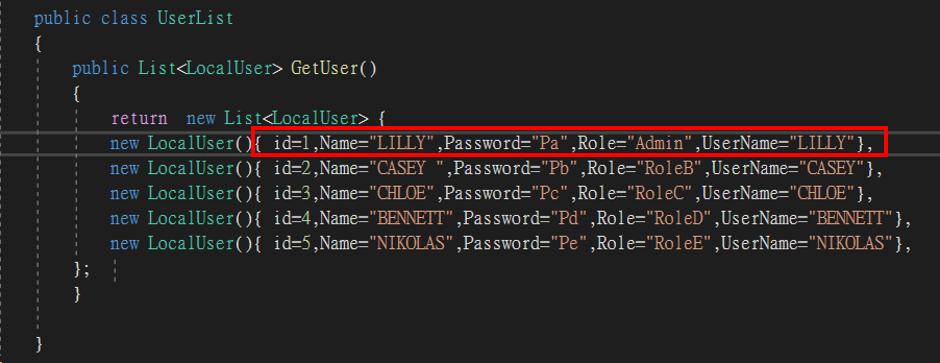
建立假帳號
之所以有這步驟是因為我不想真的使用資料庫驗證登入資訊
1
2
3
4
5
6
7
8
9
10
11
12
13
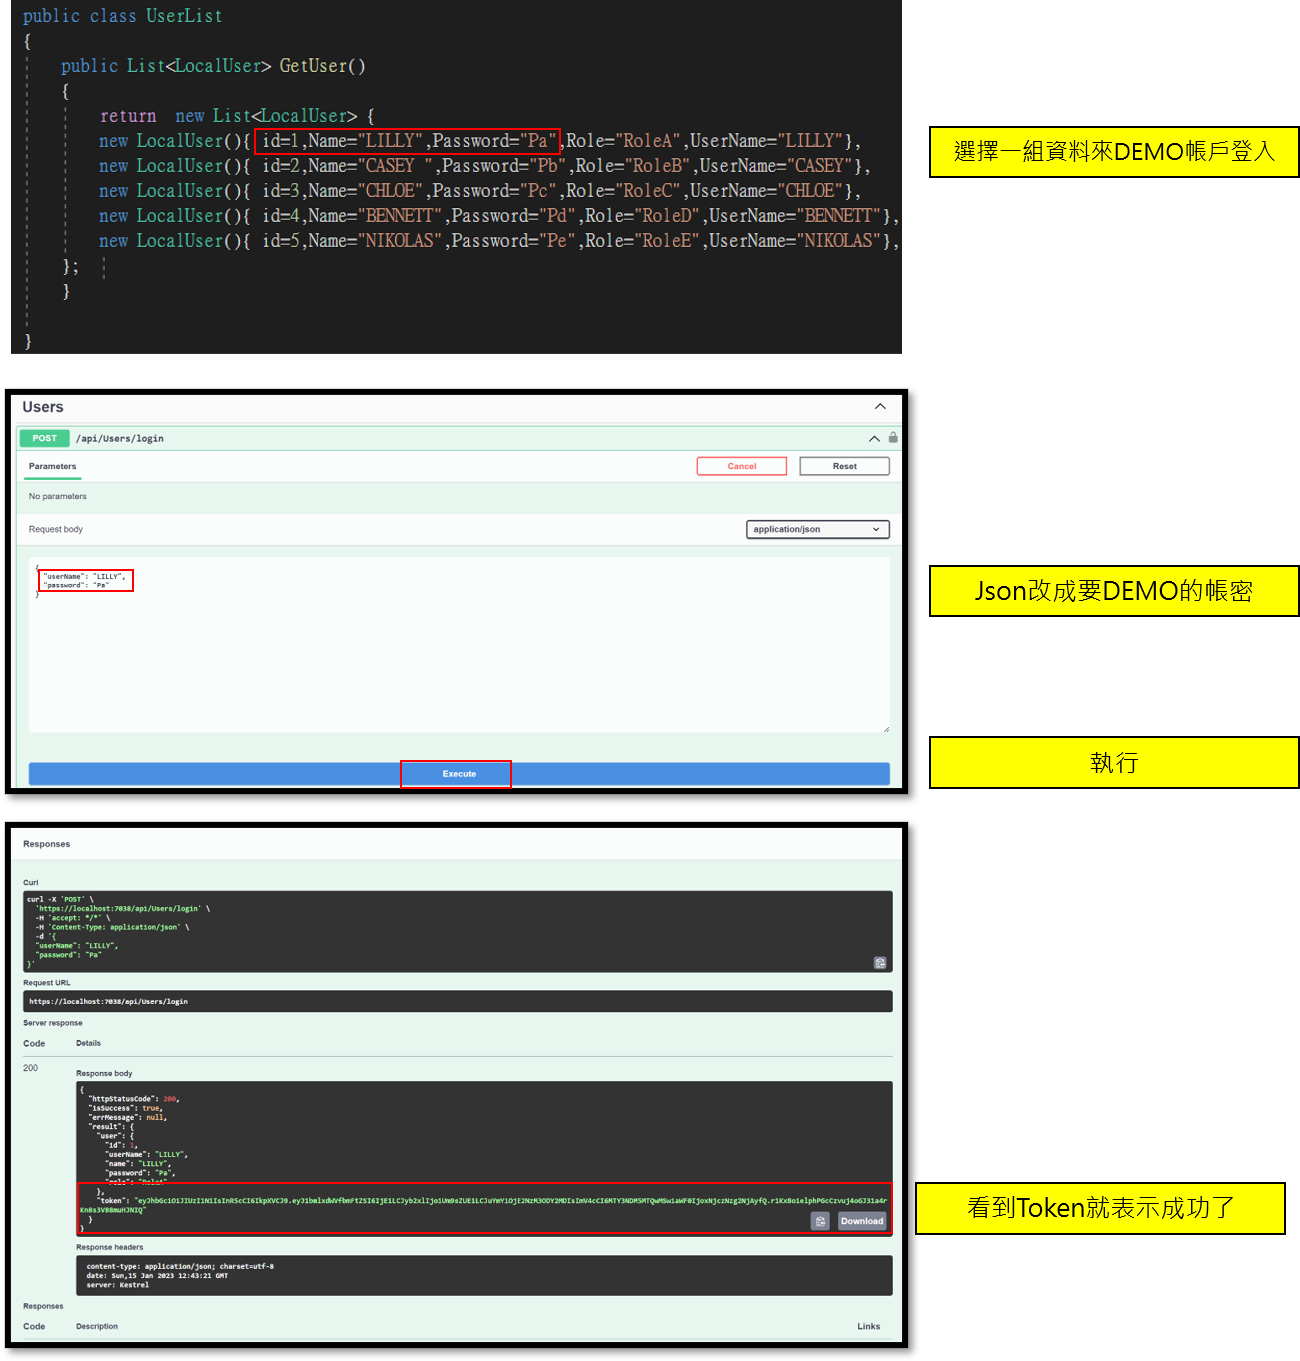
public class UserList
{
public List<LocalUser> GetUser()
{
return new List<LocalUser> {
new LocalUser(){ id=1,Name="LILLY",Password="Pa",Role="Admin",UserName="LILLY"},
new LocalUser(){ id=2,Name="CASEY ",Password="Pb",Role="RoleB",UserName="CASEY"},
new LocalUser(){ id=3,Name="CHLOE",Password="Pc",Role="RoleC",UserName="CHLOE"},
new LocalUser(){ id=4,Name="BENNETT",Password="Pd",Role="RoleD",UserName="BENNETT"},
new LocalUser(){ id=5,Name="NIKOLAS",Password="Pe",Role="RoleE",UserName="NIKOLAS"},
};
}
}
建立API標準回傳
1
2
3
4
5
6
7
public class APIResponse
{
    public HttpStatusCode HttpStatusCode { get; set; }
    public bool IsSuccess { get; set; } = true;
    public IEnumerable<string> ErrMessage { get; set; }
    public object Result { get; set; }
}
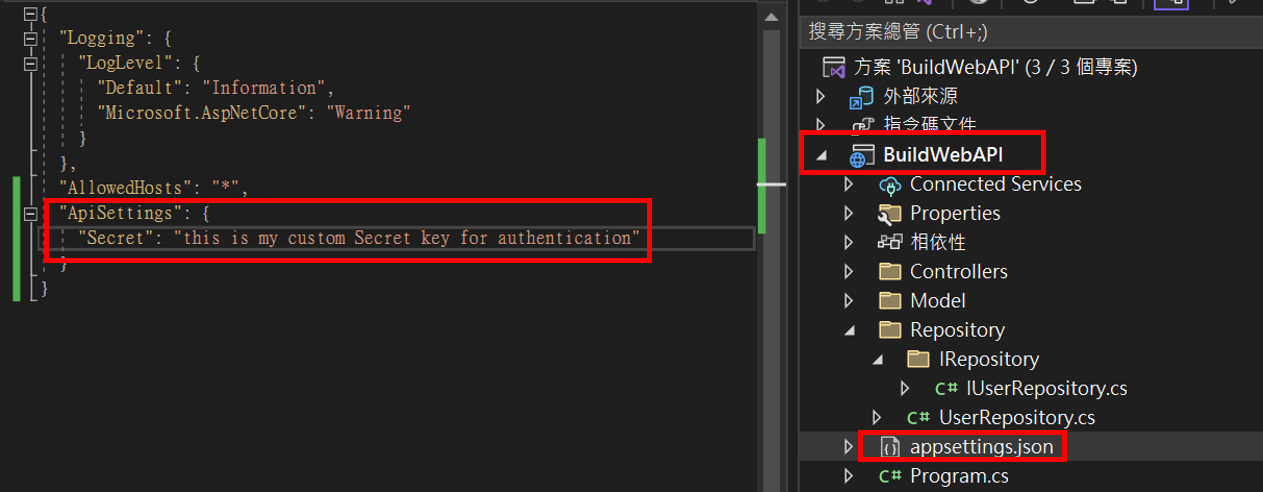
Appsettings.json中,添加API金鑰字串
1
2
3
"ApiSettings": {
  "Secret": "this is my custom Secret key for authentication"
}
備註:字串不夠長,會跑出Error
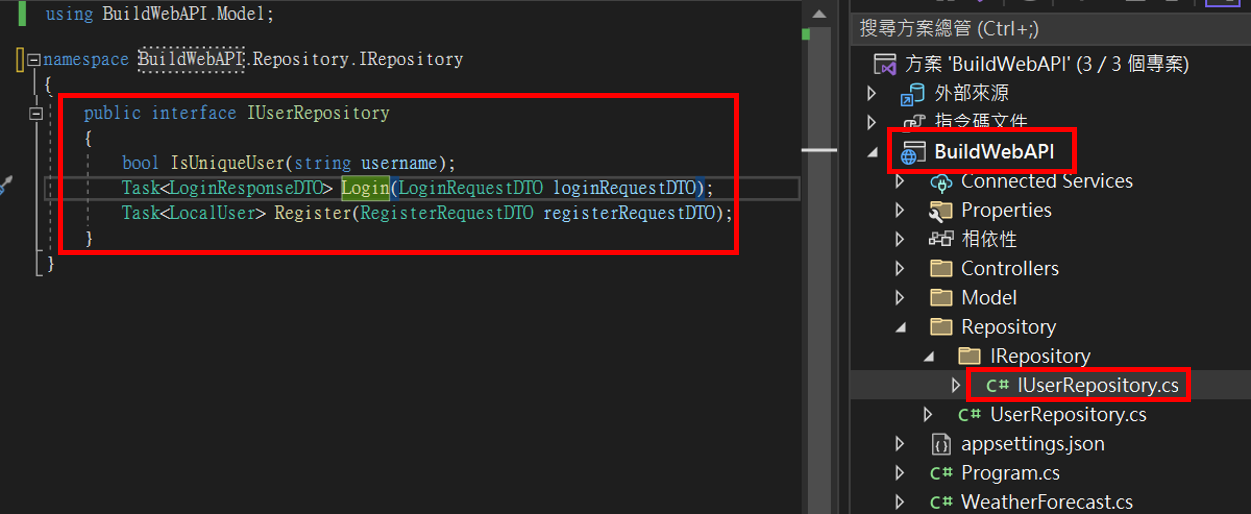
建立存取登入系統的Repository
建立interface
1
2
3
4
5
6
public interface IUserRepository
{
    bool IsUniqueUser(string username);
    Task<LoginResponseDTO> Login(LoginRequestDTO loginRequestDTO);
    Task<LocalUser> Register(RegisterRequestDTO registerRequestDTO);
}
安裝Tokens.Jwt

1
NuGet\Install-Package System.IdentityModel.Tokens.Jwt -Version 6.25.1
實現Class
1
2
3
4
5
6
7
8
9
10
11
12
13
14
15
16
17
18
19
20
21
22
23
24
25
26
27
28
29
30
31
32
33
34
35
36
37
38
39
40
41
42
43
44
45
46
47
48
49
50
public class UserRepository : IUserRepository
{
    private string secretKey;
    public UserRepository(IConfiguration configuration)
    {
        this.secretKey = configuration.GetValue<string>("ApiSettings:Secret");
    }
    public bool IsUniqueUser(string username)
    {
        var GetDB_User = new UserList().GetUser(); /*與DB有關的部分*/
        var user = GetDB_User.FirstOrDefault(c=>c.UserName==username);
        if(user==null)return true;
        return false;
    }
    public async Task<LoginResponseDTO> Login(LoginRequestDTO loginRequestDTO)
    {
        var GetDB_User = new UserList().GetUser(); /*與DB有關的部分*/
        var user = GetDB_User.FirstOrDefault(c=>c.UserName.ToLower()== loginRequestDTO.UserName.ToLower()&&
        c.Password==loginRequestDTO.Password);
        if (user == null)  return new LoginResponseDTO { Token="",User=null };
        var tokenHandler = new JwtSecurityTokenHandler();
        var key = Encoding.ASCII.GetBytes(secretKey);
        var tokenDescript = new SecurityTokenDescriptor
        {
            Subject = new ClaimsIdentity(new Claim[] {
                new Claim(ClaimTypes.Name, user.id.ToString()),
                new Claim(ClaimTypes.Role,user.Role)
            }),
            Expires = DateTime.Now.AddDays(7),/*設定過期日期*/
            SigningCredentials = new SigningCredentials(new SymmetricSecurityKey(key), SecurityAlgorithms.HmacSha256Signature)
        };
        var token = tokenHandler.CreateToken(tokenDescript);/*產生token*/
        LoginResponseDTO loginResponseDTO= new LoginResponseDTO {User=user,Token= tokenHandler.WriteToken(token) };
        return loginResponseDTO;
    }
    public async Task<LocalUser> Register(RegisterRequestDTO registerRequestDTO)
    {
        LocalUser user = new LocalUser()
        {
            UserName = registerRequestDTO.UserName,
            Password = registerRequestDTO.Password,
            Name = registerRequestDTO.Name,
            Role = registerRequestDTO.Role
        };
        var GetDB_User = new UserList().GetUser(); /*與DB有關的部分*/
        GetDB_User.Add(user);
        return user;

    }
}
建立Repository的DI注入

1
builder.Services.AddScoped<IUserRepository, UserRepository>();
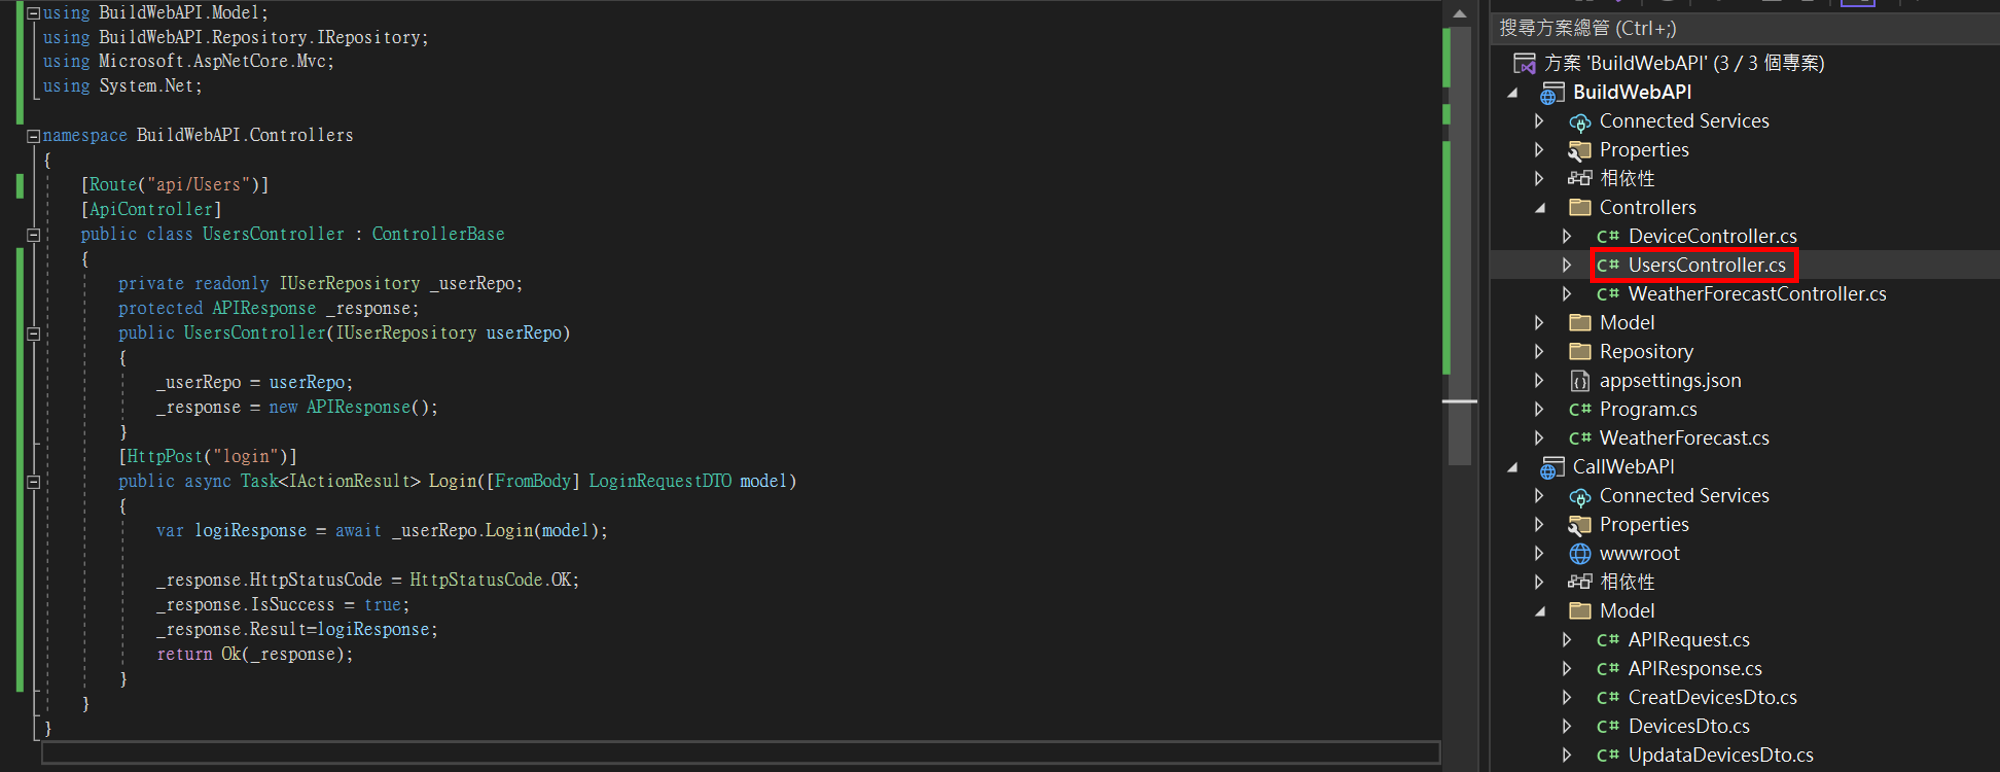
建立產生Token的APIController
API這裡新增UserController,用來DEMO登入成功後,產生Token
1
2
3
4
5
6
7
8
9
10
11
12
13
14
15
16
17
18
19
20
21
22
    [Route("api/Users")]
    [ApiController]
    public class UsersController : ControllerBase
    {
        private readonly IUserRepository _userRepo;
        protected APIResponse _response;
        public UsersController(IUserRepository userRepo)
        {
            _userRepo = userRepo;
            _response = new APIResponse();
        }
        [HttpPost("login")]
        public async Task<IActionResult> Login([FromBody] LoginRequestDTO model)
        {
            var logiResponse = await _userRepo.Login(model);

            _response.HttpStatusCode = HttpStatusCode.OK;
            _response.IsSuccess = true;
            _response.Result=logiResponse;
            return Ok(_response);
        }
    }
執行產生Token的APIController
執行API專案,並使用UserController API
API與角色權限
建立簡單的API
也可以使用下列語句測試
1
2
3
4
5
6
7
8
9
10
11
12
13
14
15
16
17
18
19
20
21
22
23
24
25
26
27
28
29
30
[Route("api/Device")]
[ApiController]
public class DeviceController : ControllerBase
{
    protected APIResponse _response;

    public DeviceController()
    {
        this._response = new APIResponse();
    }

    [HttpGet]
    [Authorize(Roles = "Admin")]
    public async Task<ActionResult<APIResponse>> GetDevices()
    {
        try
        {
            var result = await new DeviceList().GetDevices();
            _response.Result = result;
            _response.HttpStatusCode = System.Net.HttpStatusCode.OK;
            return Ok(_response);
        }
        catch (Exception ex)
        {
            _response.IsSuccess= false;
            _response.ErrMessage =new List<string>() { ex.ToString()};
        }
        return _response;
    }
}
設定API存取權限

1
[Authorize(Roles ="Admin")]
安裝JwtBearer

1
NuGet\Install-Package Microsoft.AspNetCore.Authentication.JwtBearer -Version 7.0.2
設定API解密
因為前面追加了權限驗證,但這邊還沒寫驗證金鑰,所以會因為Token驗證問題被擋下來
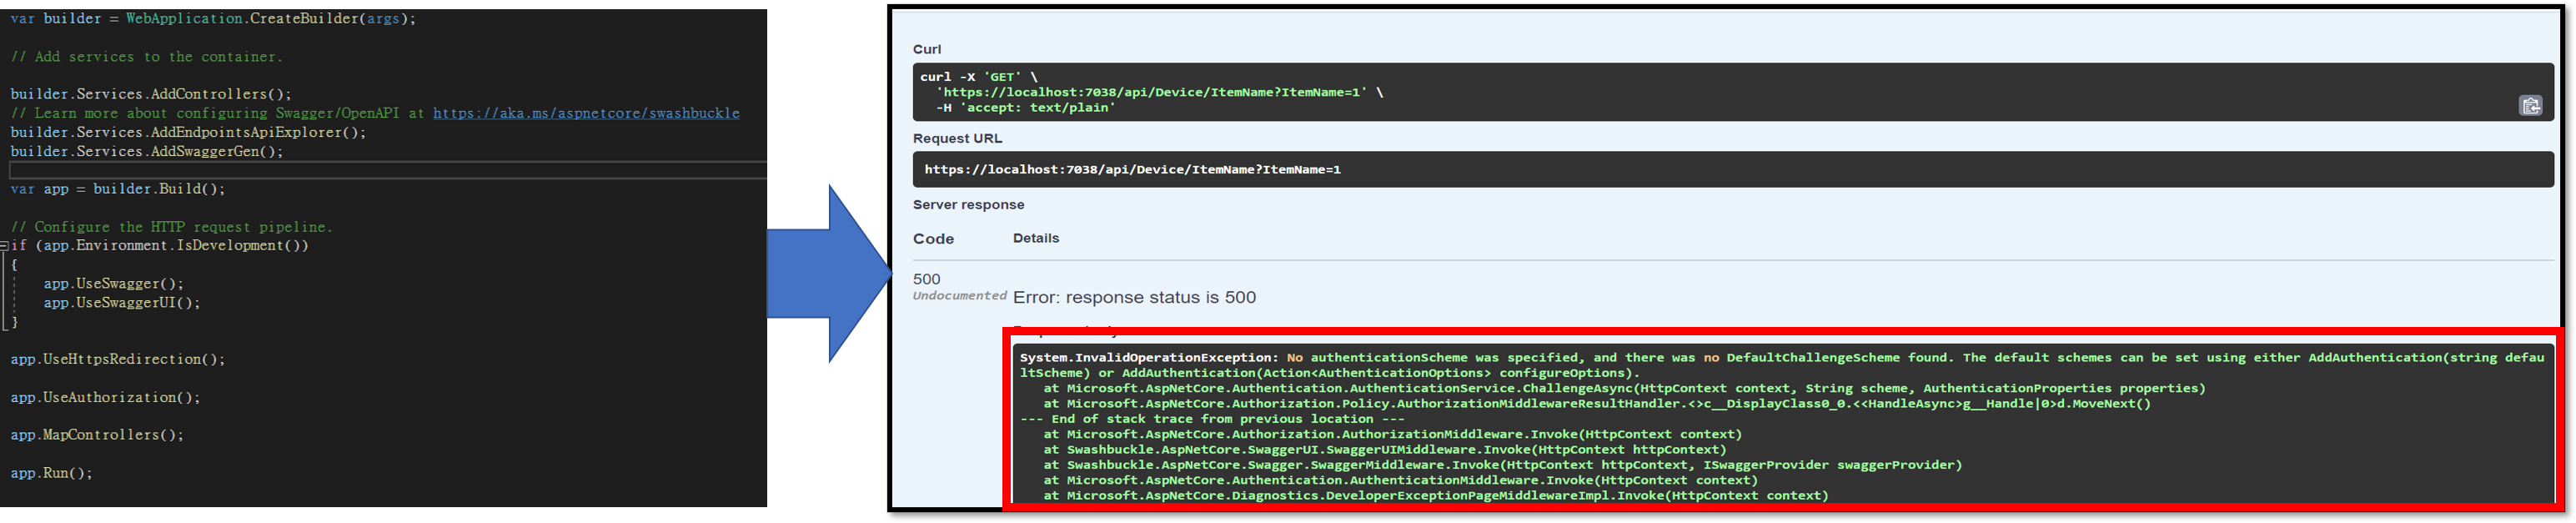
加入驗證金鑰的方式
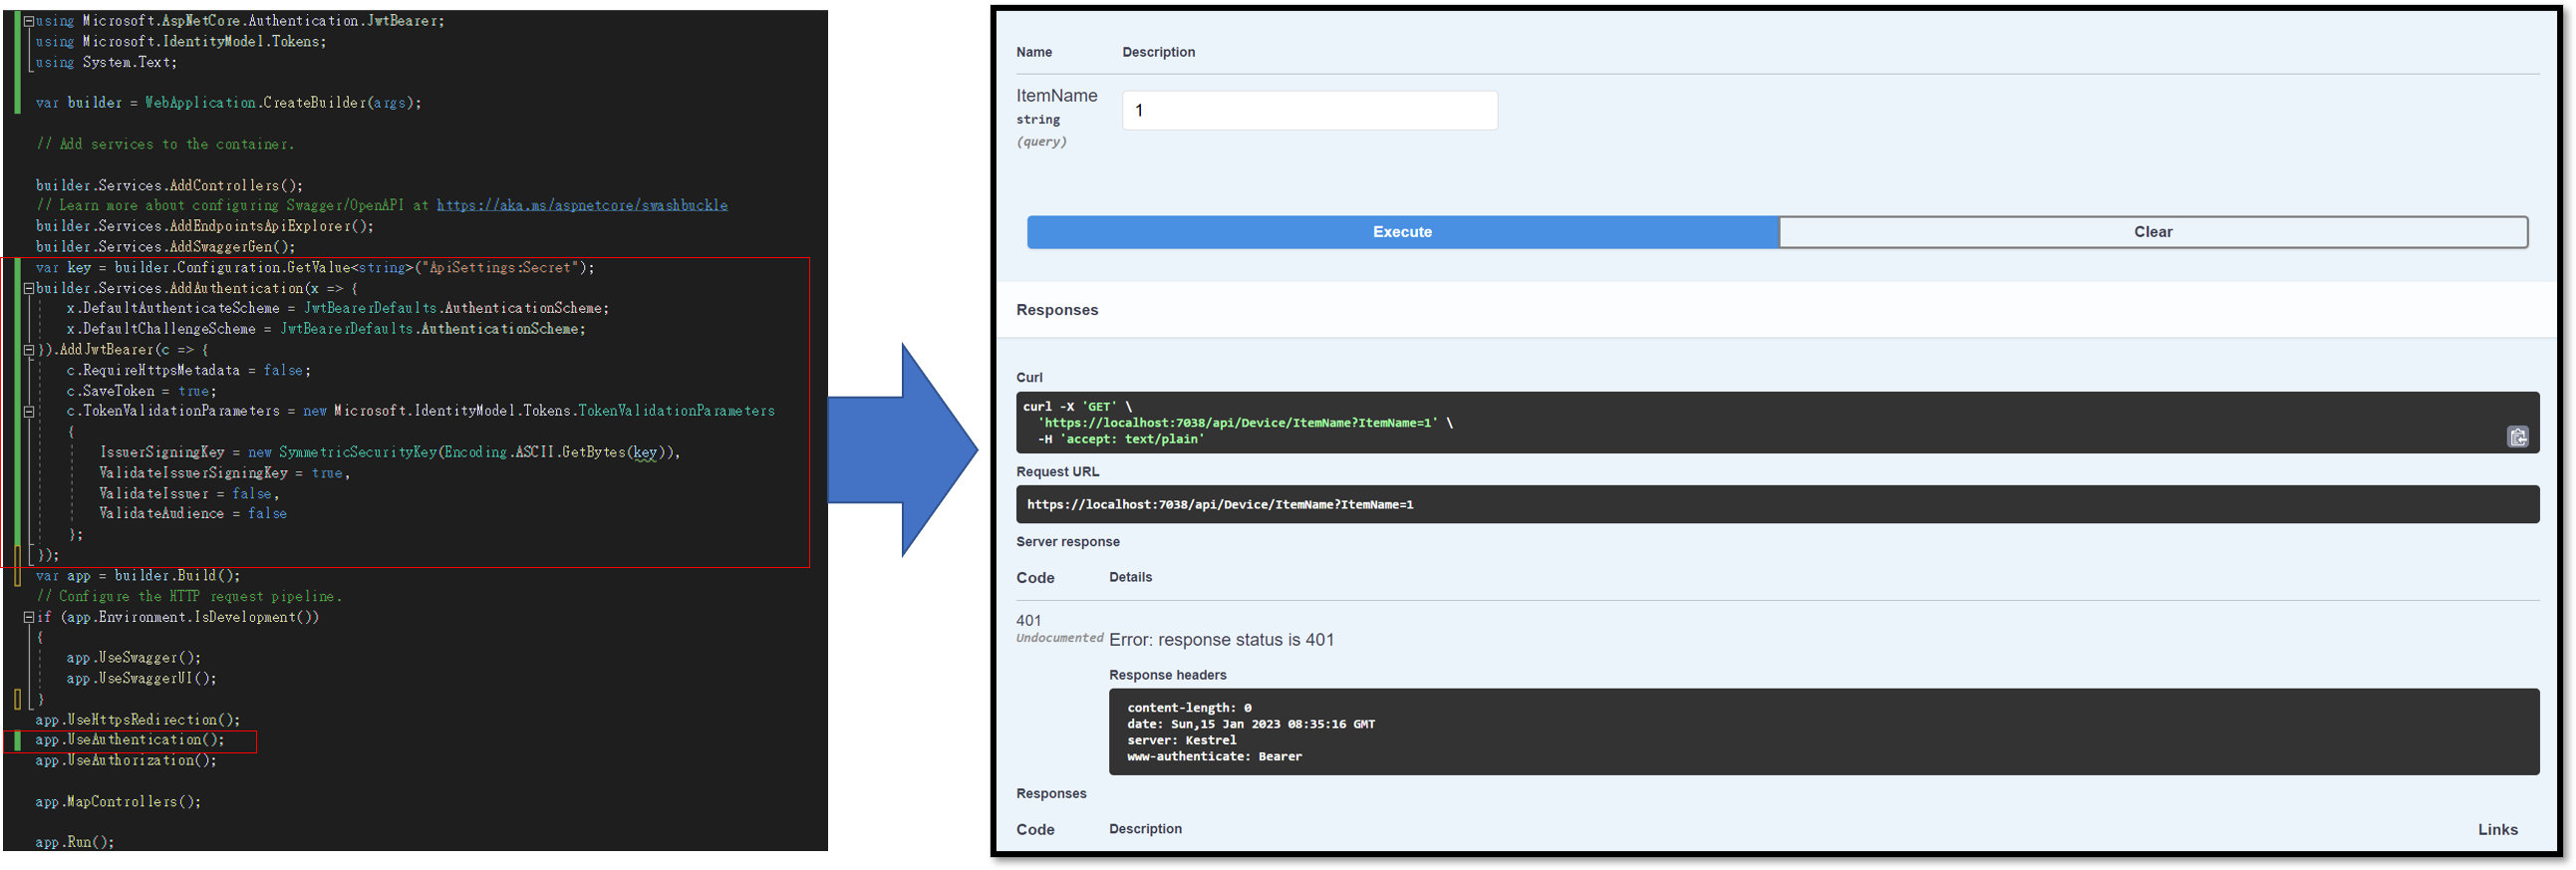
1
2
3
4
5
6
7
8
9
10
11
12
13
14
var key = builder.Configuration.GetValue<string>("ApiSettings:Secret");
builder.Services.AddAuthentication(x => {
x.DefaultAuthenticateScheme= JwtBearerDefaults.AuthenticationScheme;
    x.DefaultChallengeScheme= JwtBearerDefaults.AuthenticationScheme;
}).AddJwtBearer(c => {
            c.RequireHttpsMetadata = false;
            c.SaveToken = true;
            c.TokenValidationParameters = new Microsoft.IdentityModel.Tokens.TokenValidationParameters {
            IssuerSigningKey=new SymmetricSecurityKey(Encoding.ASCII.GetBytes(key)),
            ValidateIssuerSigningKey=true,
            ValidateIssuer=false,
            ValidateAudience= false
        };
    });
設定成必須使用有效Token才能使用API
將AddSwaggerGen改成以下語法,可以讓API變成必須先輸入Token,才能使用的介面

1
2
3
4
5
6
7
8
9
10
11
12
13
14
15
16
17
18
19
20
21
builder.Services.AddSwaggerGen(c => {
    c.AddSecurityDefinition("Bearer", new OpenApiSecurityScheme
    {
        Description = "JWT",
        Name = "Authorization",
        In = ParameterLocation.Header,
        Scheme = "Bearer"
    });
    c.AddSecurityRequirement(new OpenApiSecurityRequirement()
    {
        {
        new OpenApiSecurityScheme{
            Reference=new OpenApiReference{ Type=ReferenceType.SecurityScheme,Id="Bearer"},
            Scheme="oauth2",
            Name="Bearer",
            In = ParameterLocation.Header
            },
        new List<string>()
        }
    });
});
啟用UseAuthentication
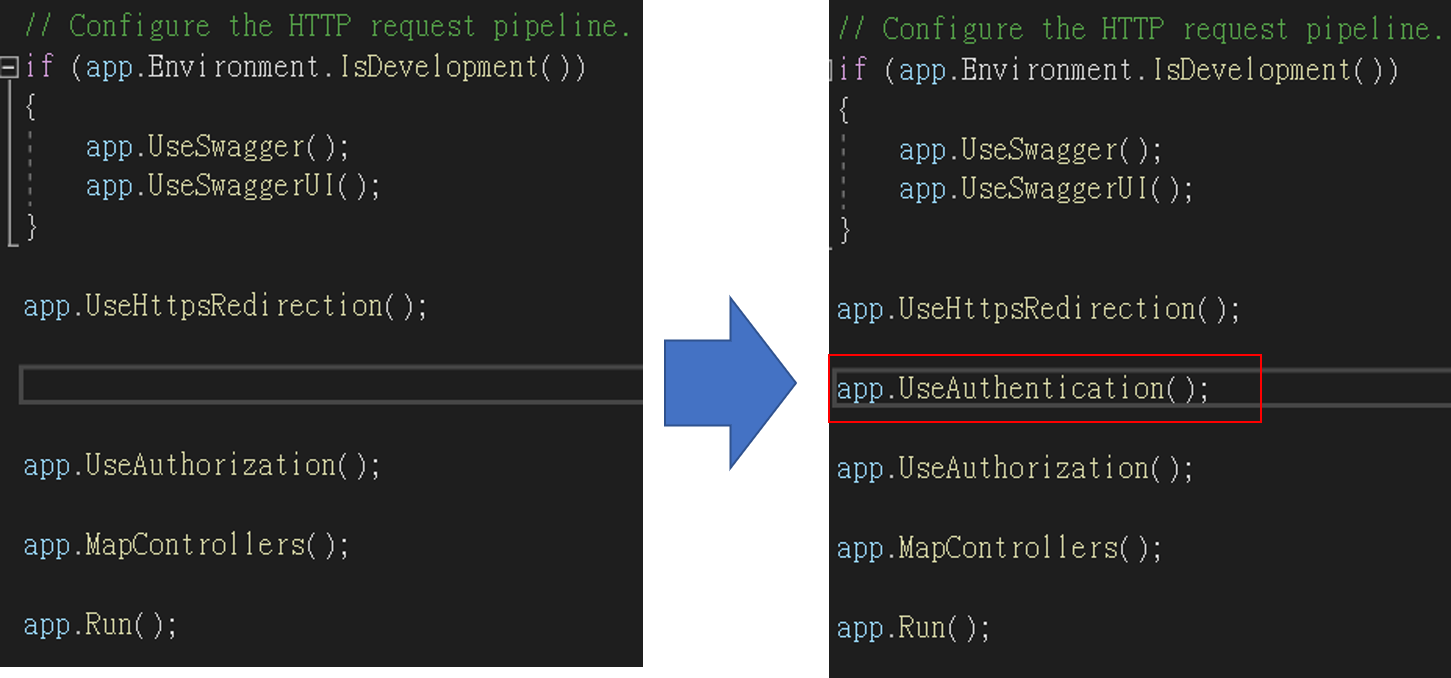
1
app.UseAuthentication();
手動測試有效Token
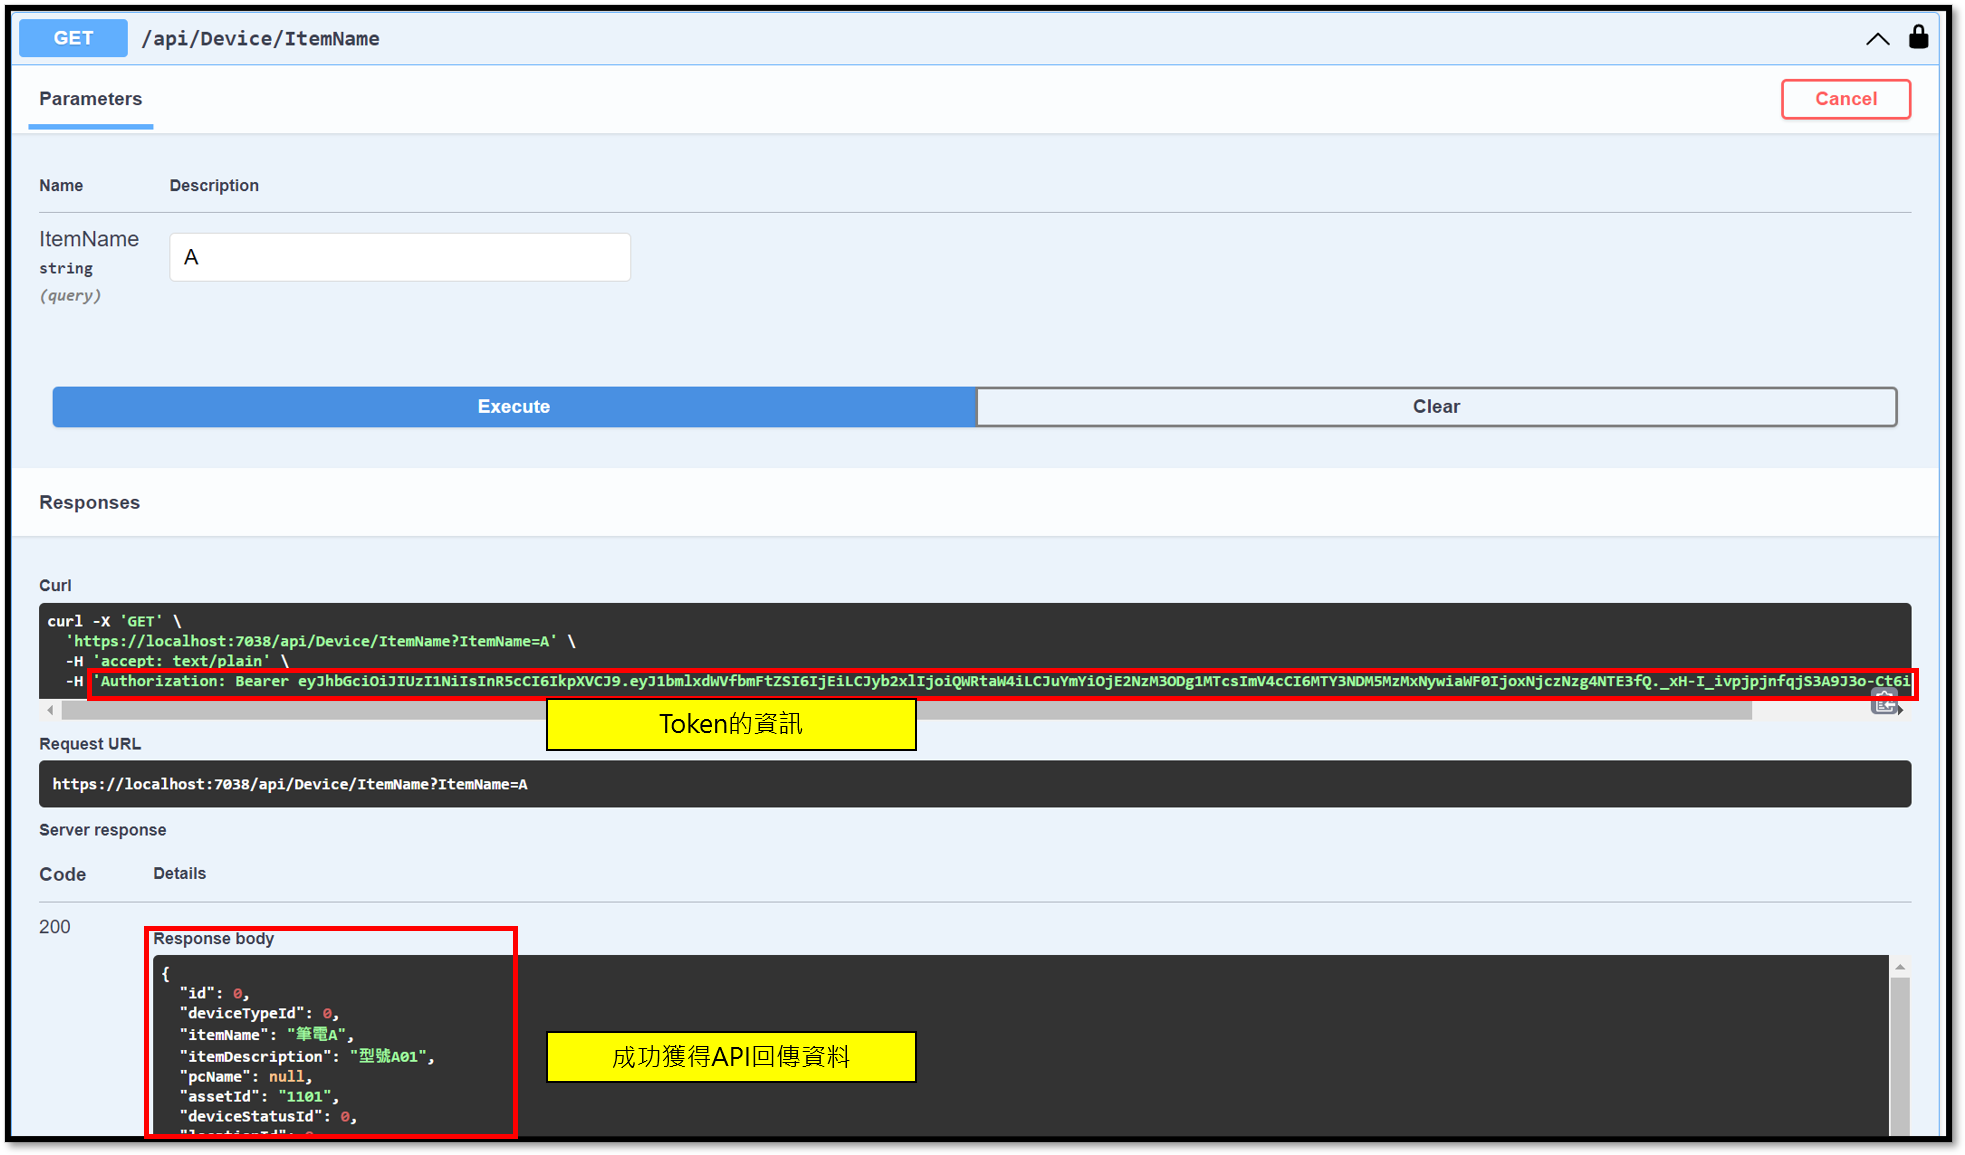
因為Token本身就是確保安全性的機制,所以若不照以下流程操作測試,直接使用API只會收到401或403錯誤代號
首先,先確定要使用的API的權限字串,如圖所示Admin
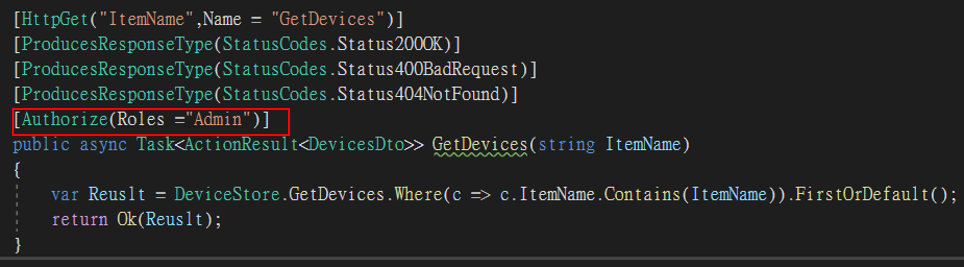
先確定要使用登入帳戶的Role,與Admin相符
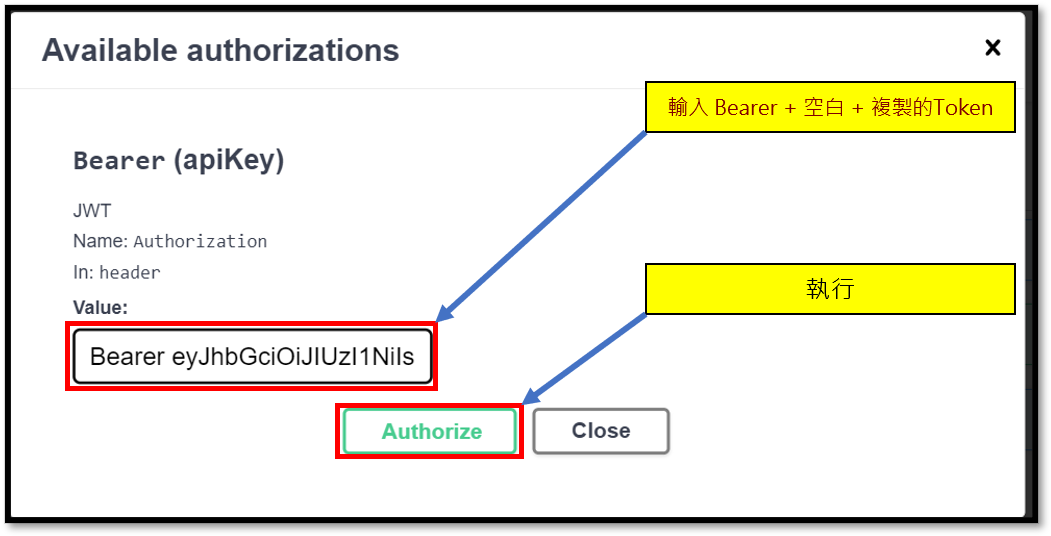
介面中,產生Token並複製Token的方式 詳見~~~
輸入 Bearer + 空白 + 複製的Token
備註Bearer這個字串,是源自前面的設定
執行須有Admin權限的API
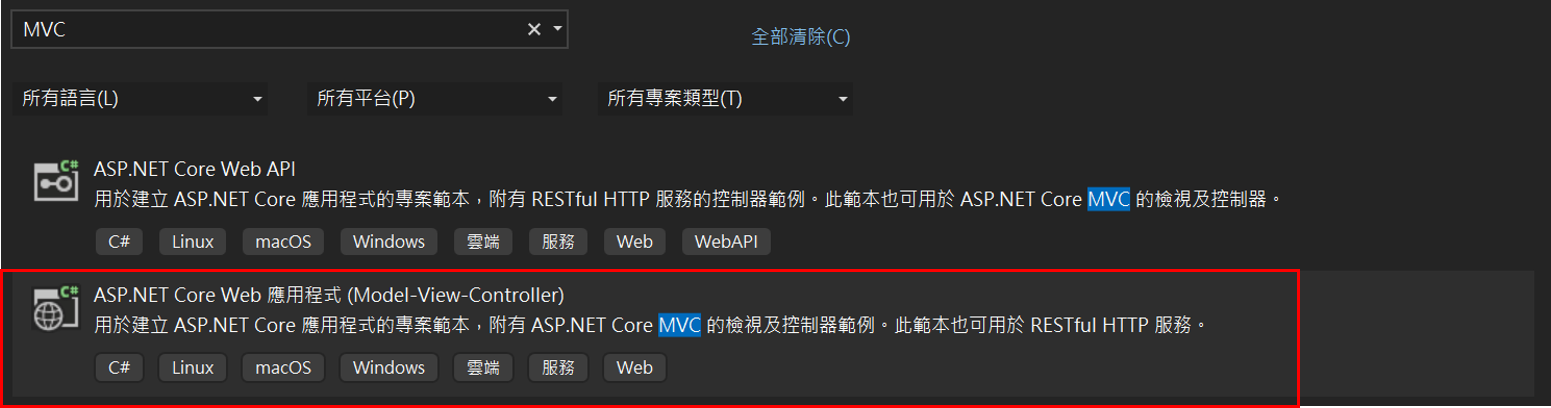
ASP.NET專案,建立Dto
新增ASP.NET專案
新增傳案

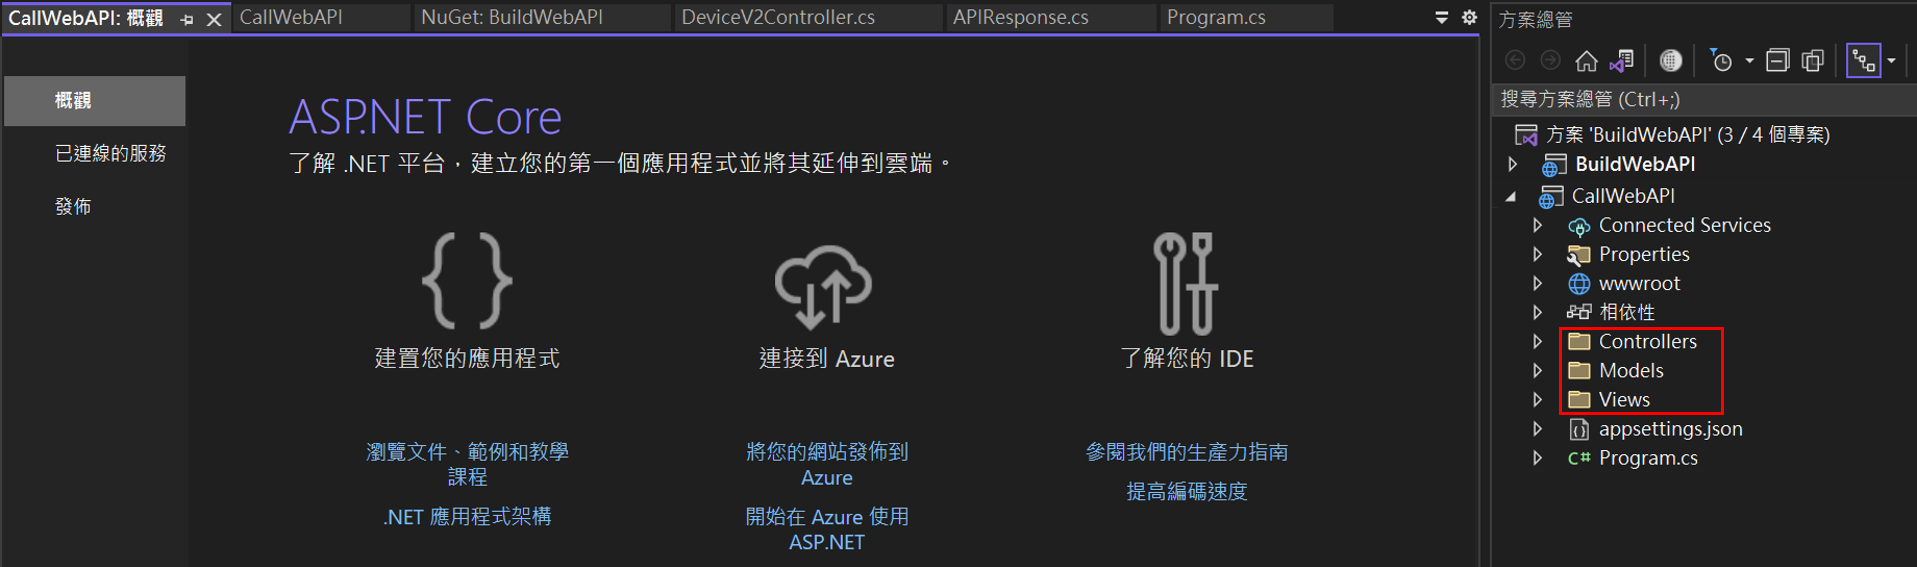
建好後,順帶將DTO跟APIResponse 複製到專案中,調用時API,這些都是一定會用到的東西
因為是DEMO所以直接COPY比較快,
建立登入系統的Dto
1
2
3
4
5
6
7
8
9
10
11
12
13
14
15
16
17
18
19
20
21
22
23
24
25
26
27
28
29
//LoginRequestDTO.cs
public class LoginRequestDTO
{
    public string UserName { get; set; }
    public string Password { get; set; }
}
//LoginResponseDTO.cs
public class LoginResponseDTO
{
    public UserDTO User { get; set; }
    public string Token { get; set; }
}
//RegisterRequestDTO.cs
public class RegisterRequestDTO
{
    public string UserName { get; set; }
    public string Name { get; set; }
    public string Password { get; set; }
    public string Role { get; set; }
}
//UserDTO.cs
public class UserDTO
{
    public int id { get; set; }
    public string UserName { get; set; }
    public string Name { get; set; }
    public string Password { get; set; }
    public string Role { get; set; }
}
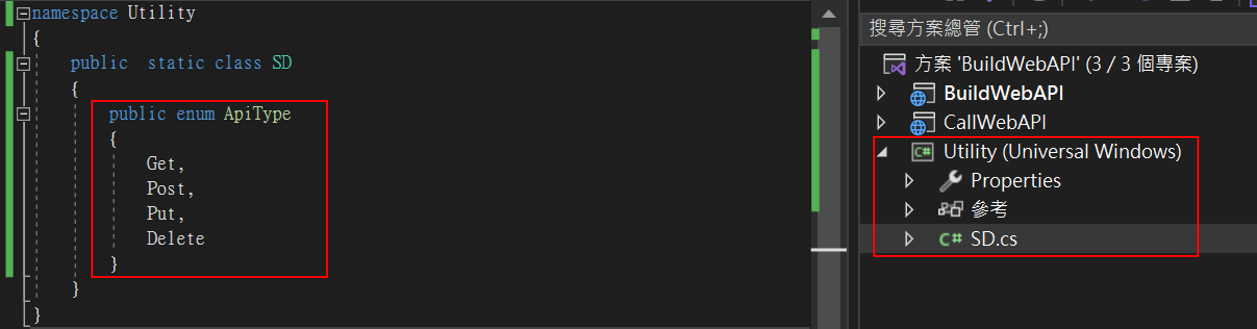
建立調用Https的enum
可以新增共用類別的Dll,將enum放進裡面
1
2
3
4
5
6
7
8
9
10
11
public static class SD
{
    public enum ApiType
    {
        Get,
        Post,
        Put,
        Delete
    }
    public static string TokenSession = "JWTToken";
}
建立標準API請求類型
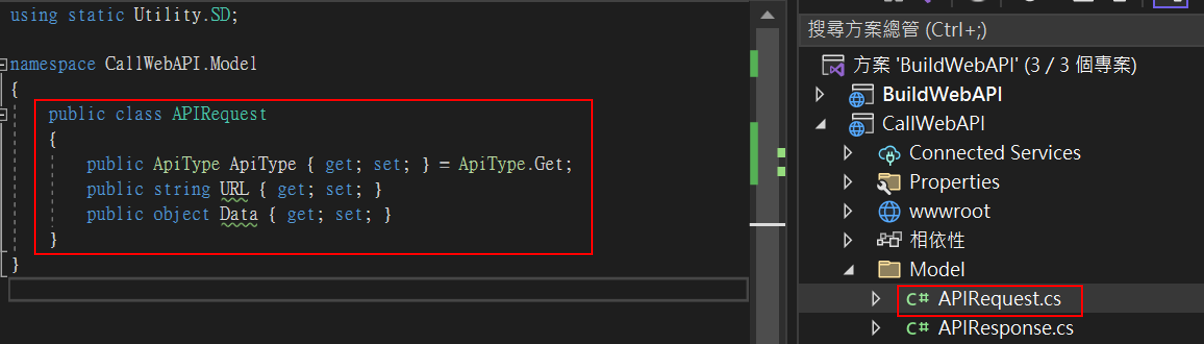
1
2
3
4
5
6
7
public class APIRequest
{
    public ApiType ApiType { get; set; } = ApiType.Get;
    public string URL { get; set; }
    public object Data { get; set; }
    public string Token { get; set; }
}
建立標準API回傳類型
1
2
3
4
5
6
7
public class APIResponse
{
    public HttpStatusCode HttpStatusCode { get; set; }
    public bool IsSuccess { get; set; } = true;
    public IEnumerable<string> ErrMessage { get; set; }
    public object Result { get; set; }
}
安裝Newtonsoft.Json
1
NuGet\Install-Package Newtonsoft.Json -Version 13.0.2
ASP.NET專案,建立API Service
建立通用API Service
先建立Services資料夾,結構長這樣
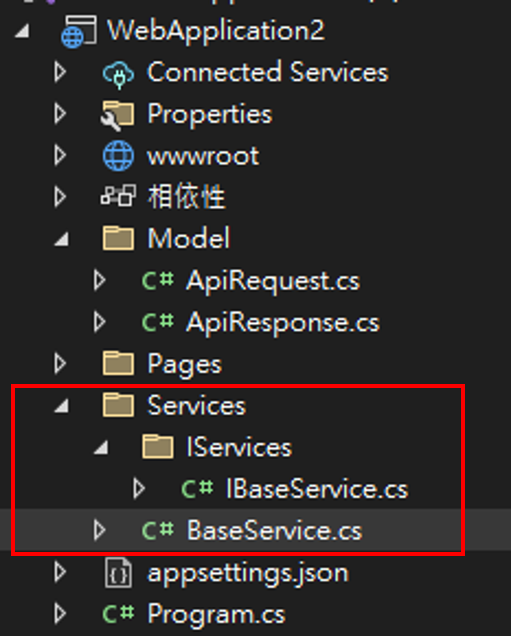 IBaseService.cs
1
2
3
4
5
public interface IBaseService
{
    APIRequest apiRequest { get; set; }
    Task<T> SendAsync<T>(APIRequest apiRequest);
}
BaseService.cs
1
2
3
4
5
6
7
8
9
10
11
12
13
14
15
16
17
18
19
20
21
22
23
24
25
26
27
28
29
30
31
32
33
34
35
36
37
38
39
40
41
42
43
44
45
46
47
48
49
50
51
52
53
54
55
56
57
58
59
60
61
62
public class BaseService : IBaseService
{

    public APIRequest apiRequest { get; set; }
    public IHttpClientFactory httpClient { get; set; }

    public BaseService(IHttpClientFactory httpClient)
    {
        this.apiRequest = new APIRequest();
        this.httpClient = httpClient;
    }

    public async Task<T> SendAsync<T>(APIRequest apiRequest)
    {
        try
        {
            var client = httpClient.CreateClient("API");
            HttpRequestMessage message = new HttpRequestMessage();
            message.Headers.Add("Accept", "application/json");
            message.RequestUri = new Uri(apiRequest.URL);
            if (apiRequest.Data != null)
            {
                message.Content = new StringContent(JsonConvert.SerializeObject(apiRequest.Data), Encoding.UTF8, "application/json");
            }
            switch (apiRequest.ApiType)
            {
                case ApiType.Get:
                    message.Method = HttpMethod.Get;
                    break;
                case ApiType.Post:
                    message.Method = HttpMethod.Post;
                    break;
                case ApiType.Put:
                    message.Method = HttpMethod.Put;
                    break;
                case ApiType.Delete:
                    message.Method = HttpMethod.Delete;
                    break;
            }
            HttpResponseMessage apiResponse = null;
            if (!string.IsNullOrEmpty(apiRequest.Token))
            {
                client.DefaultRequestHeaders.Authorization = new System.Net.Http.Headers.AuthenticationHeaderValue("Bearer",apiRequest.Token);
            }
            apiResponse = await client.SendAsync(message);
            var apiContent = await apiResponse.Content.ReadAsStringAsync();
            var APIResponse = JsonConvert.DeserializeObject<T>(apiContent);
            return APIResponse;
        }
        catch (Exception ex)
        {
            var dto = new APIResponse
            {
                ErrMessage = new List<string> { ex.Message.ToString() },
                IsSuccess = false
            };
            var res = JsonConvert.SerializeObject(dto);
            var APIResponse = JsonConvert.DeserializeObject<T>(res);
            return APIResponse;
        }
    }
}
建立商業邏輯API Service
如下
1
2
3
4
5
6
7
8
9
10
11
12
13
14
15
16
17
18
19
20
21
22
23
24
25
26
//CreatDevicesDto.cs
public class CreatDevicesDto
{
    public int Id { get; set; }
    public int DeviceTypeId { get; set; } //設備類型
    public string ItemName { get; set; } //設備品名
    public string ItemDescription { get; set; } //物品描述
}
//UpdataDevicesDto.cs
public class UpdataDevicesDto
{
    public int Id { get; set; }
    public string PCName { get; set; } //電腦名稱
    public string AssetId { get; set; } //設備編號
}
//DevicesDto.cs
public class DevicesDto
{
    public string AssetId { get; set; }// 財產編號
    public string ItemName { get; set; }// 描述
    public string ItemDescription { get; set; }// 部門
    public string DepartmentId { get; set; }// 部門ID
    public string Department { get; set; }// 部門
    public string Borrower { get; set; }//借用人工號
    public string BorrowerName { get; set; }//借用人姓名
}
建立商業邏輯API Service
建立操作資料庫CRUD相關的Service
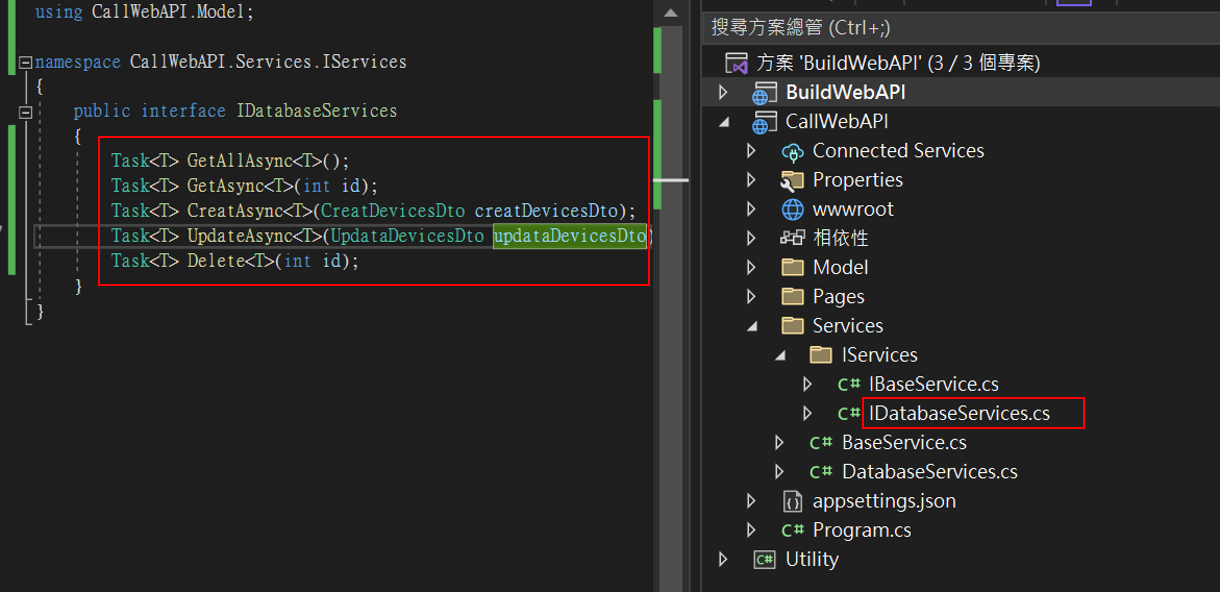
建立interface,因為需要傳入token進行驗證,所以會多個傳入token的參數
備註:下面參數中的CreatDevicesDto與UpdataDevicesDto 要根據API自行替換成其他參數
1
2
3
4
5
6
7
8
9
public interface IDatabaseServices
{
    Task<T> GetAllAsync<T>(string token);
    Task<T> GetAsync<T>(string id, string token);
    Task<T> CreatAsync<T>(CreatDevicesDto creatDevicesDto, string token);
    Task<T> UpdateAsync<T>(UpdataDevicesDto updataDevicesDto, string token);
    Task<T> Delete<T>(int id, string token);

}
實現Class 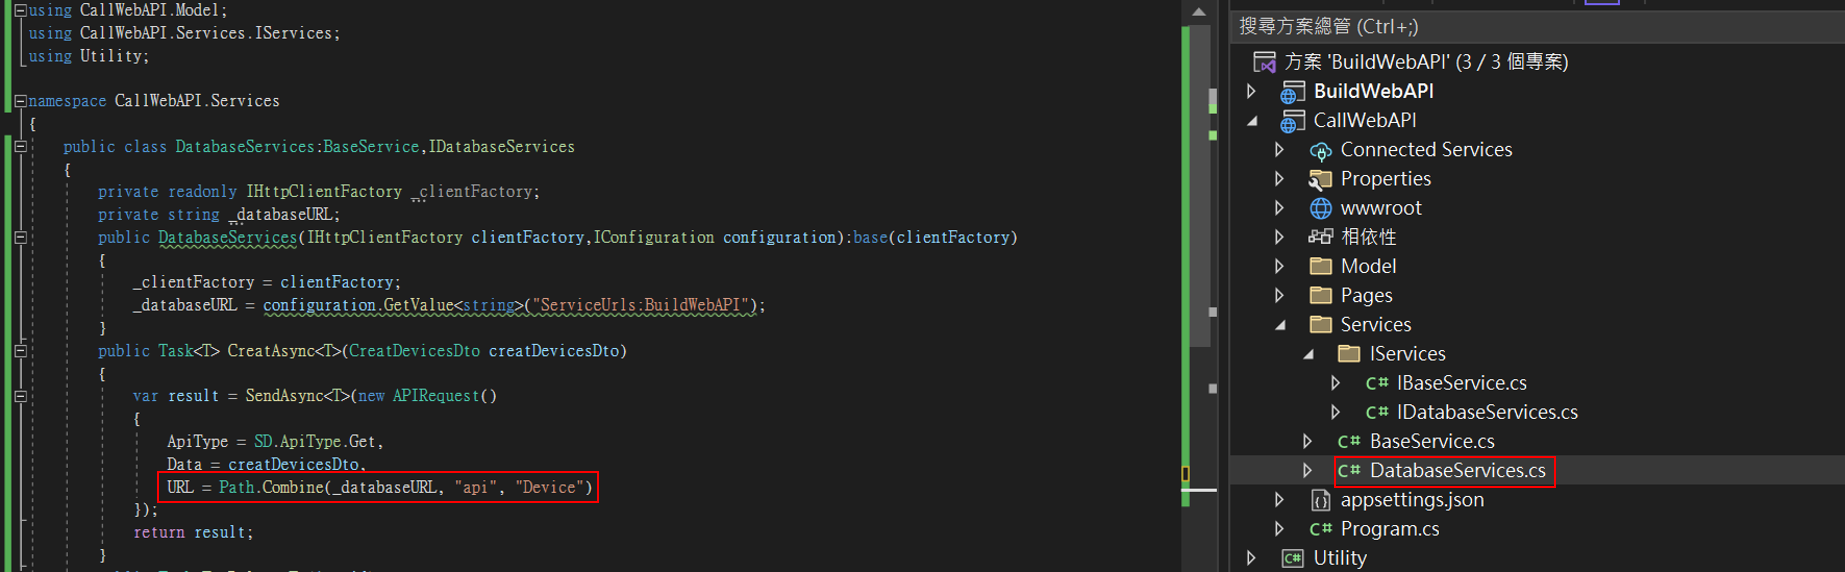
1
2
3
4
5
6
7
8
9
10
11
12
13
14
15
16
17
18
19
20
21
22
23
24
25
26
27
28
29
30
31
32
33
34
35
36
37
38
39
40
41
42
43
44
45
46
47
48
49
50
51
52
53
54
55
56
57
public class DatabaseServices:BaseService,IDatabaseServices
{
private readonly IHttpClientFactory _clientFactory;
private string _databaseURL;
public DatabaseServices(IHttpClientFactory clientFactory,IConfiguration configuration):base(clientFactory)
{
_clientFactory = clientFactory;
_databaseURL = configuration.GetValue<string>("ServiceUrls:BuildWebAPI");
}
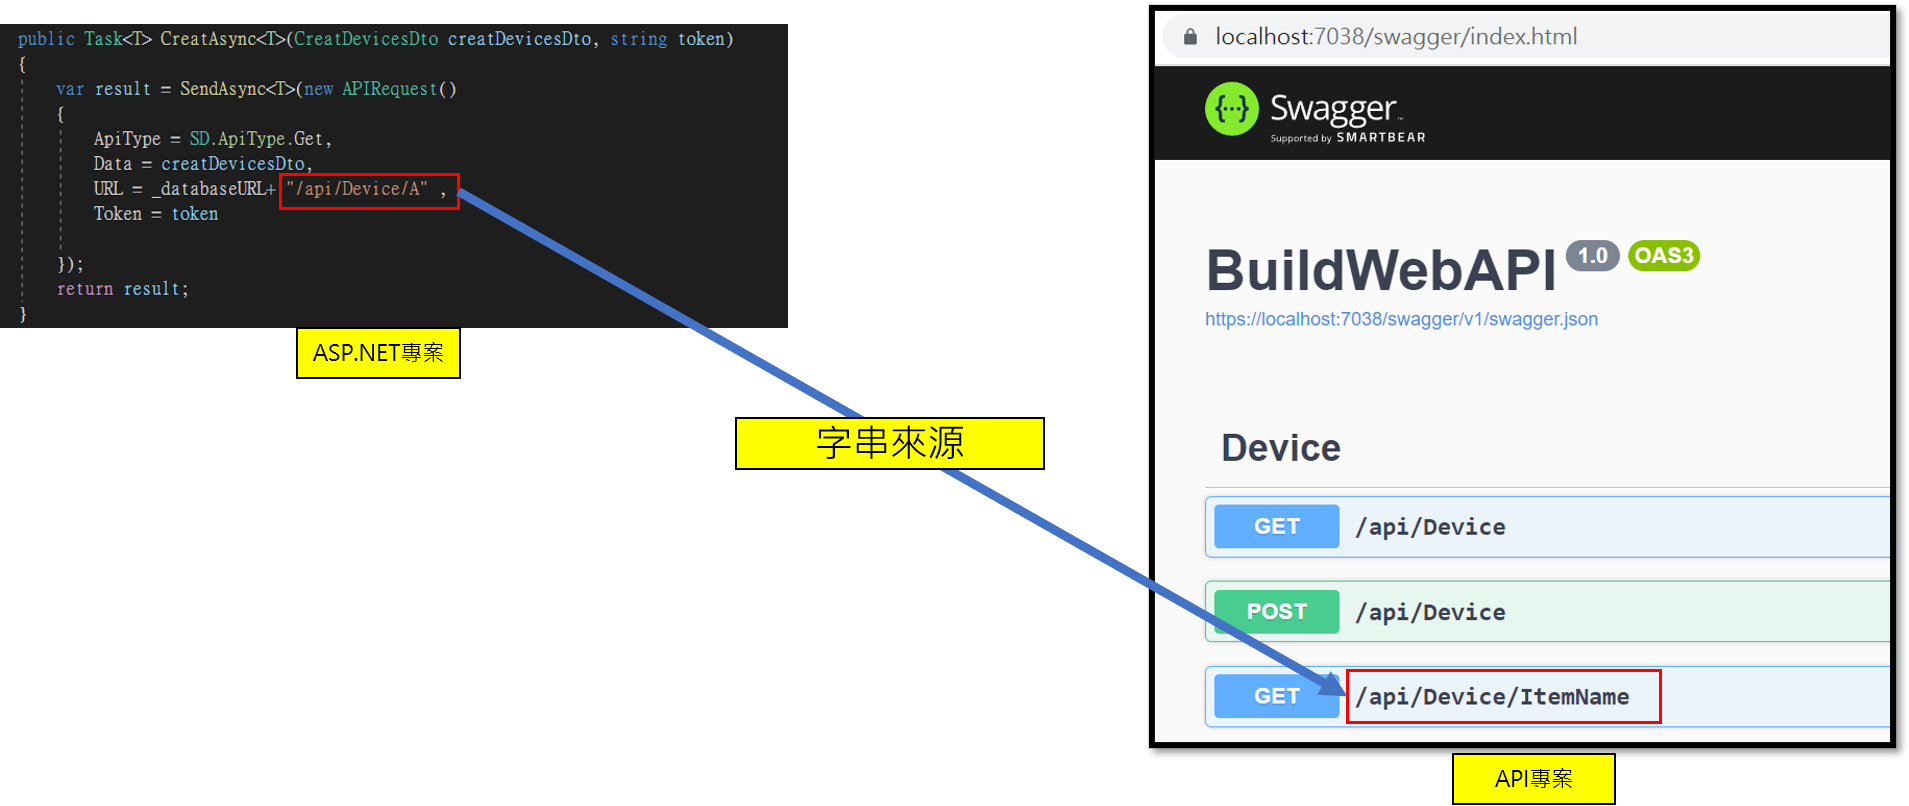
public Task<T> CreatAsync<T>(CreatDevicesDto creatDevicesDto, string token)
{
var result = SendAsync<T>(new APIRequest()
{
ApiType = SD.ApiType.Get,
Data = creatDevicesDto,
URL = _databaseURL+ "/api/Device/A" ,
Token = token
});
return result;
}
public Task<T> Delete<T>(int id, string token)
{
throw new NotImplementedException();
}
public Task<T> GetAllAsync<T>(string token)
{
var result = SendAsync<T>(new APIRequest()
{
ApiType = SD.ApiType.Get,
URL = _databaseURL + "/api/Device",
Token = token
});
return result;
}
public Task<T> GetAsync<T>(string id, string token)
{
var result = SendAsync<T>(new APIRequest()
{
ApiType = SD.ApiType.Get,
URL = _databaseURL + $"/api/Device/ItemName?ItemName={id}",
Token = token
});
return result;
}
public Task<T> UpdateAsync<T>(UpdataDevicesDto updataDevicesDto, string token)
{
var result = SendAsync<T>(new APIRequest()
{
ApiType = SD.ApiType.Put,
Data = updataDevicesDto,
URL = Path.Combine(_databaseURL, "api", "Device"),
Token = token
});
return result;
}
}
補充說明:字串來源要客製化維護
注入DI:商業邏輯Services
如下
1
builder.Services.AddScoped<IDatabaseServices, DatabaseServices>();
建立驗證身分的Service

1
2
3
4
5
6
7
8
9
10
11
12
13
14
15
16
17
18
19
20
21
22
23
24
25
26
27
28
29
30
31
public interface IAuthService
{
Task<T> LoginAsync<T>(LoginRequestDTO loginRequestDTO);
Task<T> RegisterAsync<T>(RegisterRequestDTO registerRequestDTO);
}
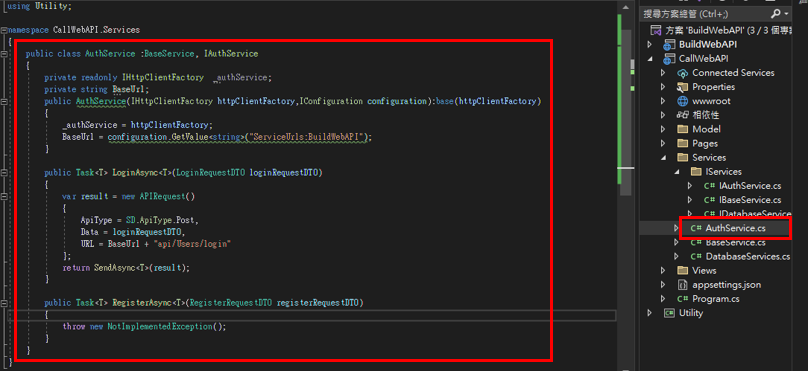
public class AuthService :BaseService, IAuthService
{
private readonly IHttpClientFactory _authService;
private string BaseUrl;
public AuthService(IHttpClientFactory httpClientFactory,IConfiguration configuration):base(httpClientFactory)
{
_authService = httpClientFactory;
BaseUrl = configuration.GetValue<string>("ServiceUrls:BuildWebAPI");
}
public Task<T> LoginAsync<T>(LoginRequestDTO loginRequestDTO)
{
var result = new APIRequest()
{
ApiType = SD.ApiType.Post,
Data = loginRequestDTO,
URL = BaseUrl + "/api/Users/login"
};
return SendAsync<T>(result);
}
public Task<T> RegisterAsync<T>(RegisterRequestDTO registerRequestDTO)
{
throw new NotImplementedException();
}
}
注入DI:驗證身分的Services
如下
1
2
builder.Services.AddHttpClient<IAuthService, AuthService>();
builder.Services.AddScoped<IAuthService, AuthService>();
ASP.NET專案,建立Controller與Razor
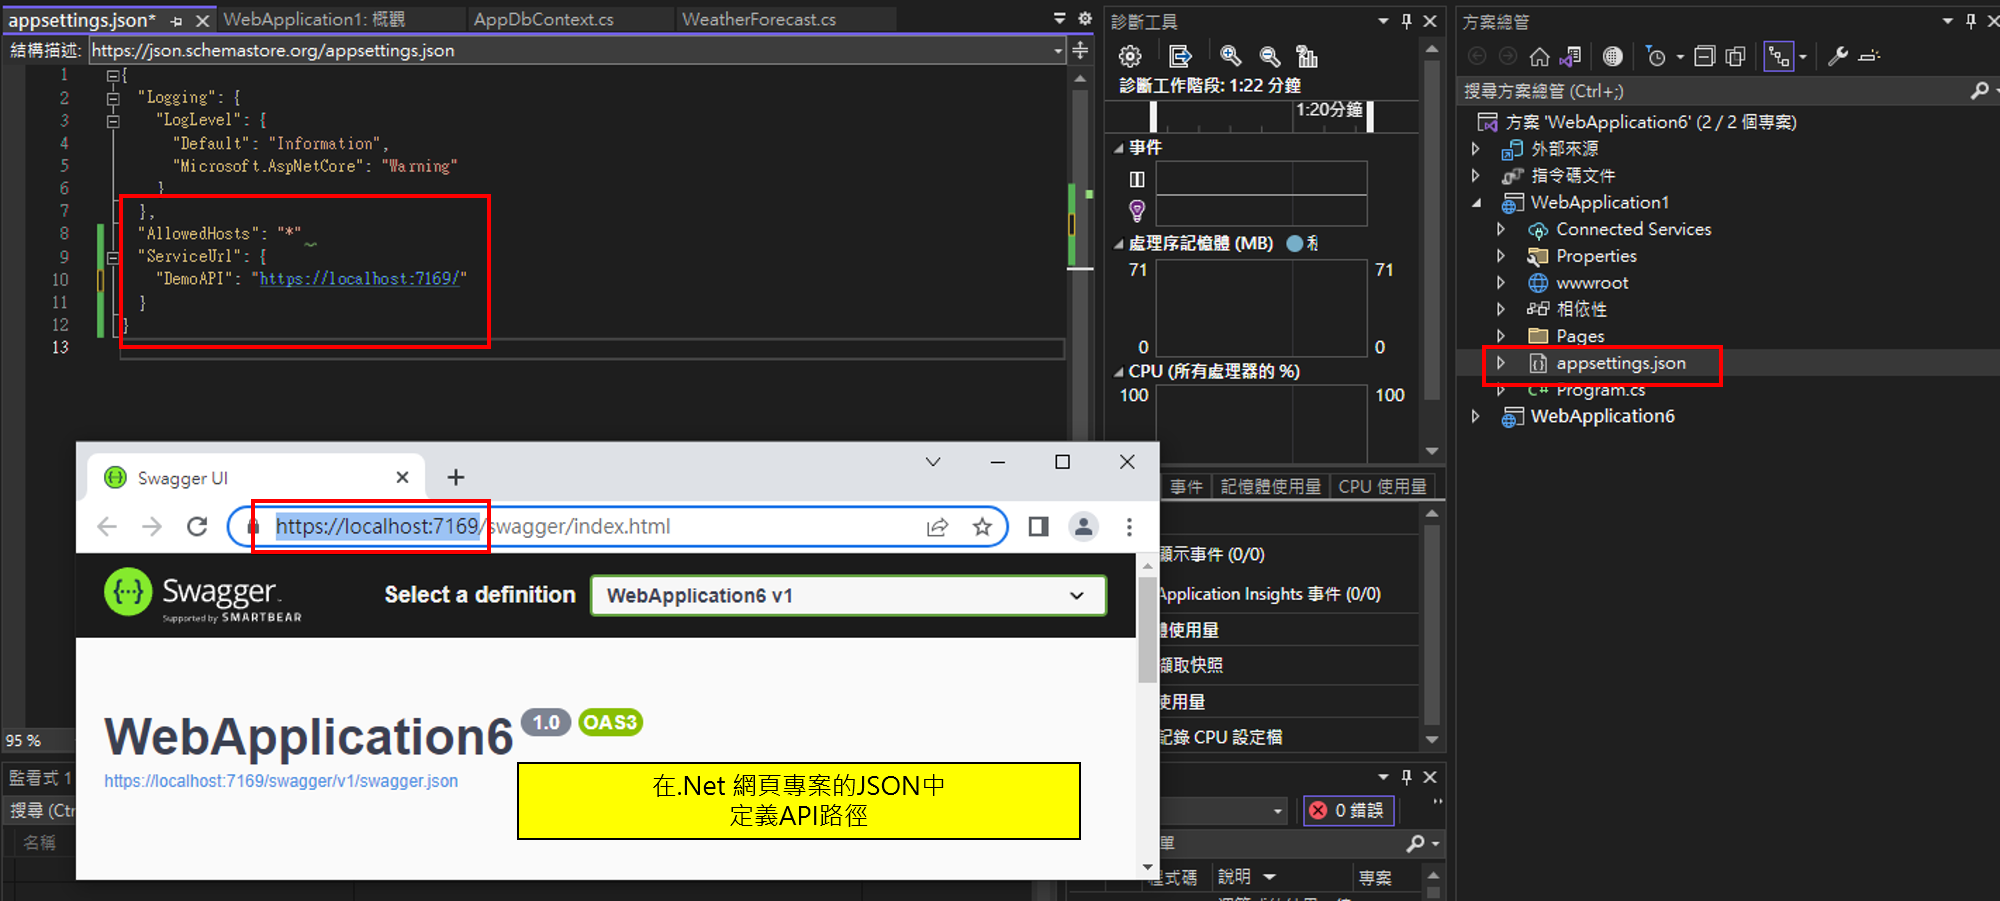
在appsettings.json定義要用的API網址
首先需要在ASP.NET網頁專案的JSON中,定義要使用的API的網址
1
2
3
"ServiceUrls": {
  "BuildWebAPI": "https://localhost:7038"
},
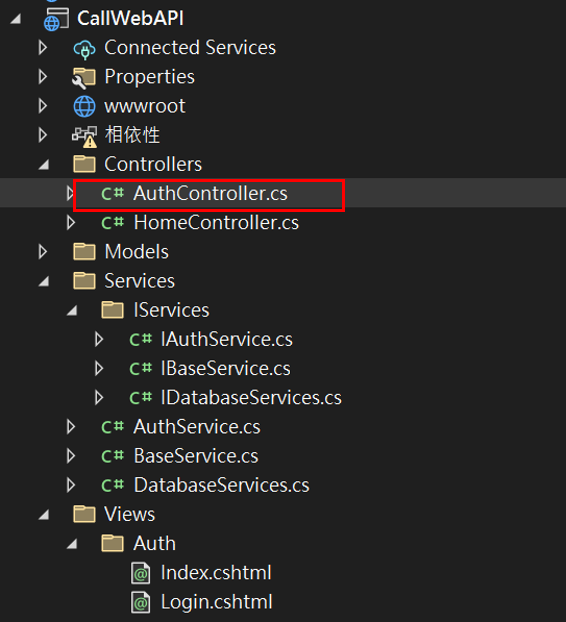
建立驗證身分的Controller
備註1:如果API跟ASP在同個方案總管底下,記得要同時啟動專案
備註2:Program.cs記得追加DI注入
1
2
3
4
builder.Services.AddControllersWithViews();
builder.Services.AddHttpClient<IAuthService, AuthService>();
builder.Services.AddScoped<IAuthService, AuthService>();
var app = builder.Build();
1
2
3
4
5
6
7
8
9
10
11
12
13
14
15
16
17
18
19
20
21
22
23
24
25
26
27
28
29
30
31
32
33
34
35
36
37
38
39
40
41
42
43
44
45
46
47
48
49
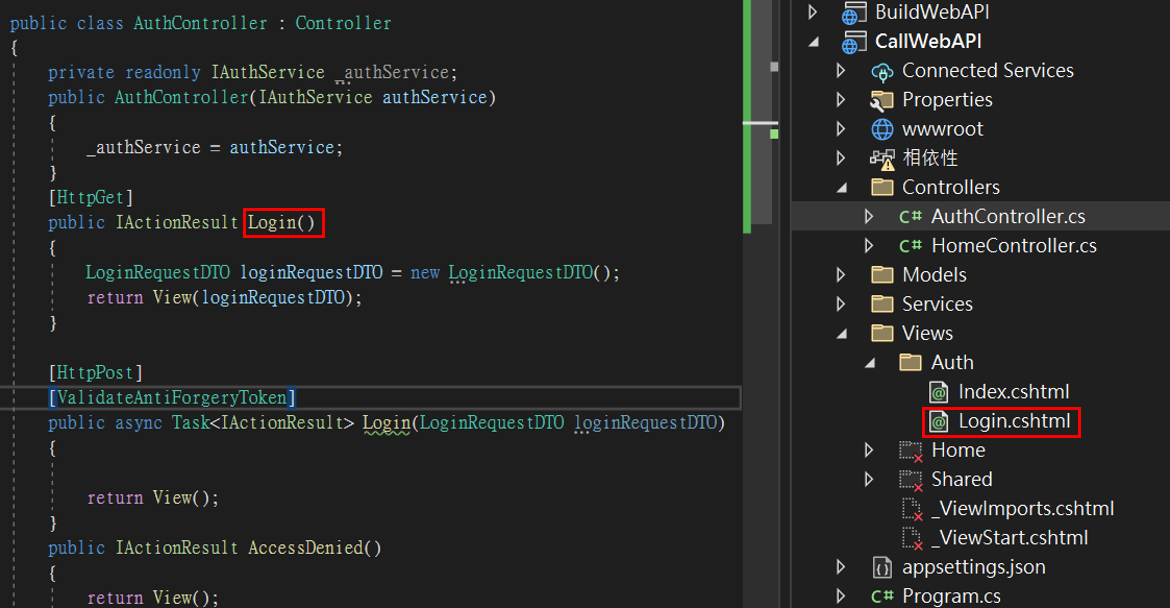
public class AuthController : Controller
{
private readonly IAuthService _authService;
public AuthController(IAuthService authService)
{
_authService = authService;
}
public IActionResult Index()
{
return View();
}
[HttpGet]
public IActionResult Login()
{
LoginRequestDTO loginRequestDTO = new LoginRequestDTO();
return View(loginRequestDTO);
}
[HttpPost]
[ValidateAntiForgeryToken]
public async Task<IActionResult> Login(LoginRequestDTO loginRequestDTO)
{
APIResponse Response = await _authService.LoginAsync<APIResponse>(loginRequestDTO);
if (Response != null && Response.IsSuccess == true)
{
LoginResponseDTO model = JsonConvert.DeserializeObject<LoginResponseDTO>($"{Response.Result}");
var identity = new ClaimsIdentity(CookieAuthenticationDefaults.AuthenticationScheme);
identity.AddClaim(new Claim(ClaimTypes.Name, model.User.UserName));
identity.AddClaim(new Claim(ClaimTypes.Name, model.User.Role));
var principal = new ClaimsPrincipal(identity);
await HttpContext.SignInAsync(CookieAuthenticationDefaults.AuthenticationScheme, principal);
HttpContext.Session.SetString(SD.TokenSession, model.Token);
return RedirectToAction("Index","Home");
}
return View();
}
public async Task<IActionResult> Logout()
{
await HttpContext.SignOutAsync();
HttpContext.Session.SetString(SD.TokenSession,string.Empty);
return RedirectToAction("Index", "Home");
}
public IActionResult AccessDenied()
{
return View();
}
}
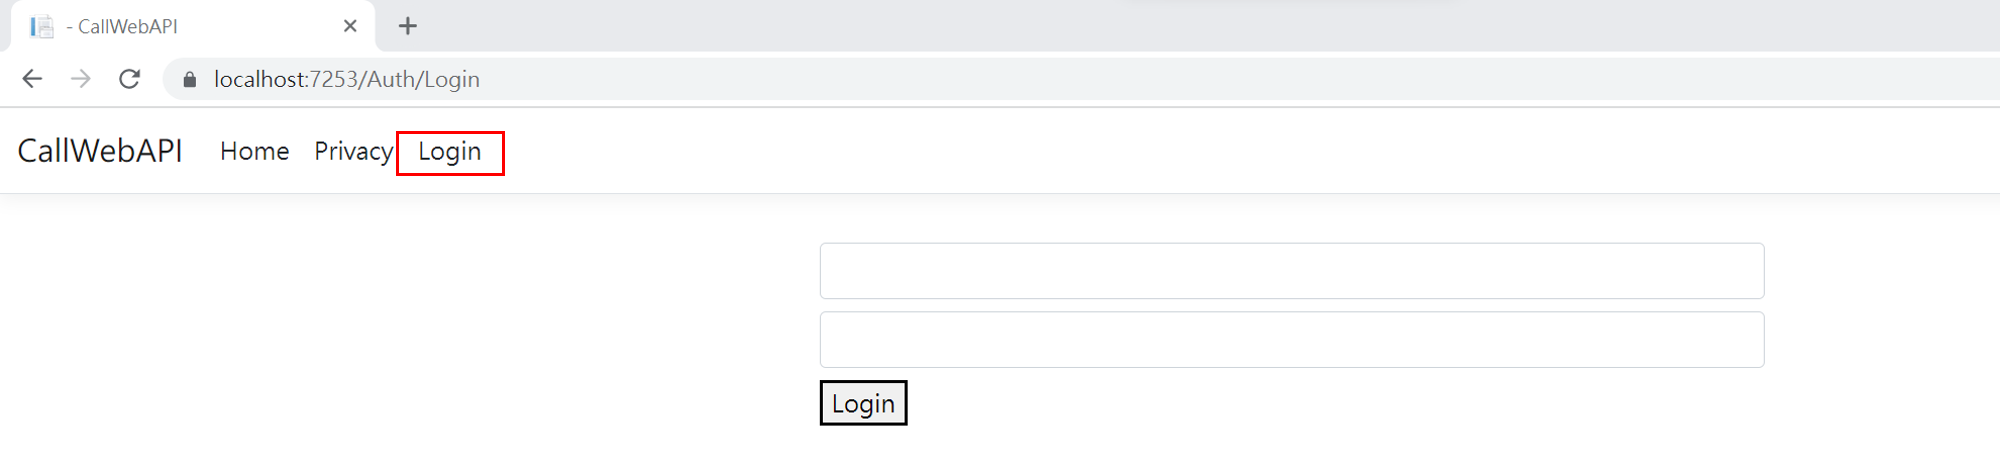
建立驗證身分的Login頁面
1
2
3
4
5
6
7
8
9
10
11
12
13
14
15
16
17
18
19
20
21
22
23
24
25
26
27
28
@model CallWebAPI.Model.LoginRequestDTO

<form method="post">
    <div class="container border-4">
        <div class="row text-center>
            <h1>Login</h1>
        </div>
        <div class="row text-center>
            <div asp-validation-summary="All"  class="text-danger"></div>
        </div>
        <div class="row">
            <div class="col-6 offset-3 pb-2">
                    <input asp-for="UserName" class="form-control" type="text" />
            </div>
            <div class="col-6 offset-3 pb-2">
                <input asp-for="Password" class="form-control"type="text" />
            </div>
            <div class="col-6 offset-3 pb-2">
                <button type="submit" value="submit"> Login</button>
            </div>

        </div>
    </div>
</form>

@section Scripts{
<partial name="_ValidationScriptsPartial">
}
建立商業邏輯Controller
如下
1
2
3
4
5
6
7
8
9
10
11
12
13
14
15
16
17
18
19
20
21
22
public class DatabaseController : Controller
{
    private IDatabaseServices _databaseServices;
    public DatabaseController(IDatabaseServices databaseServices)
    {
        _databaseServices = databaseServices;
    }
    public IActionResult Index()
    {
        return View();
    }
    public async Task<IActionResult> IndexDB()
    {
        List<DevicesDto> list = new List<DevicesDto>();
        var response = await _databaseServices.GetAllAsync<APIResponse>( HttpContext.Session.GetString(SD.TokenSession));
        if (response != null && response.IsSuccess)
        {
            list = JsonConvert.DeserializeObject<List<DevicesDto>>($"{response.Result}");
        }
        return View(list);
    }
}
建立商業邏輯頁面
如下
1
2
3
4
5
6
7
8
9
10
11
12
13
14
15
16
17
18
19
20
21
22
23
@model IEnumerable<CallWebAPI.Model.DevicesDto>
<table class="table">
    <thead>
        <tr>
            <th>
                ItemName
            </th>
            <th>
                AssetId
            </th>
        </tr>
    </thead>
    <tbody>
        @foreach (var item in Model)
        {
        <tr>
            <td>@item.ItemName</td>
            <td>@item.AssetId</td>
        </tr>

            }
    </tbody>
</table>
建立SessionToken字串
如下
1
public static string TokenSession = "JWTToken";
上方Menu追加Login與Logout
設定Layout_
1
2
3
4
5
6
7
8
9
10
11
12
13
14
15
16
17
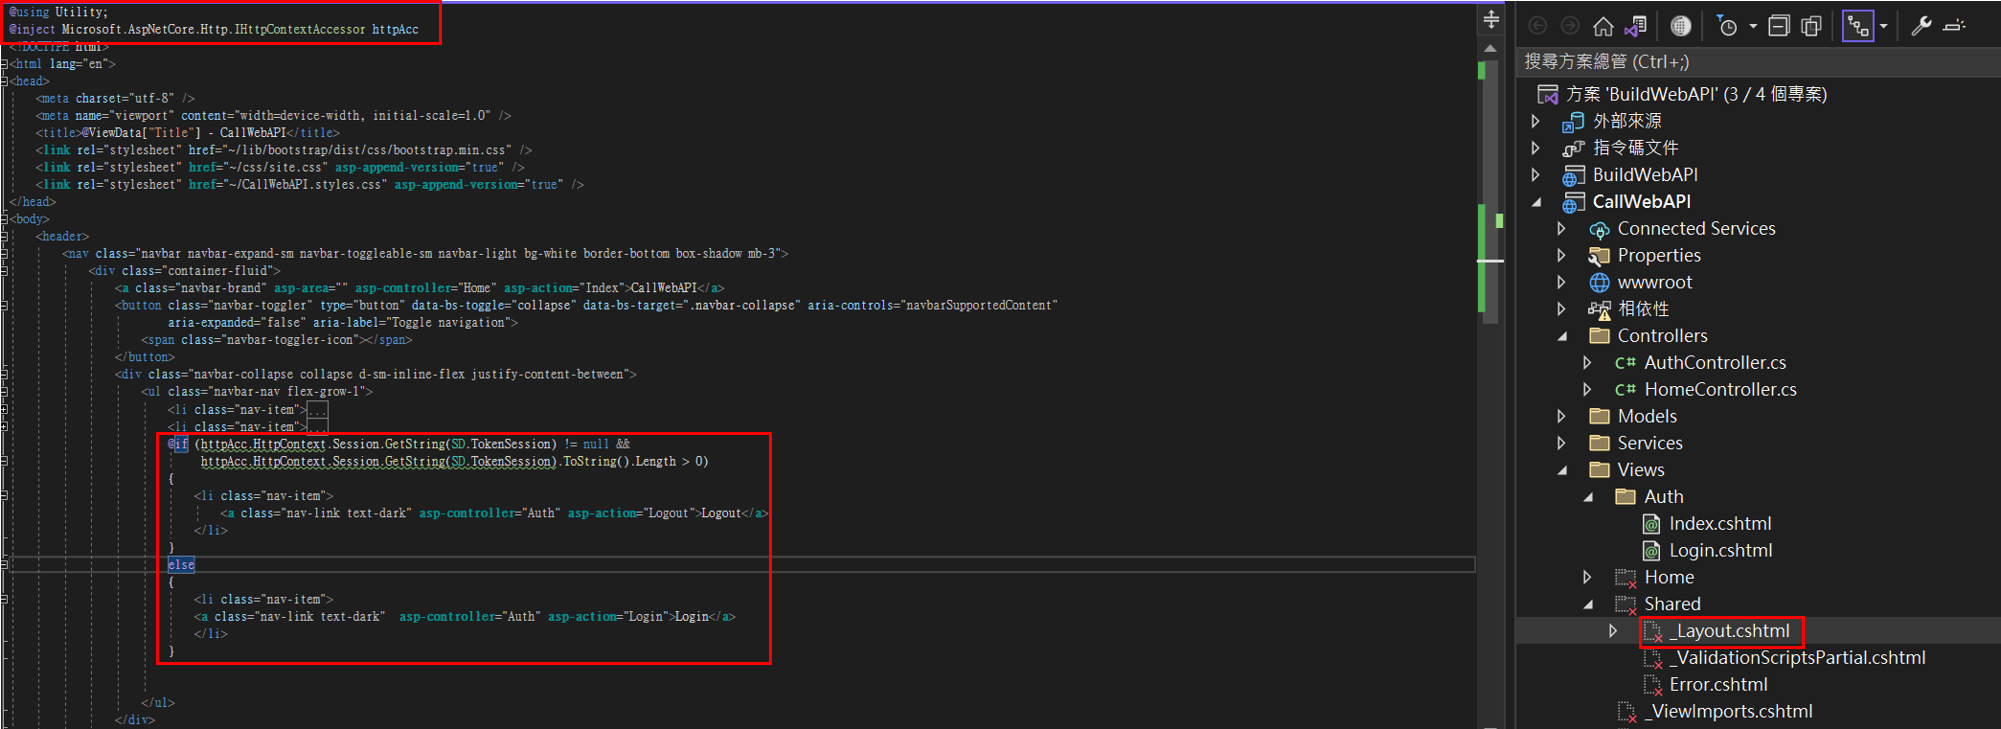
@using Utility;
@inject Microsoft.AspNetCore.Http.IHttpContextAccessor httpAcc
@if (httpAcc.HttpContext.Session.GetString(SD.TokenSession) != null &&
httpAcc.HttpContext.Session.GetString(SD.TokenSession).ToString().Length > 0)
{
<li class="nav-item">
<a class="nav-link text-dark" asp-controller="Auth" asp-action="Logout">Logout</a>
</li>
}
else
{
<li class="nav-item">
<a class="nav-link text-dark" asp-controller="Auth" asp-action="Login">Login</a>
</li>
}
加入DI

1
builder.Services.AddSingleton<IHttpContextAccessor, HttpContextAccessor>();
為了避免Token短期重複產生,需要的設定Cookie驗證
1
2
3
4
5
6
7
8
9
10
11
12
13
builder.Services.AddAuthentication(CookieAuthenticationDefaults.AuthenticationScheme).AddCookie(c => {
c.Cookie.HttpOnly= true;
    c.ExpireTimeSpan=TimeSpan.FromMinutes(5);
    c.SlidingExpiration = true;
    c.LoginPath = "/Auth/Login";//根據驗證身分的網址變更
});
builder.Services.AddSession(c => {
    c.IdleTimeout=TimeSpan.FromMinutes(5);
    c.Cookie.HttpOnly= true;
    c.Cookie.IsEssential = true;
});

app.UseSession();
將Web專案產生的Token回傳
將APIRequest補上Token string
將Service補上Token參數

1
2
3
4
5
6
7
8
public interface IDatabaseServices
{
    Task<T> GetAllAsync<T>(string token);
    Task<T> GetAsync<T>(int id, string token);
    Task<T> CreatAsync<T>(CreatDevicesDto creatDevicesDto, string token);
    Task<T> UpdateAsync<T>(UpdataDevicesDto updataDevicesDto, string token);
    Task<T> Delete<T>(int id, string token);
}
API與版本控制
安裝套件
Microsoft.AspNetCore.Mvc.Versioning

1
NuGet\Install-Package Microsoft.AspNetCore.Mvc.Versioning -Version 5.0.0
Microsoft.AspNetCore.Mvc.Versioning.ApiExplorer

1
NuGet\Install-Package Microsoft.AspNetCore.Mvc.Versioning.ApiExplorer -Version 5.0.0
API的Program添加Servers設定

1
2
3
4
builder.Services.AddApiVersioning(c => {
    c.AssumeDefaultVersionWhenUnspecified = true; //預設版本啟動
    c.DefaultApiVersion = new Microsoft.AspNetCore.Mvc.ApiVersion(1,0);//設定次要版本
});
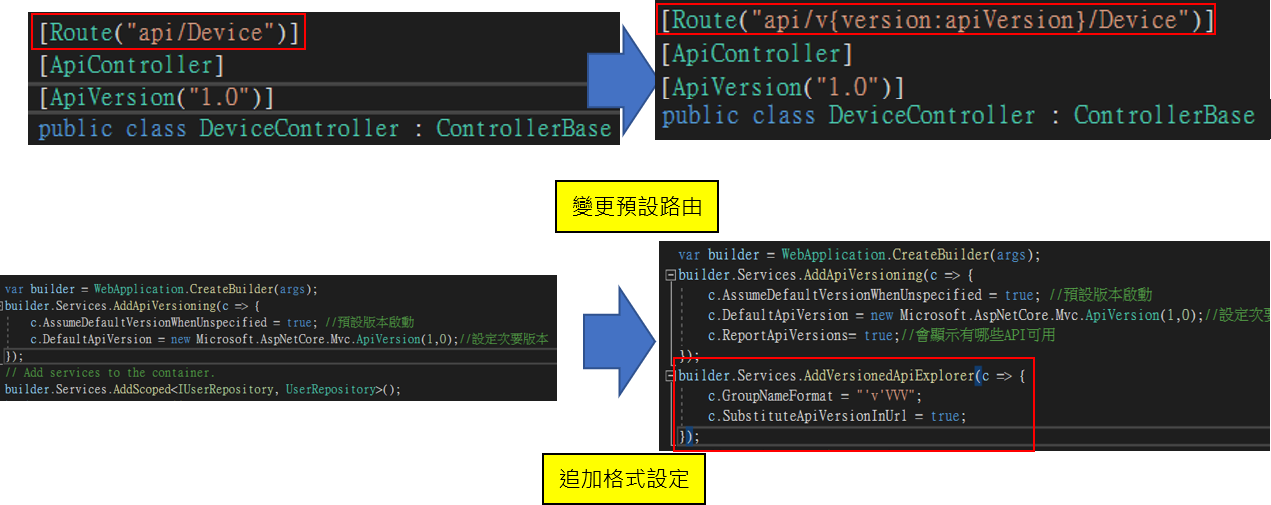
1
2
3
4
builder.Services.AddVersionedApiExplorer(c => {
    c.GroupNameFormat = "'v'VVV";
    c.SubstituteApiVersionInUrl = true;
});
Route
1
[Route("api/v{version:apiVersion}/Device")]
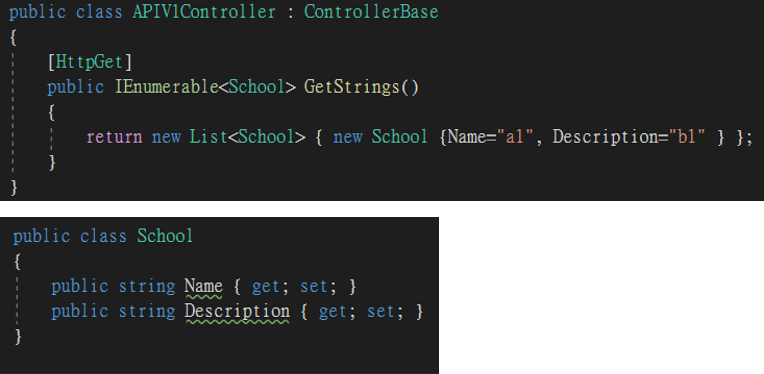
備註1:設計測試用的API的時候記得要用IEnumerable包住Class回傳,例如附圖這樣
備註2:安裝完套件之後,上面可以Copy的語法都要添加完畢,才能正常啟動API,備註1的方式在沒有使用版控API套件的情況下能正常運作
Controller添加版本描述
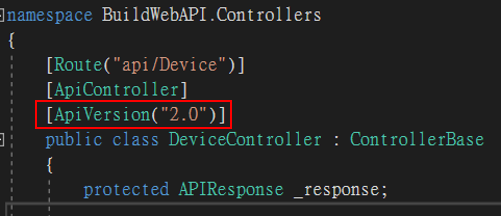
1
[ApiVersion("2.0")]
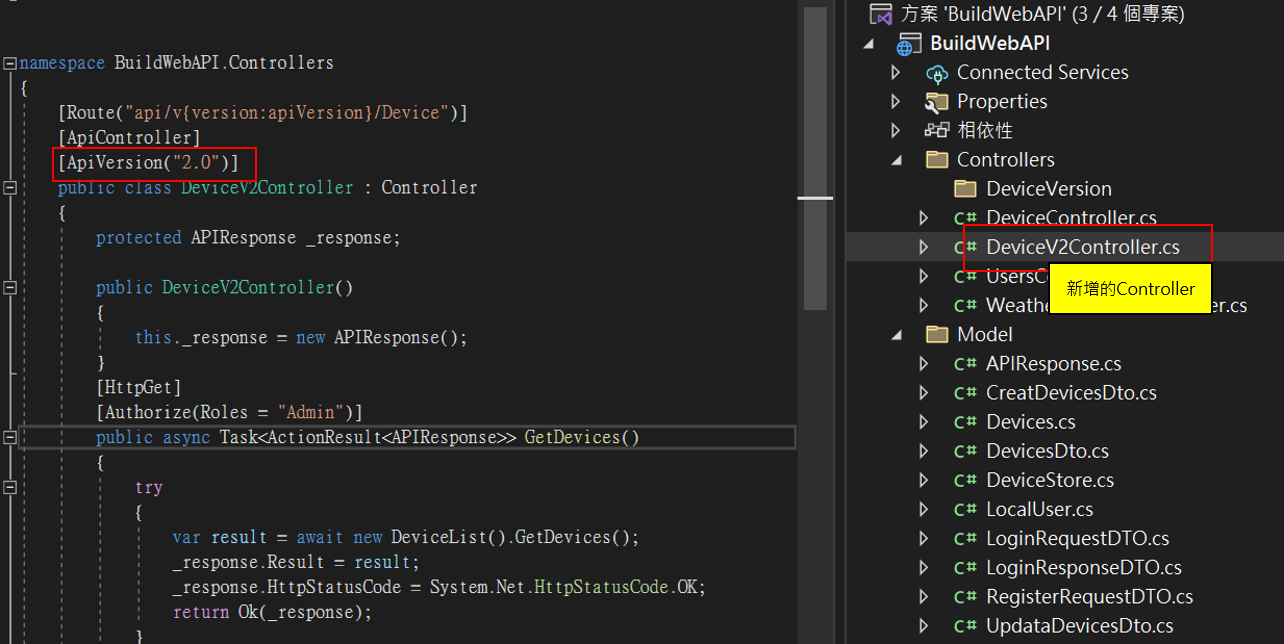
APIController多版本控制
建立一個新的Controller,並設定其為新版本
格式設定補充說明
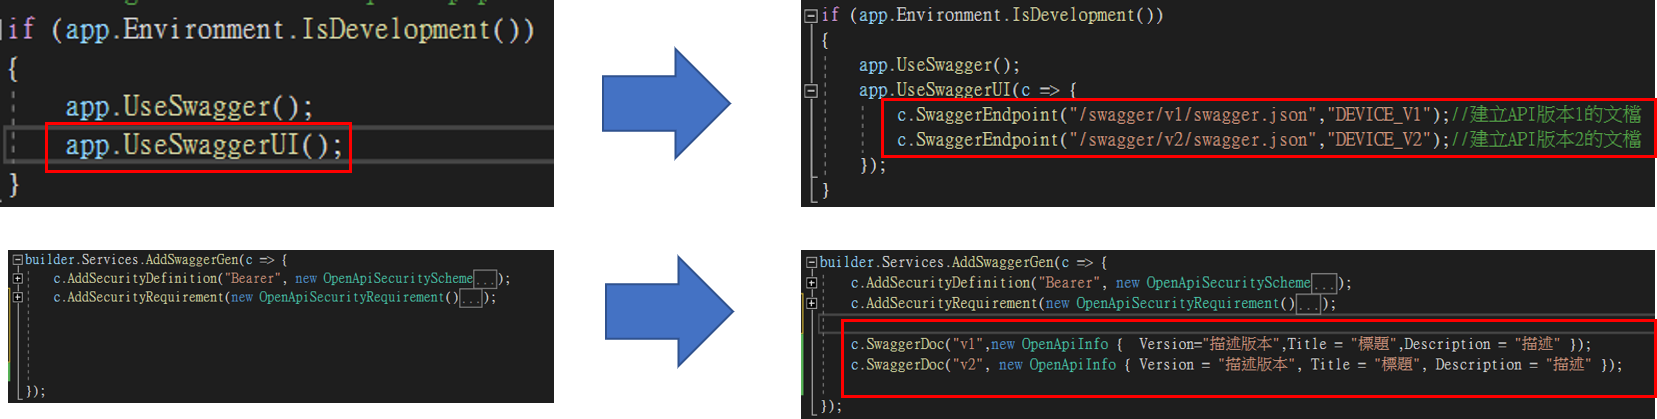
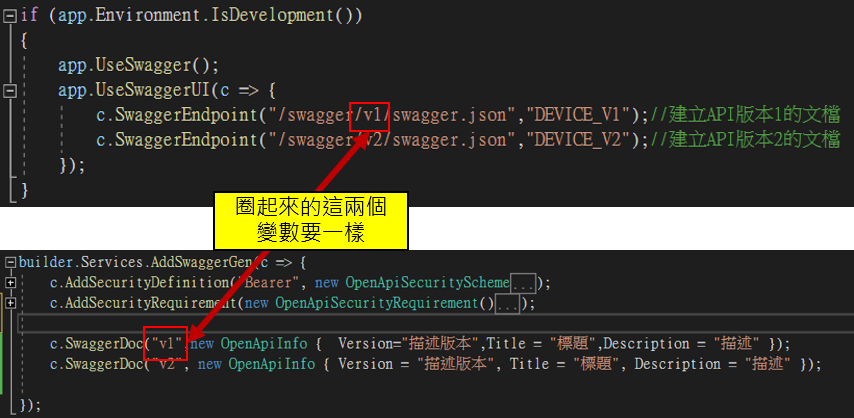
添加不同API版本的描述文檔
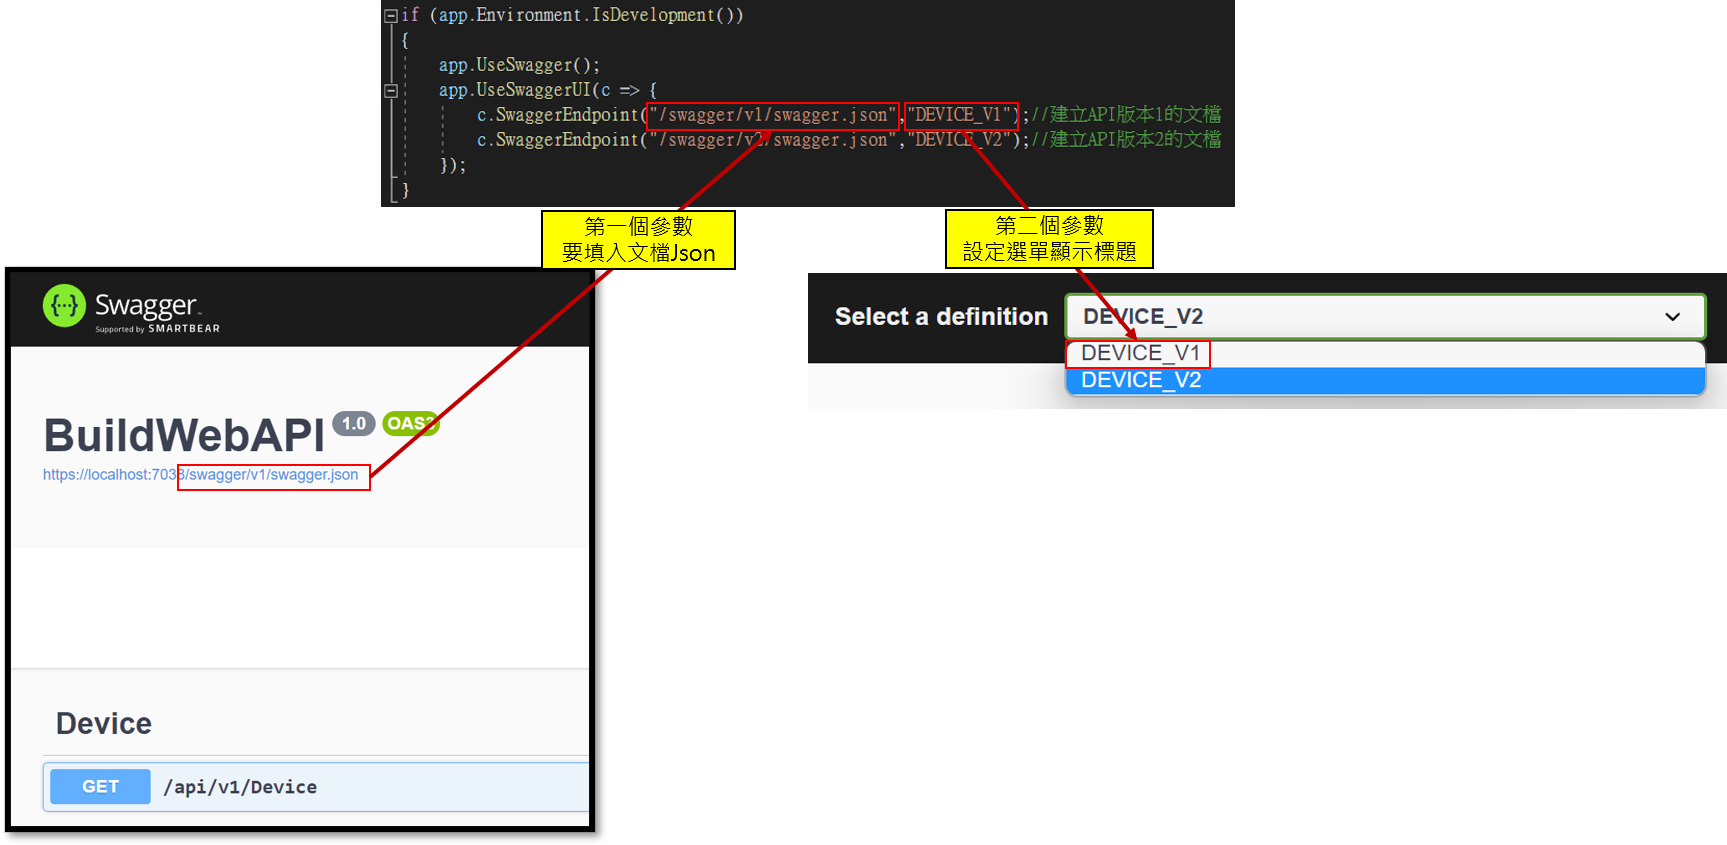
說明達成下圖這種,多個下拉式選單切換不同版本API的方法

UseSwaggerUI中,設定SwaggerEndpoint
AddSwaggerGen中,設定SwaggerDoc
1
2
3
4
5
6
7
8
9
10
11
builder.Services.AddSwaggerGen(c => {

    c.SwaggerDoc("v1",new OpenApiInfo {  Version="描述版本",Title = "標題",Description = "描述" });
    c.SwaggerDoc("v2", new OpenApiInfo { Version = "描述版本", Title = "標題", Description = "描述" });

});

app.UseSwaggerUI(c => {
    c.SwaggerEndpoint("/swagger/v1/swagger.json","DEVICE_V1");//建立API版本1的文檔
    c.SwaggerEndpoint("/swagger/v2/swagger.json","DEVICE_V2");//建立API版本2的文檔
});
UseSwaggerUI補充說明
AddSwaggerGen和SwaggerEndpoint的補充說明
跨版本通用Controller
如果有個APIController底下的Method是不需要考慮版控,例如API登入系統的Controller,則用下圖的方式設計
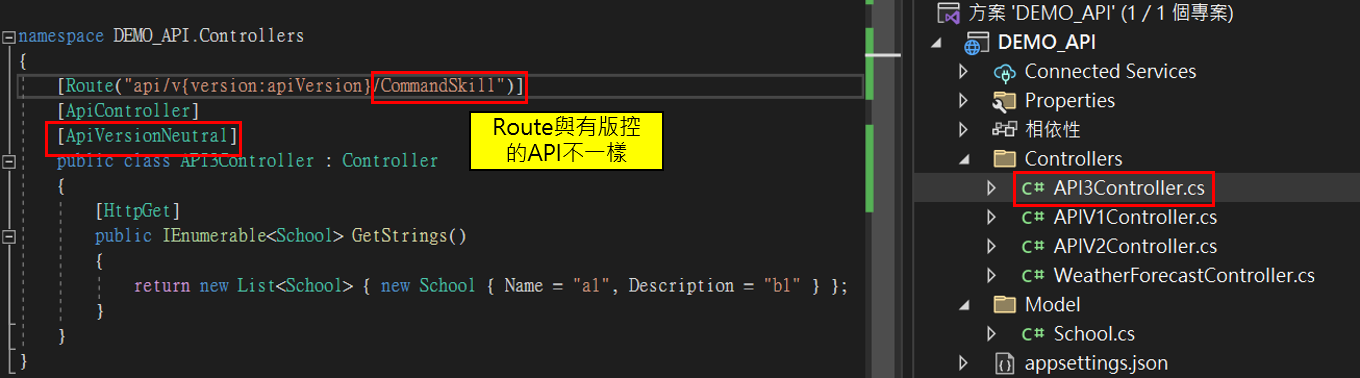
1
[ApiVersionNeutral]
API與暫存
如下圖所示,在Program.cs設定暫存規則,並在Controller實施
備註:下圖的30指的是30秒

1
2
3
4
builder.Services.AddControllers(c =>
{
    c.CacheProfiles.Add("30sCache", new Microsoft.AspNetCore.Mvc.CacheProfile {Duration=30 });
});
Controller.cs
1
[ResponseCache(CacheProfileName = "30sCache")]
設定Post/Get
接著在演示 DTO and AutoMapper ->所有串接改成異步方法 -> 實際串接資料庫 -> 建立API Request AND Response Class -> 網頁專案中異步UnitOfWork
待學習FromBody的用途
參考網站
https://www.cnblogs.com/ypyp123/p/16198778.html https://blog.csdn.net/dawfwafaew/article/details/123753114 https://blog.csdn.net/weixin_52437470/article/details/113726646
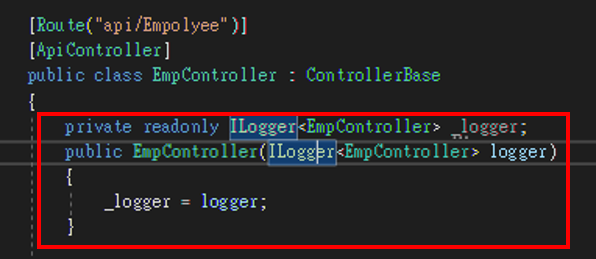
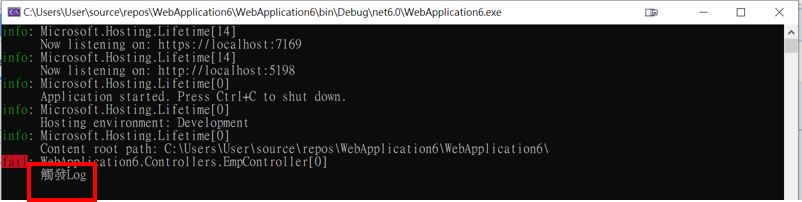
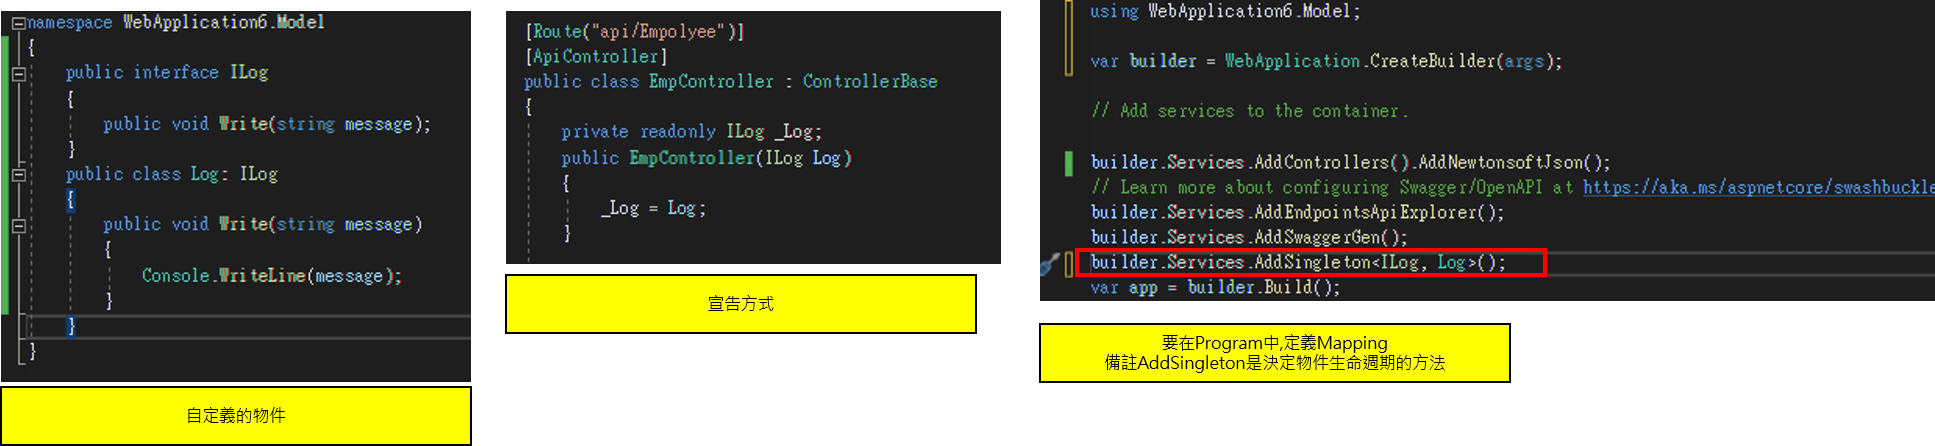
加入Log紀錄資訊的方式
因為以內建DI 所以不需要額外再宣告新物件,使用方式如下
宣告方式
function中的使用方式
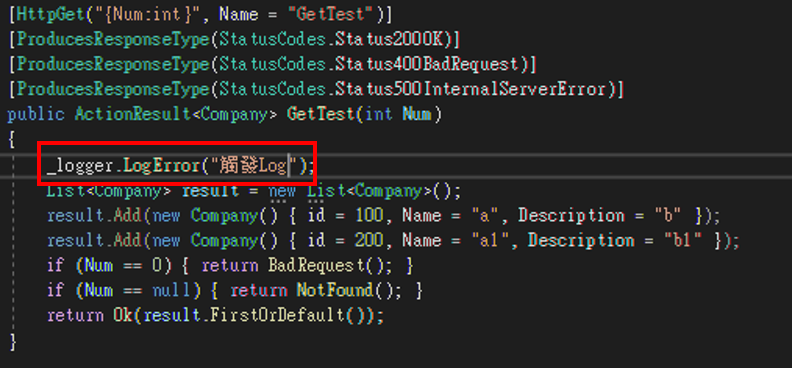
呈現Log資訊的位置
自定義DI注入的Mapping類別的方式
實體框架注入ConnectString的方式
.NET Core 與 .Net Framework不同,無法使用ADO.NET 快速建立已存在的資料庫模型,替代方案詳見以下網址參考
https://stackoverflow.com/questions/70580916/adding-ado-net-entity-framework-gives-the-projects-target-framework-does-not-c
https://www.entityframeworktutorial.net/efcore/create-model-for-existing-database-in-ef-core.aspx