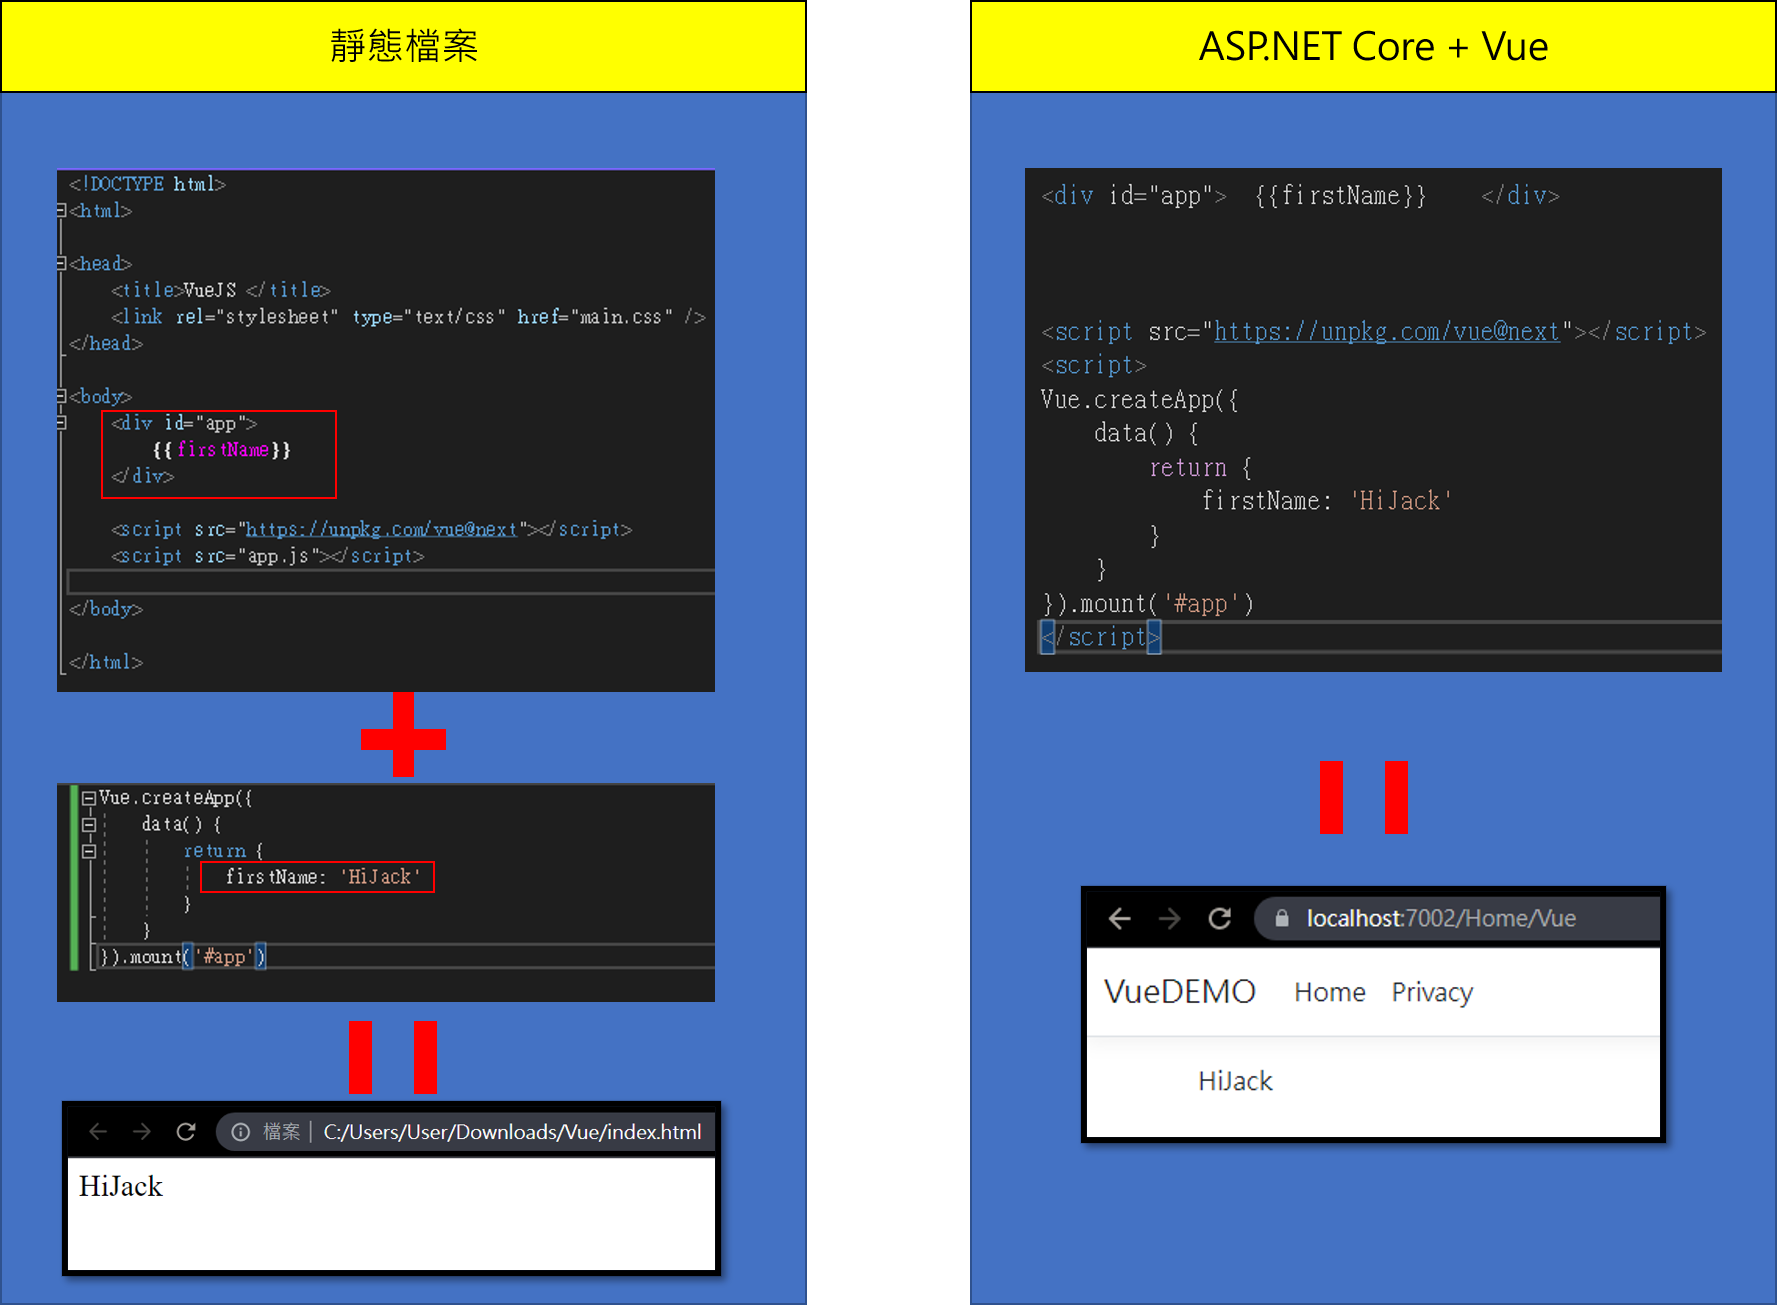
First Vue Project

1
 <script src="https://unpkg.com/vue@next"></script>
Html 和 JavaScript交握
Vue指令
v-model
如下
1
2
3
4
5
6
7
8
9
10
11
12
13
14
15
16
17
18
19
<div id="app">
<label>First Name</label>
<input type="text" v-model="firstName" />
</div>
<script src="https://unpkg.com/vue@next"></script>
<script>
Vue.createApp({
    data() {
        return {
            firstName: 'HiJack'
        }
    },
    methods:{
    FullfirstName() {
        return  `${this.firstName}`
        }
    }
}).mount('#app')
</script>
v-bind
使用v-bind傳遞變數到html的作法 
v-html
javaScript插入DOM的方式 
1
2
3
4
5
6
7
8
9
10
11
12
13
<div id="app">
<p v-html="GoogleURL_HTML"></p>
</div>
<script src="https://unpkg.com/vue@next"></script>
<script>
Vue.createApp({
    data() {
        return {
            GoogleURL_HTML:'<a href="https://Google.com" target="_blank">Google</a>'
        }
    }
}).mount('#app')
</script>
v-on click 事件觸發
如下,使用v-on:click
1
2
3
4
5
6
7
8
9
10
11
12
13
14
15
16
17
18
19
<div id="app">
<p></p>
 <button type="button" v-on:click="Addition">Addition</button>
<button type="button" v-on:click="age--">Subtraction</button>
</div>
<script src="https://unpkg.com/vue@next"></script>
<script>
Vue.createApp({
    data() {
        return {
            age:20
        }
    },
    methods:
    {
    Addition(){this.age++}
    }
}).mount('#app')
</script>
或使用v-on:[input]
1
2
3
4
5
6
7
8
9
10
11
12
13
14
15
16
17
18
19
20
21
22
23
24
25
26
<div id="app">
<hr />
<label>First Name</label>
<input type="text" v-model="firstName" />
<label>Last Name</label>
<input type="text" v-model="lastName" v-on:input="updateLastName" />
</div>
<script src="https://unpkg.com/vue@next"></script>
<script>
Vue.createApp({
    data() {
        return {
            firstName: 'HiJack'
        }
    },
    methods:{
    FullfirstName() {
            return `${this.firstName} ${this.lastName}`
        },
        updateLastName(event)
        {
            this.lastName=event.target.value
        }
    }
}).mount('#app')
</script>
v-on click 傳遞參數
下面這個範例可以在輸入TextBox時,按F12看Console結果
1
2
3
4
5
6
7
8
9
10
11
12
13
14
15
16
17
18
19
20
<script src="https://unpkg.com/vue@next"></script>
<script>
Vue.createApp({
    data() {
        return {
            firstName: 'TEST'
        }
    },
    methods:{
    FullfirstName() {
            return `${this.firstName} ${this.lastName}`
        },
        updateLastName(Msg,event)
        {
            console.log(Msg);
            this.lastName=event.target.value
        }
    }
}).mount('#app')
</script>
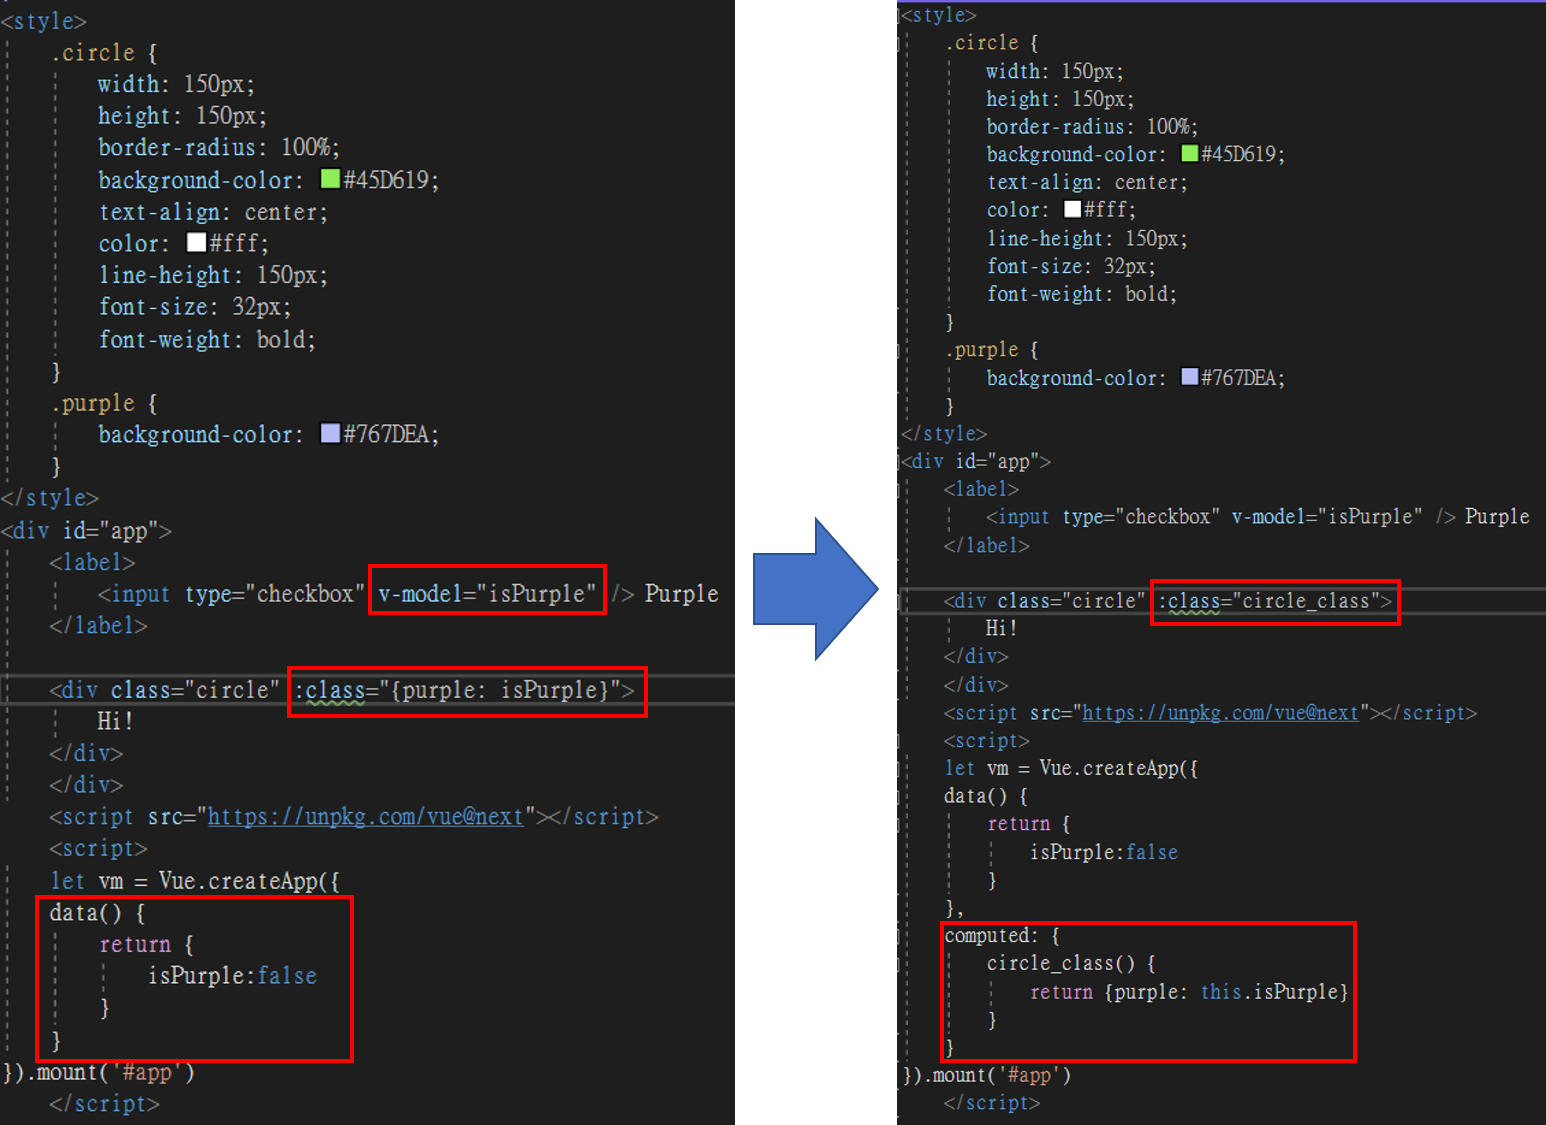
Computed
1
2
3
4
5
6
7
8
9
10
11
12
13
14
15
16
17
18
19
20
21
22
23
24
25
26
27
28
29
30
31
32
33
34
35
36
37
38
39
40
<style>
    .circle {
        width: 150px;
        height: 150px;
        border-radius: 100%;
        background-color: #45D619;
        text-align: center;
        color: #fff;
        line-height: 150px;
        font-size: 32px;
        font-weight: bold;
    }
    .purple {
        background-color: #767DEA;
    }
</style>
<div id="app">
    <label>
        <input type="checkbox" v-model="isPurple" /> Purple
    </label>

    <div class="circle" :class="circle_class">
        Hi!
    </div>
    </div>
    <script src="https://unpkg.com/vue@next"></script>
    <script>
    let vm = Vue.createApp({
    data() {
        return {
            isPurple:false
        }
    },
    computed: {
        circle_class() {
            return {purple: this.isPurple}
        }
    }
}).mount('#app')
    </script>
條件渲染
v-show也能做到條件渲染,但使用細節可能跟if不太一樣
詳見https://vuejs.org/guide/essentials/conditional.html#v-show 範例如下
1
2
3
4
5
6
7
8
9
10
11
12
13
14
15
16
17
18
19
20
21
<div id="app">
    <p v-if="model == 1"> model=1</p>
    <p v-else-if="model == 2"> model=2</p>
    <p v-else"> other</p>

    <select v-model="model">
        <option value="1">if</option>
        <option value="2">else if</option>
        <option value="3">else </option>
    </select>
    </div>
    <script src="https://unpkg.com/vue@next"></script>
    <script>
    let vm = Vue.createApp({
    data() {
        return {
            model:1
        }
    }
}).mount('#app')
    </script>
componet的使用方式
如下 範例如下
1
2
3
4
5
6
7
8
9
10
11
12
13
14
15
16
17
18
19
20
21
22
<div id="app">
    <hello></hello>
    <hello></hello>
    <hello></hello>
    </div>
    <script src="https://unpkg.com/vue@next"></script>
    <script>
let vm = Vue.createApp({
  //  template: ``
})

vm.component('hello', {
  template: `<h1></h1>`,
  data() {
    return {
      message: 'Hello World!'
    }
  }
})

vm.mount('#app')
    </script>
常用工具-PowerShell
Vite
開啟PowerShell,依序輸入紅框中的指令
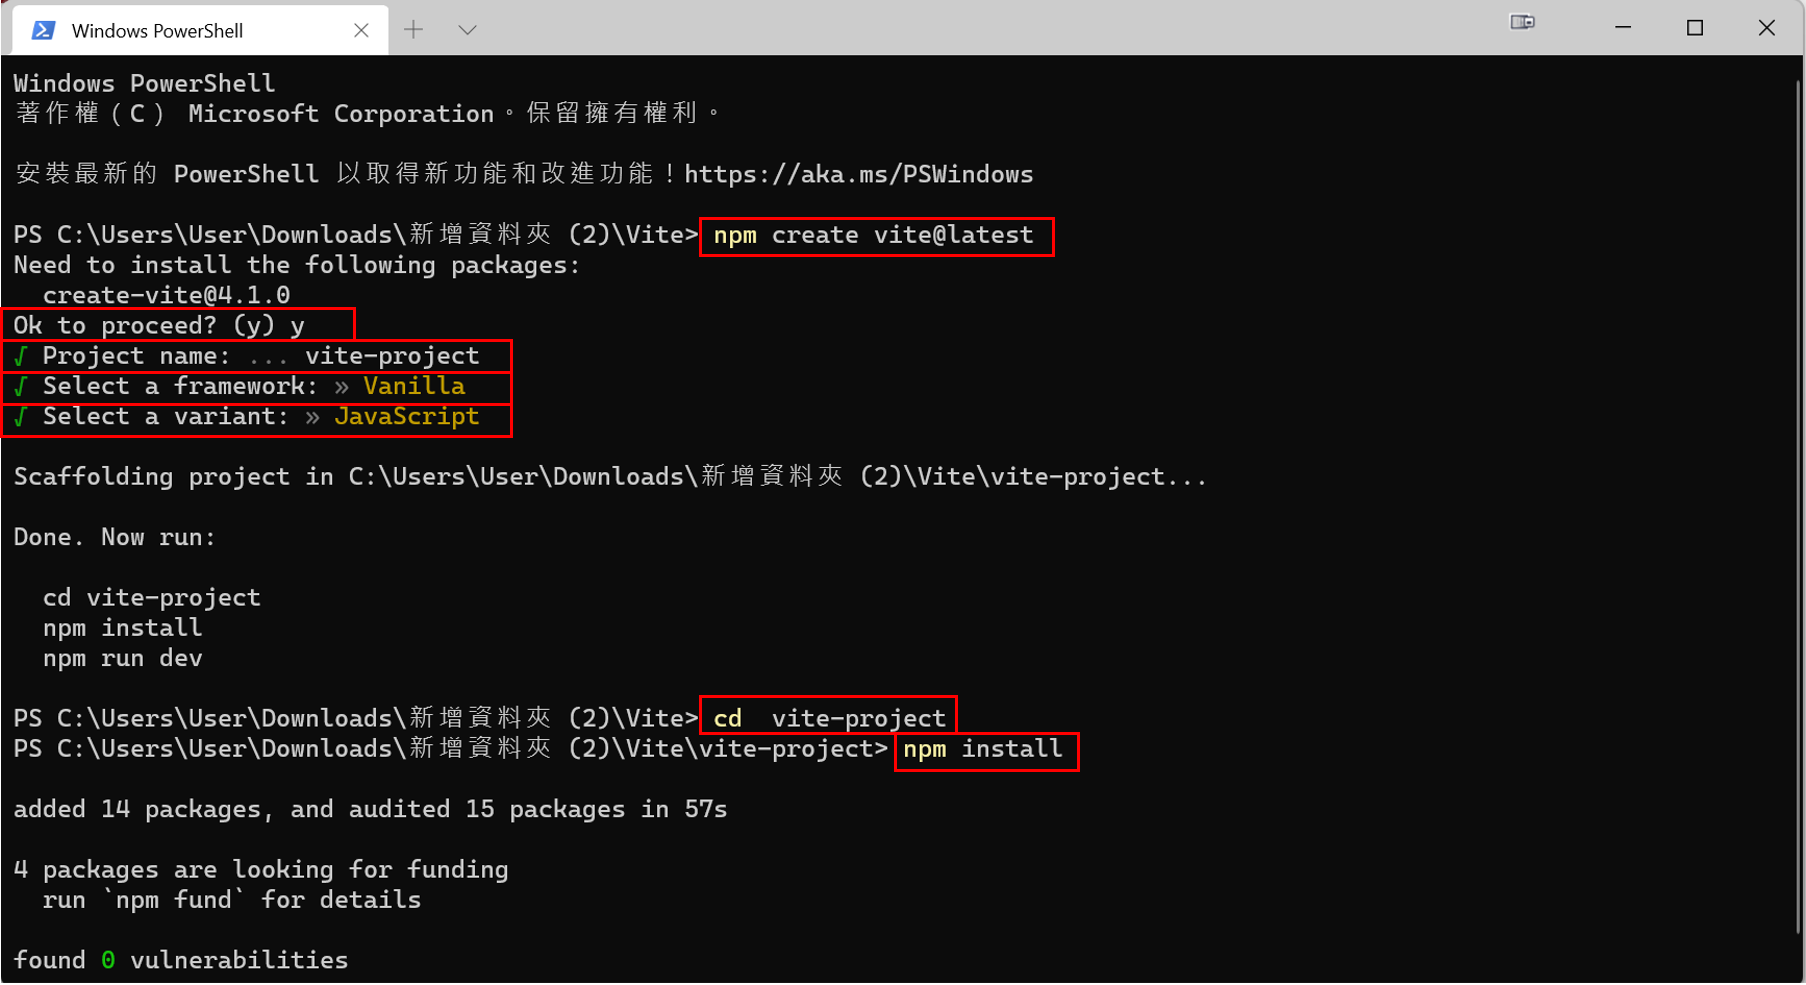
1
npm create vite@latest
完成之後,會產出一個vite專案,裡面的資料大致上有這些
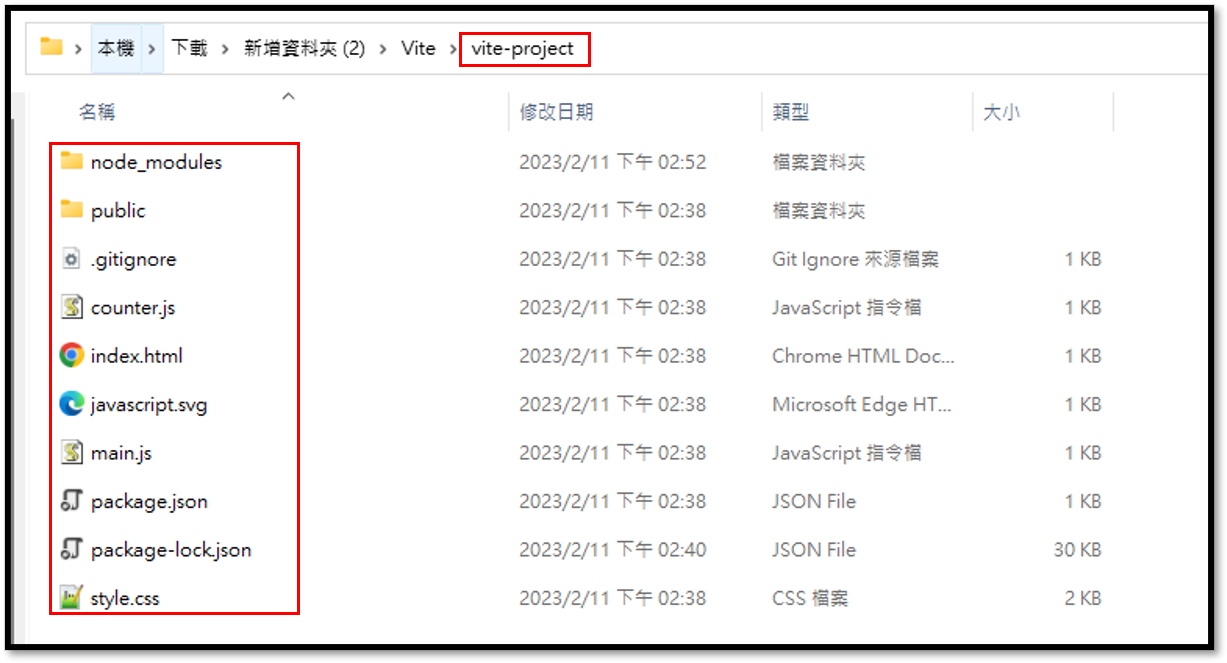
可以使用PowerShell啟動Vite Server
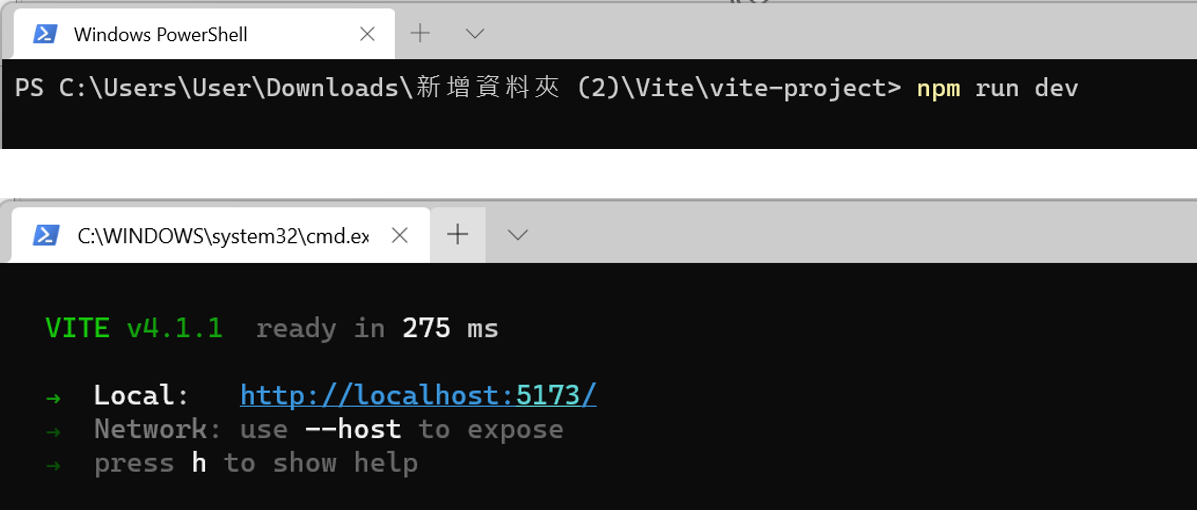
1
npm run dev
「npm run build」可能是產生要放到IIS的檔案,備註:我還沒試過
SASS
備註:SASS 是用來加速CSS開發
安裝SASS

1
 npm install sass
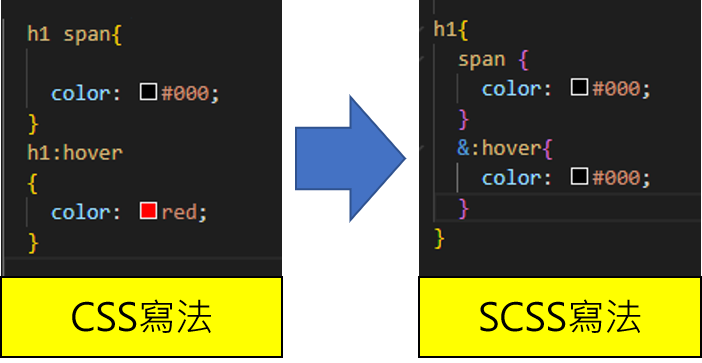
因為sass是用來加速開發css的語言,所以確定要使用sass的話,原本的副檔名要從css要改成scss

改成sass最大的好處是可以結構化管理css
ESLink
備註:ESLink 用來檢查JavaScript程式碼是否符合規則
安裝ESLink
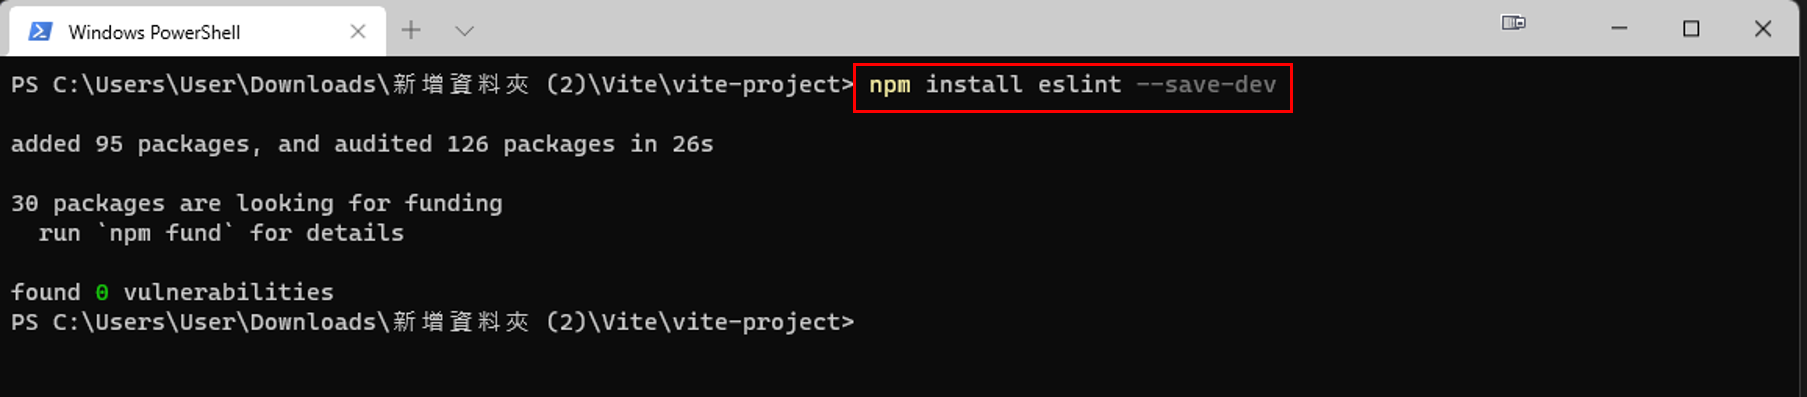
1
 npm install eslint --save-dev
為vite配置eslint外掛
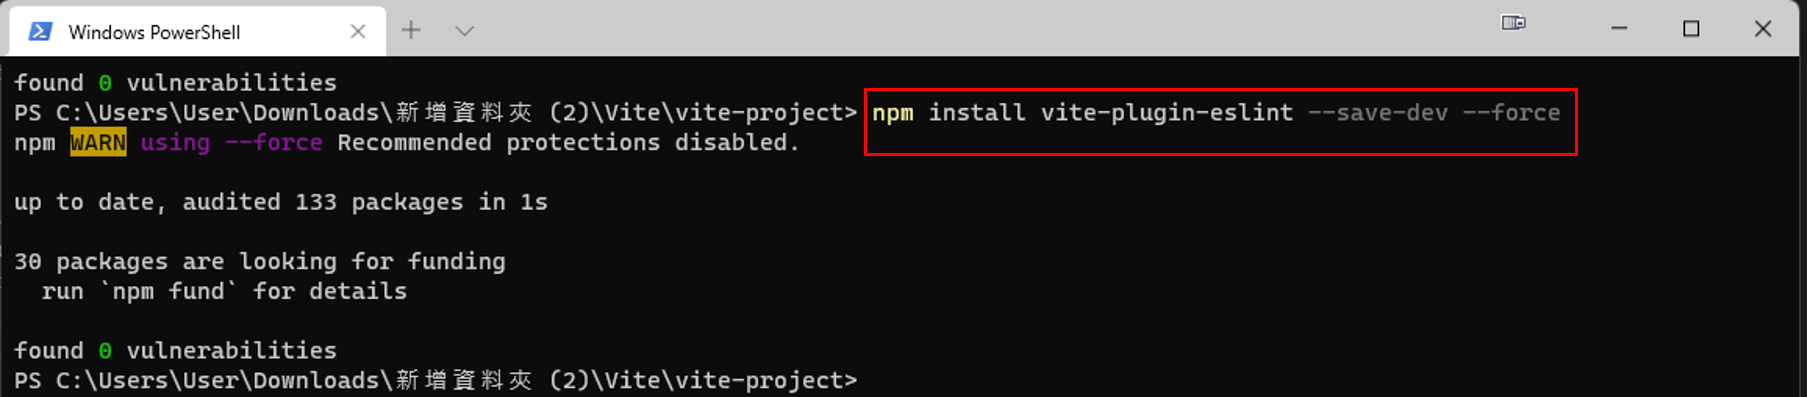
1
   npm install vite-plugin-eslint --save-dev --force
配置ESLink
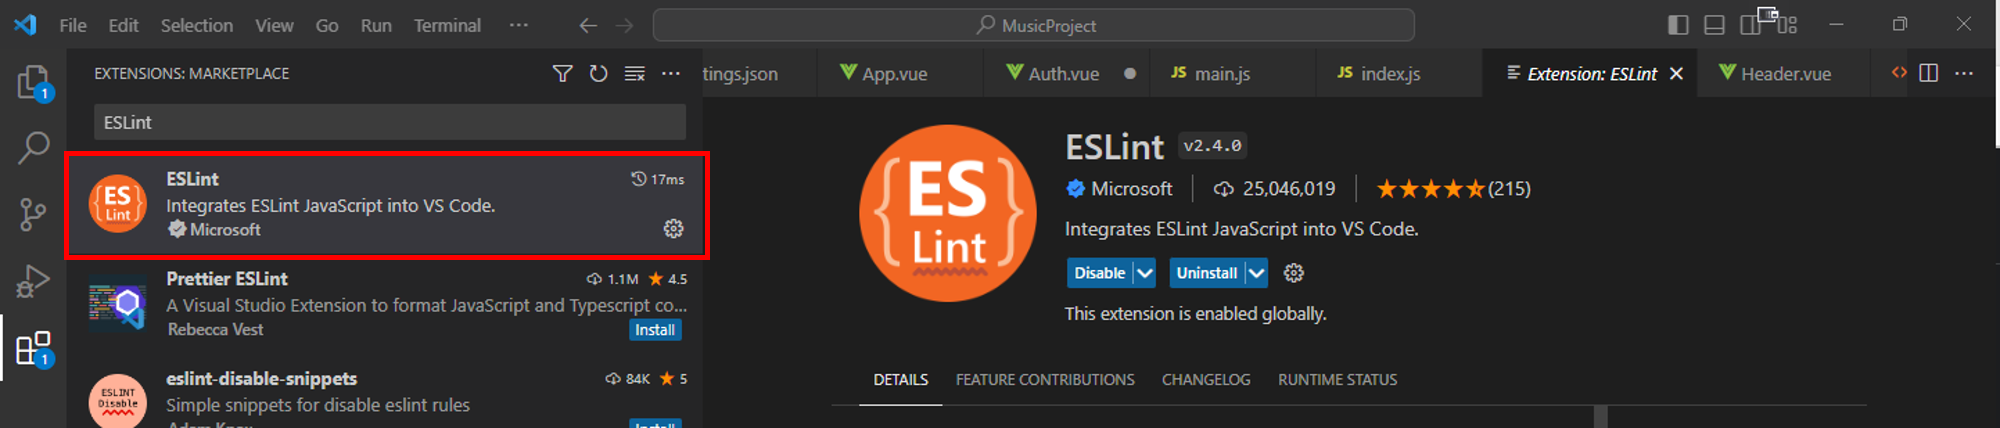
常用工具-VS Code
ESLint
安裝ESLint
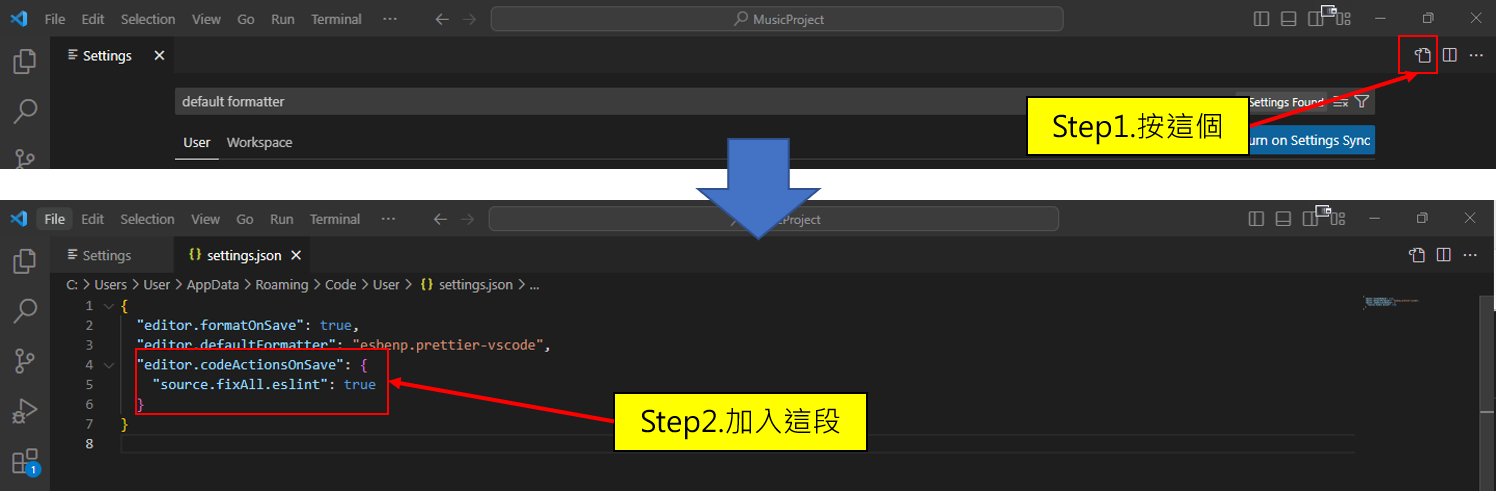
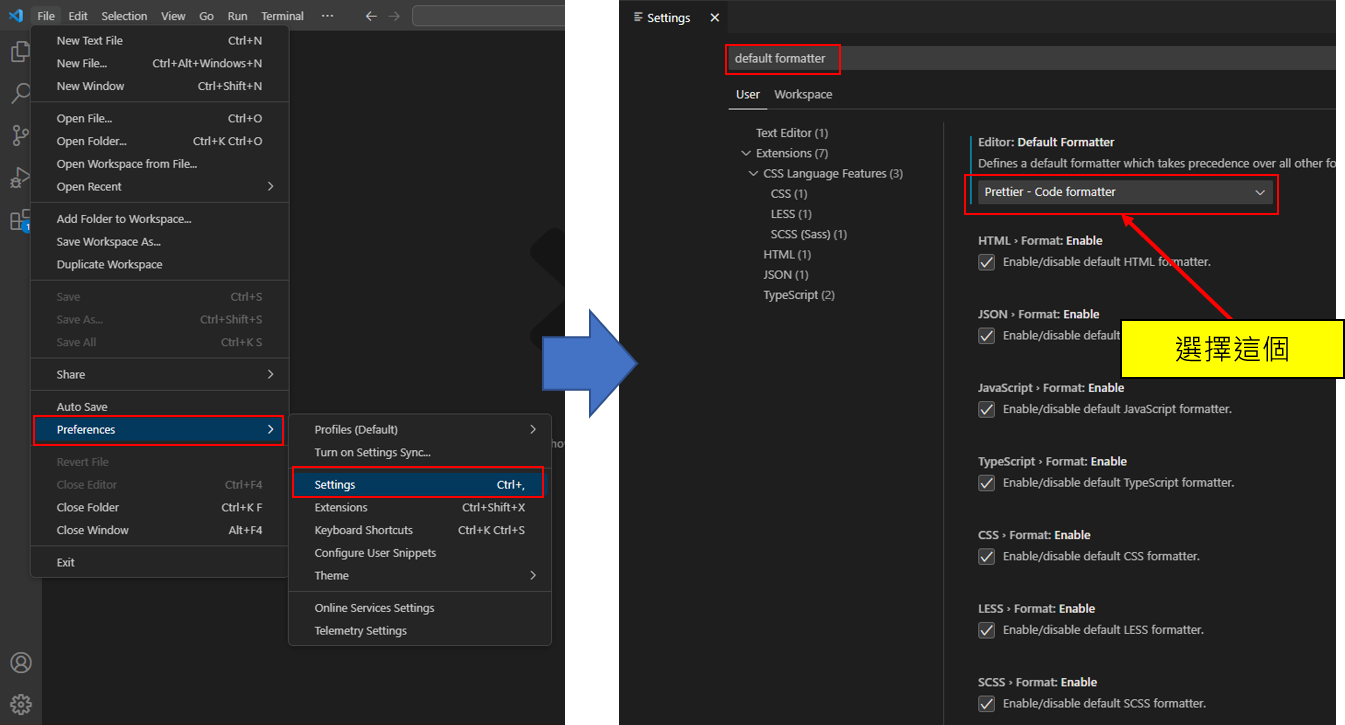
設定儲存時自動格式化

設定儲存時自動使用ESLint修正語法
1
2
3
"editor.codeActionsOnSave": {
    "source.fixAll.eslint": true
}
vee-validate
進行驗證用的外掛套件 在專案底目錄下,使用這指令安裝
1
npm i vee-validate
Prettier - Code formatter
Prettier - Code formatter
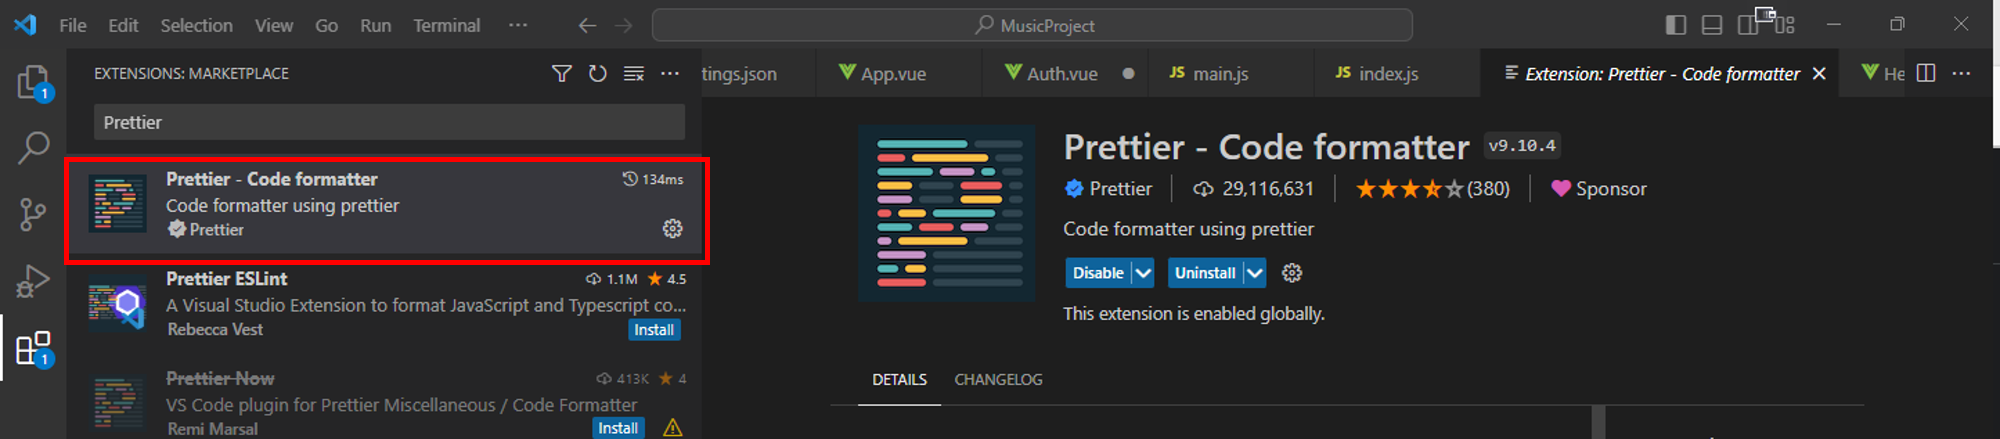
設定儲存時自動格式化
Tailwind
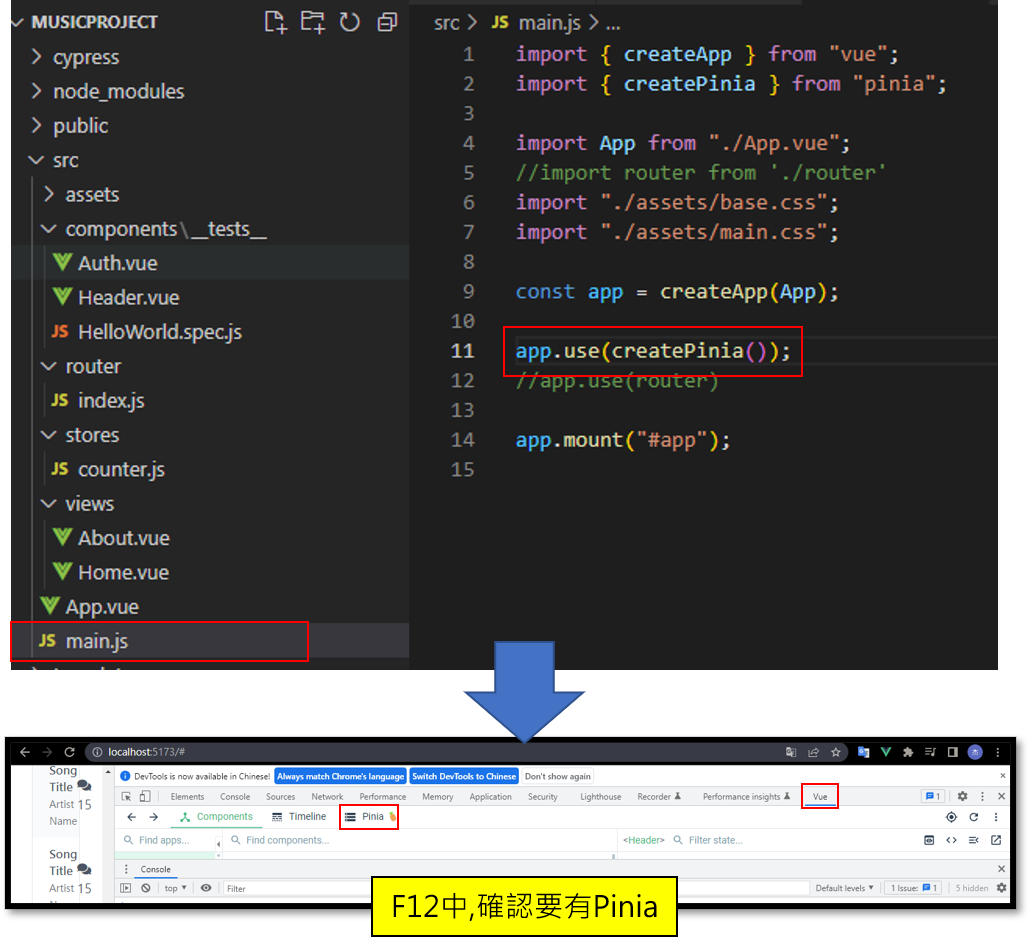
Pinia
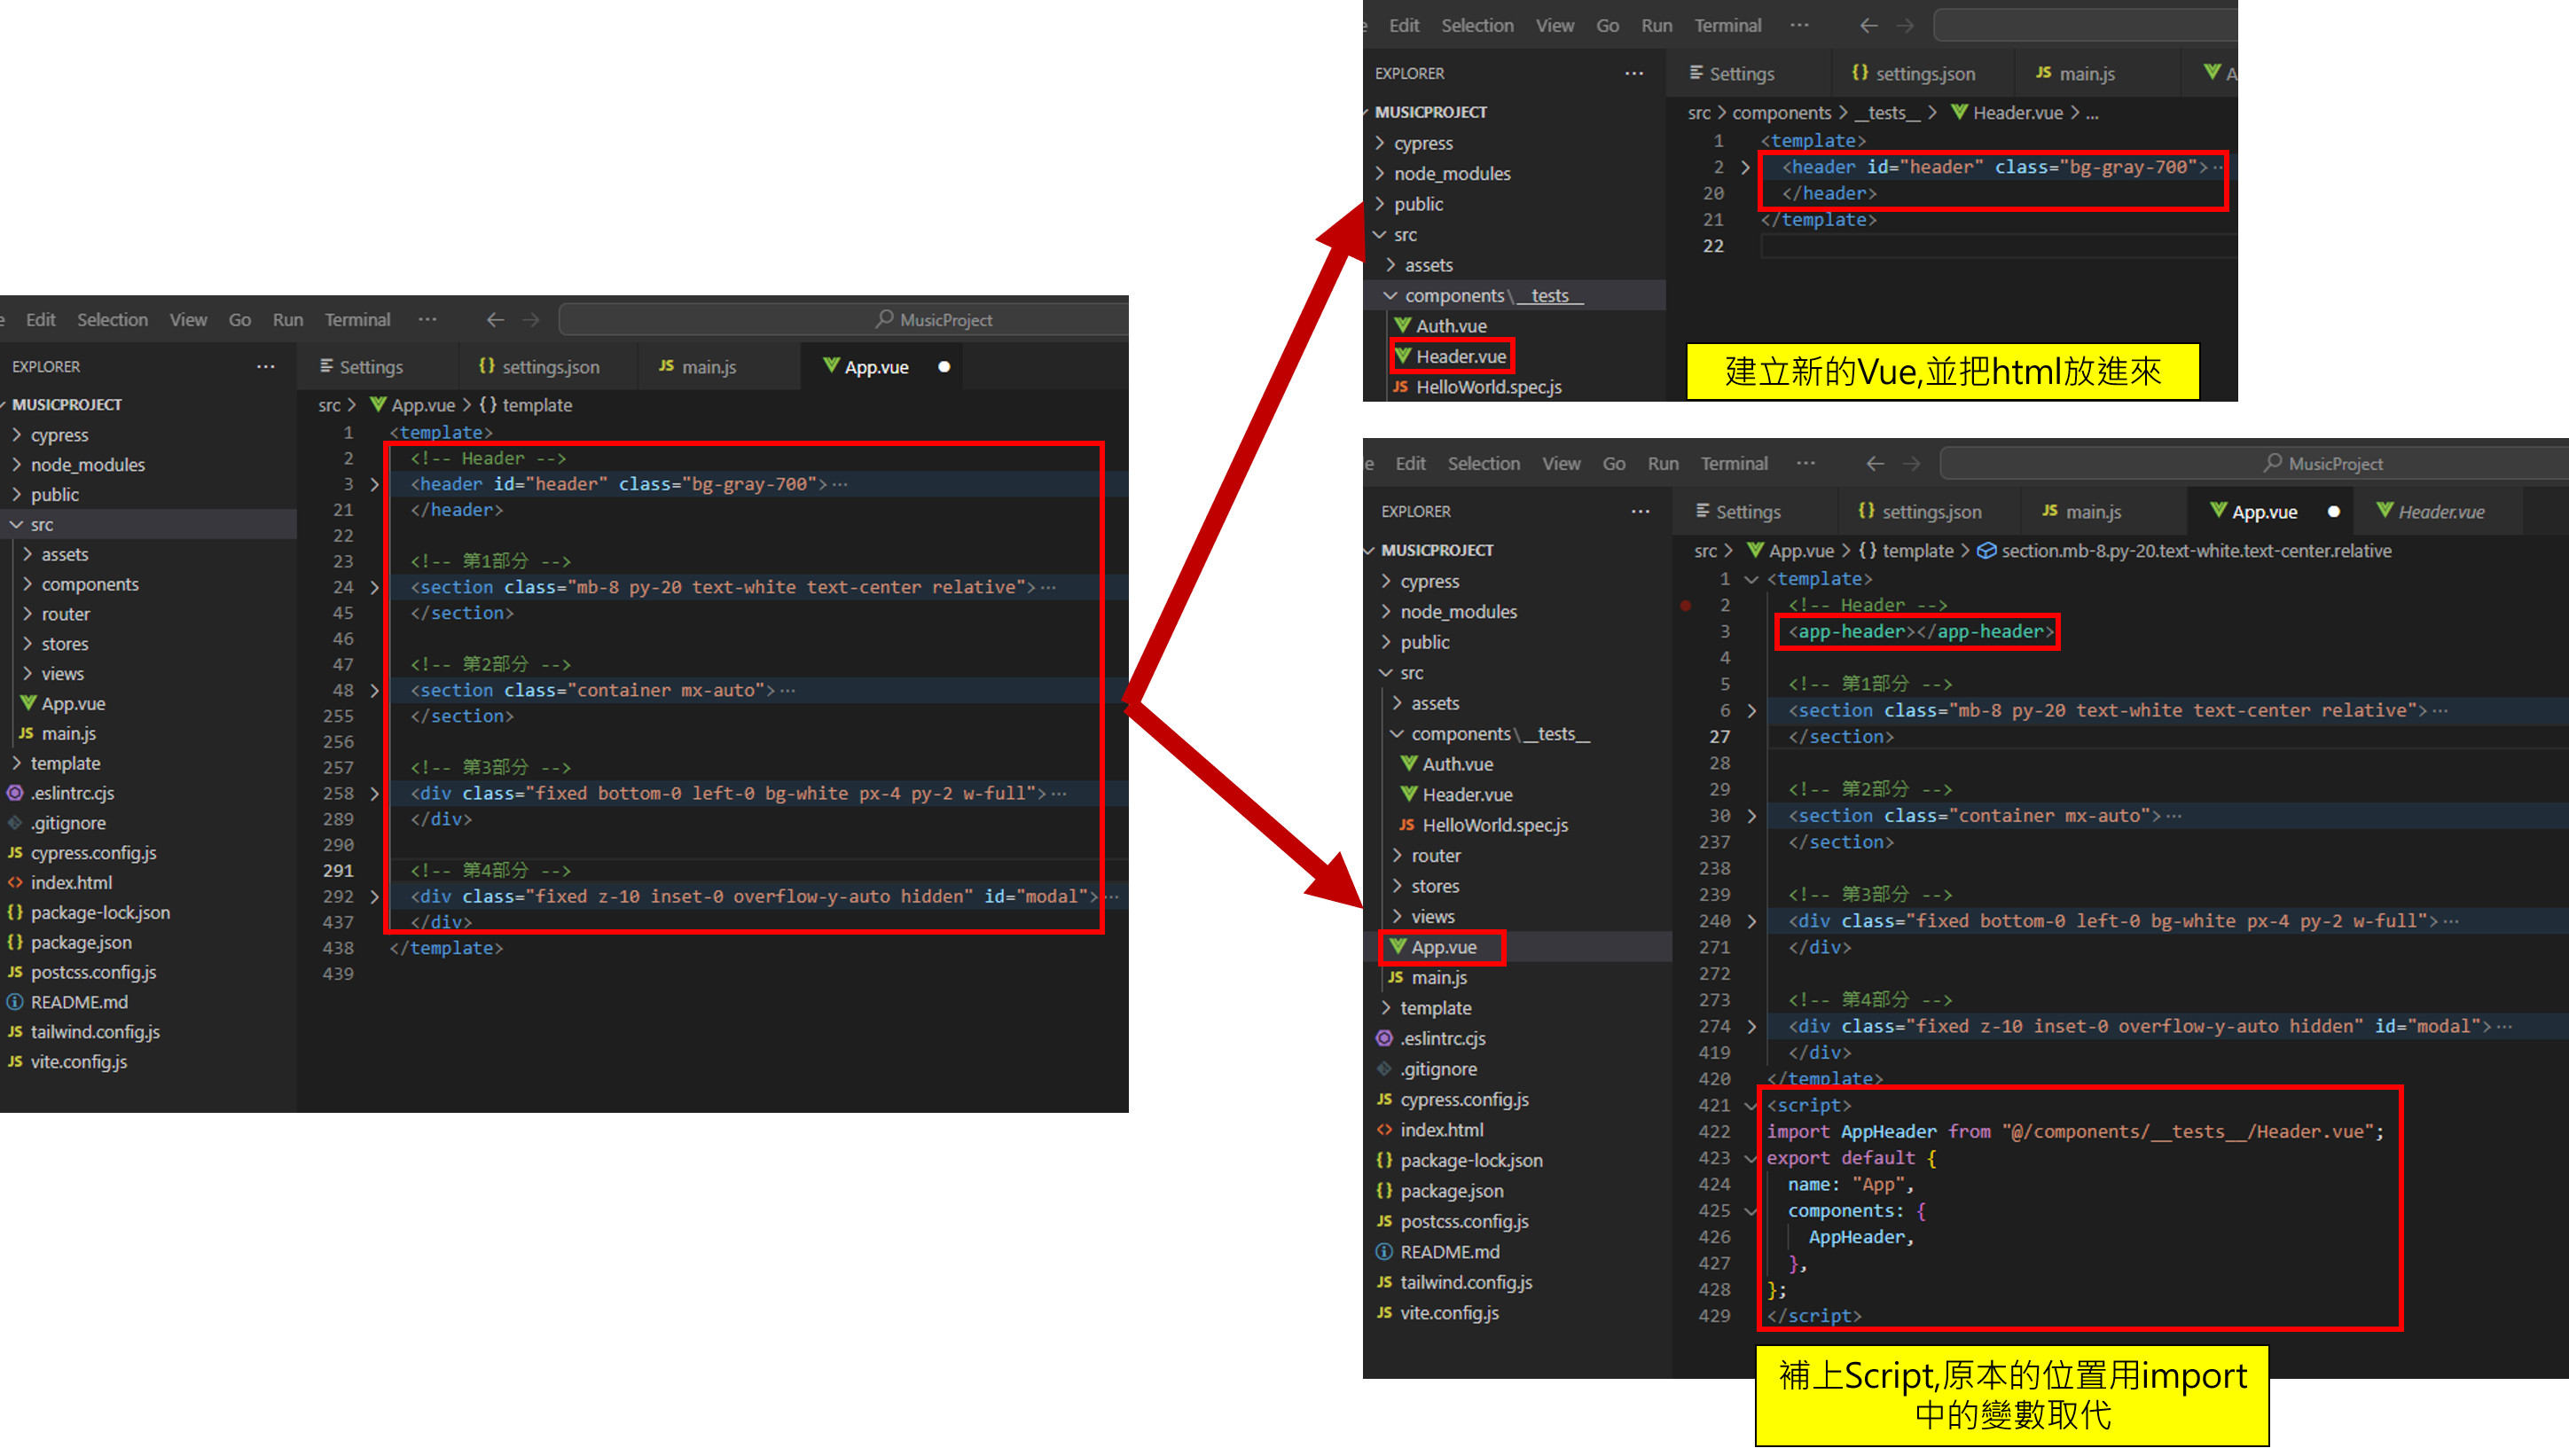
Html to Vue
靜態Html配置到Vue專案中
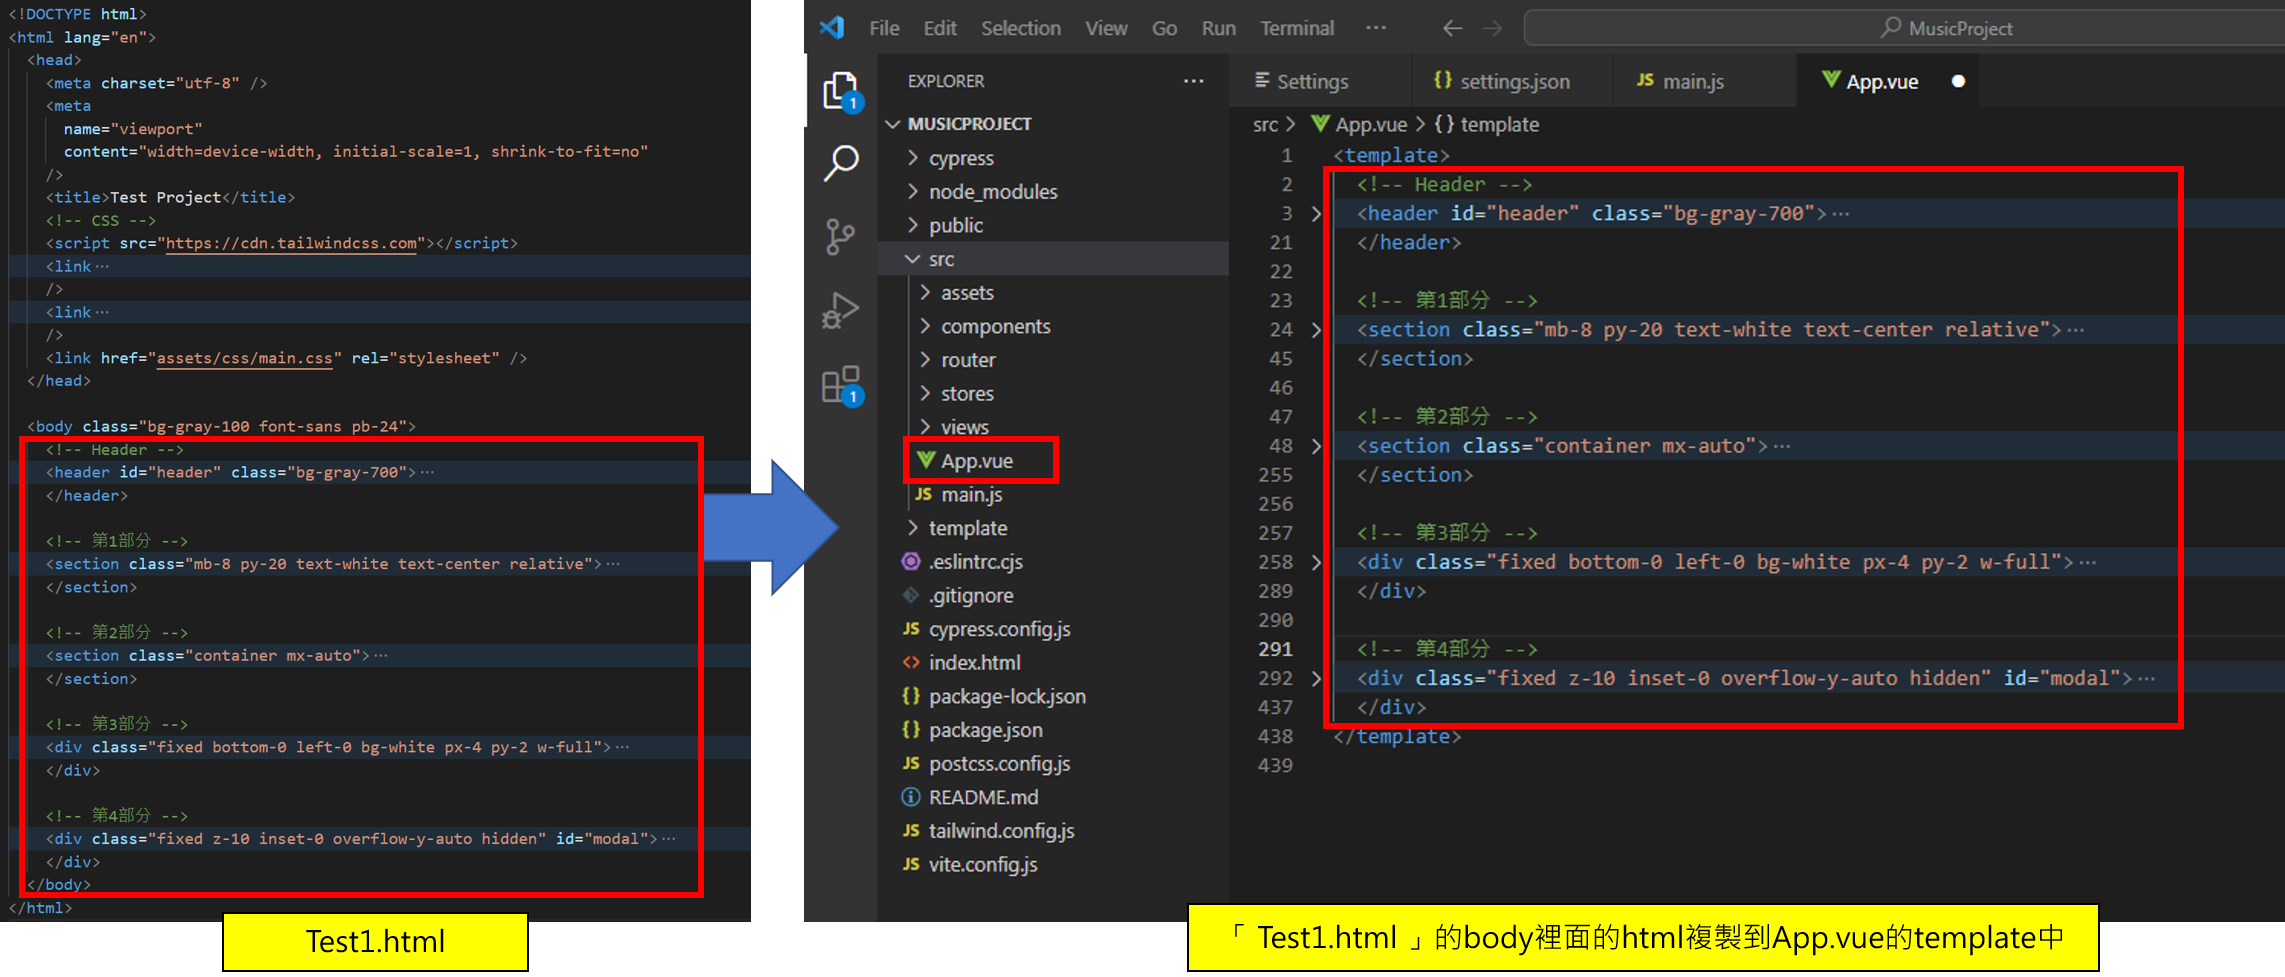
結構化各個html部分
例如移動Header
建立新的Vue檔,將Header移到新的vue中
快速搭建Vue專案
指令建立初始專案

1
   npm init vue@latest
使用vee-validate驗證資料
在專案底目錄下,使用這指令安裝vee-validate
1
npm i vee-validate
導入vee-validate  html標籤轉為vee
安裝驗證規則vee-validate的驗證規則
1
npm i @vee-validate/rules
導入vee-validate/rules 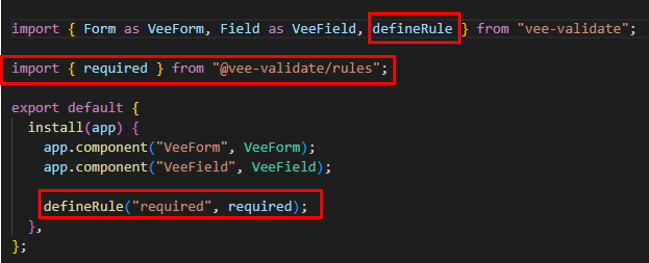
遷換到專案底下,安裝npm並執行專案
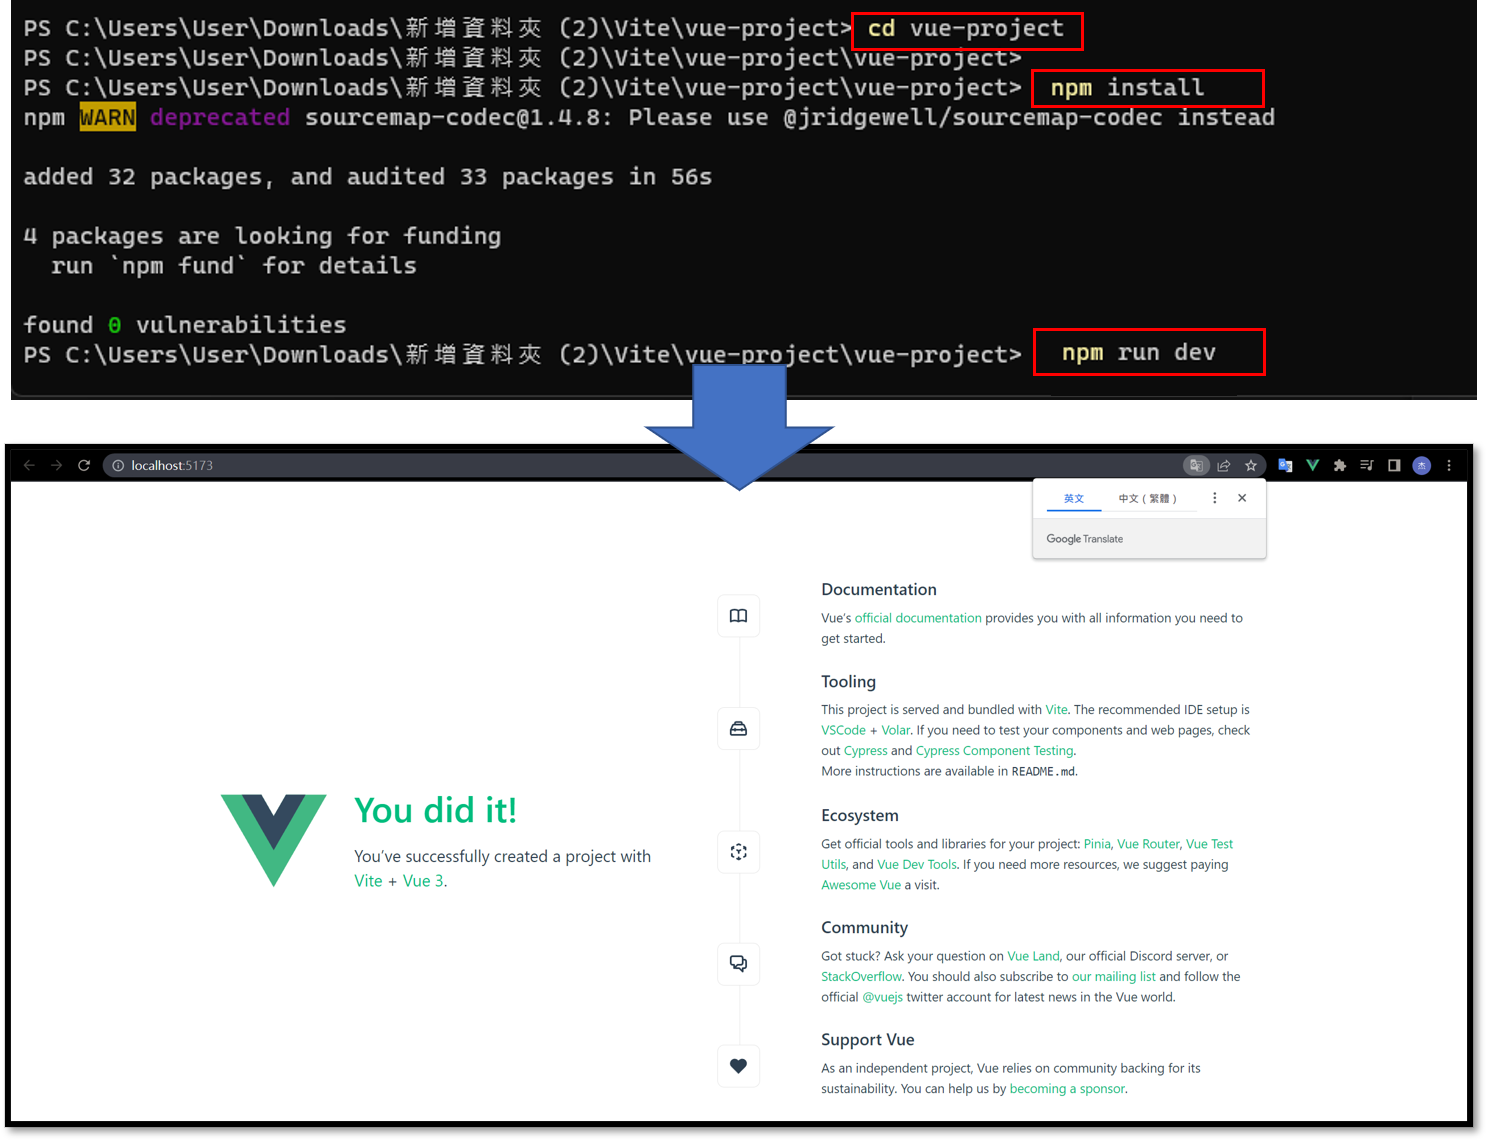
1
   npm run dev
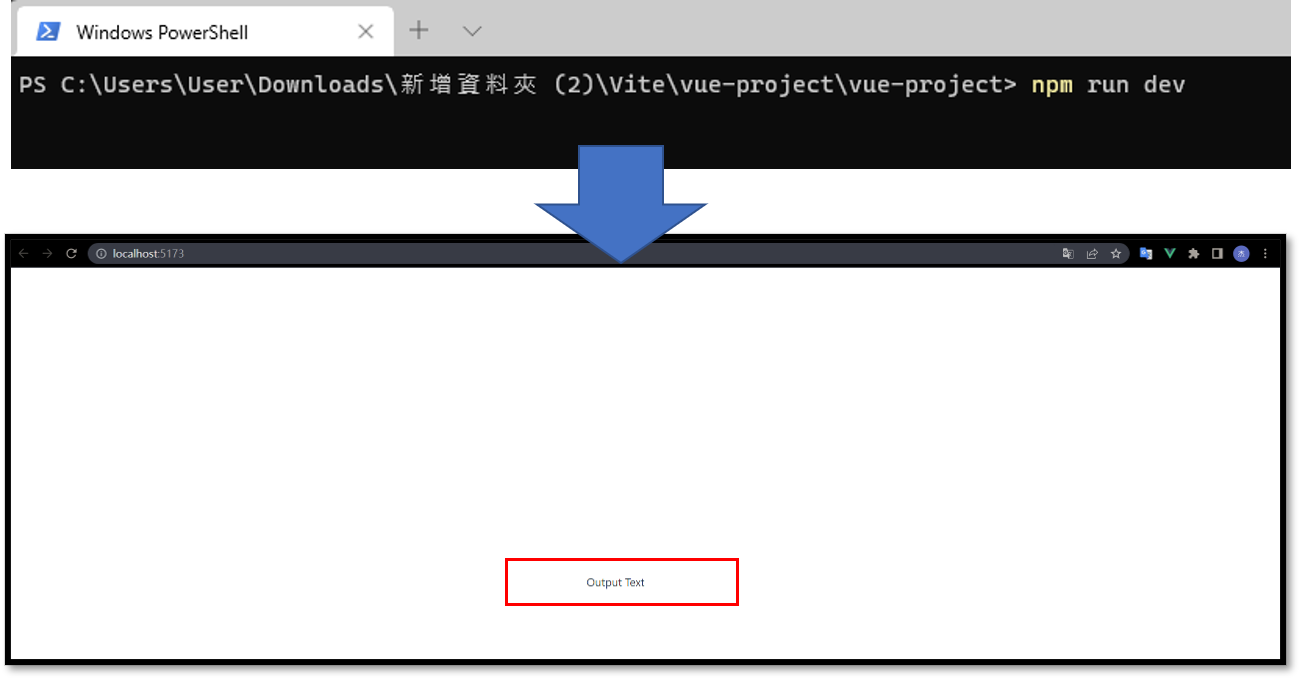
App.vue的Hello World
Source Code如下
1
2
3
4
5
6
7
8
9
10
11
12
13
    <template>
    <p> {{ msg }} </p>
    </template>
    <script>
    export default{
    name:'測試',
    data(){
        return {
        msg : 'Output Text'
        }
    }
    }
    </script>
執行結果
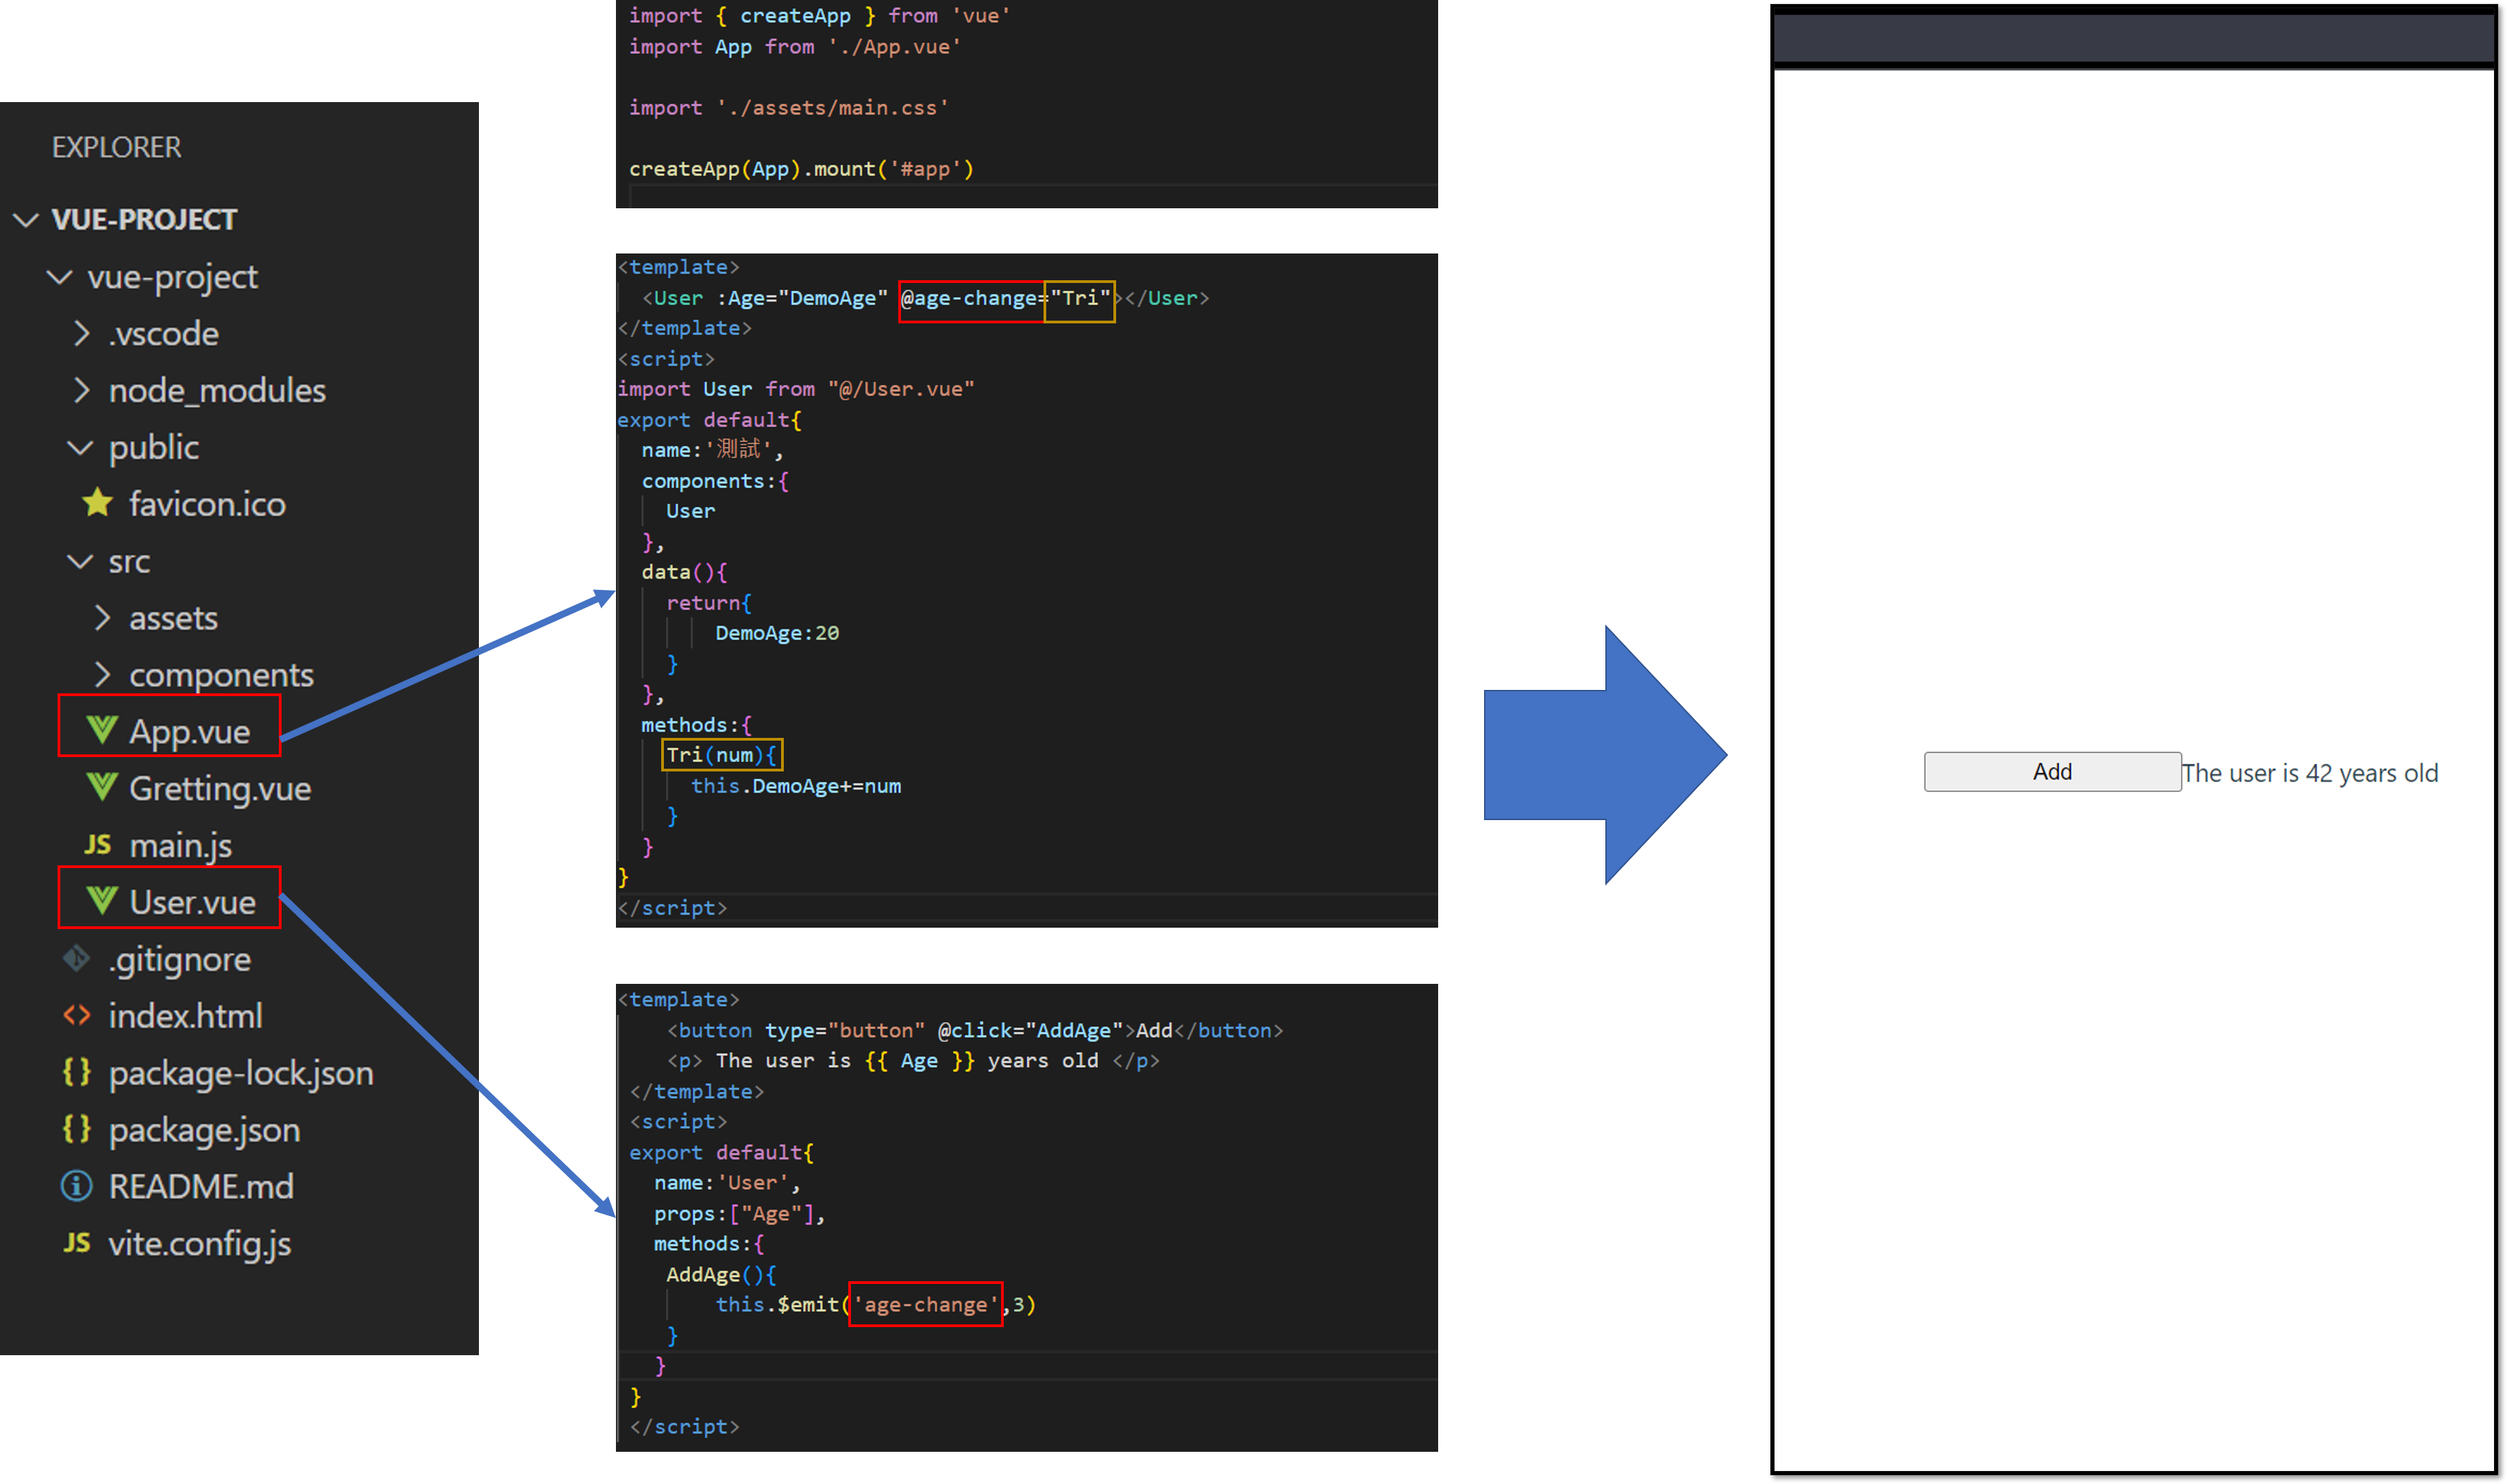
App.vue的component結構化
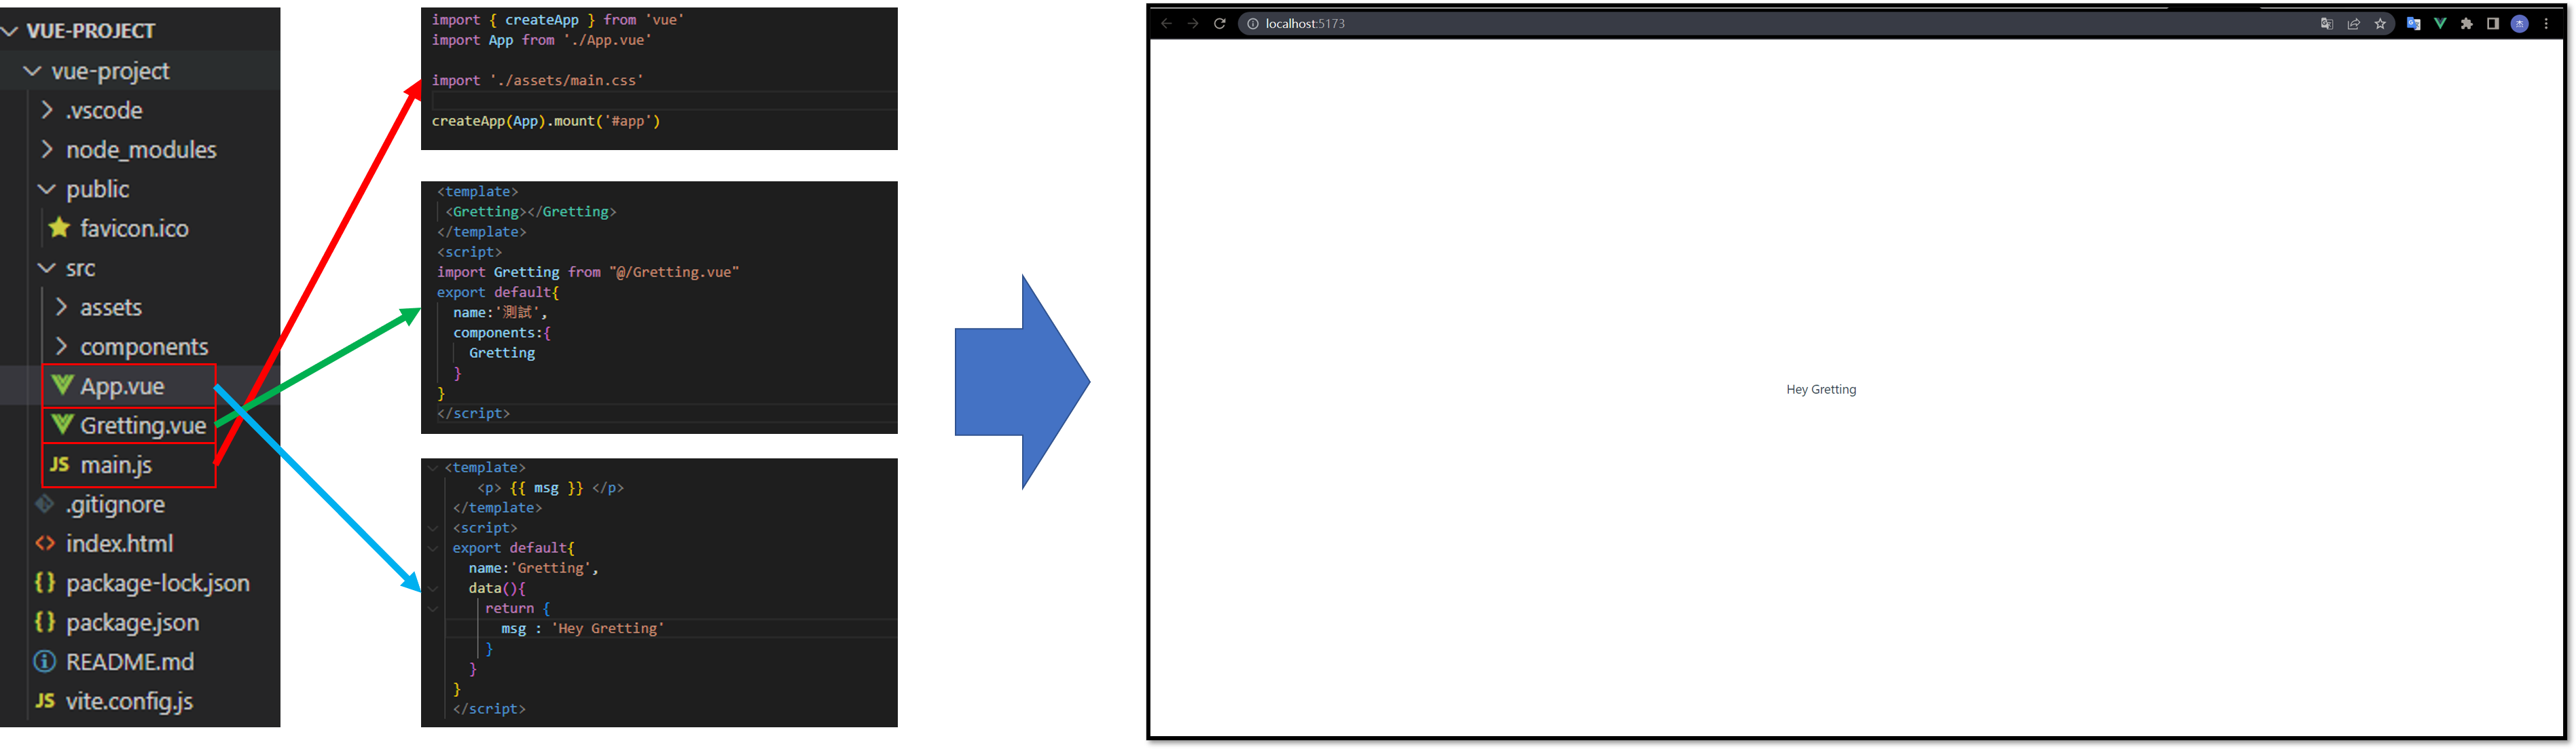
App.vue的component傳遞參數
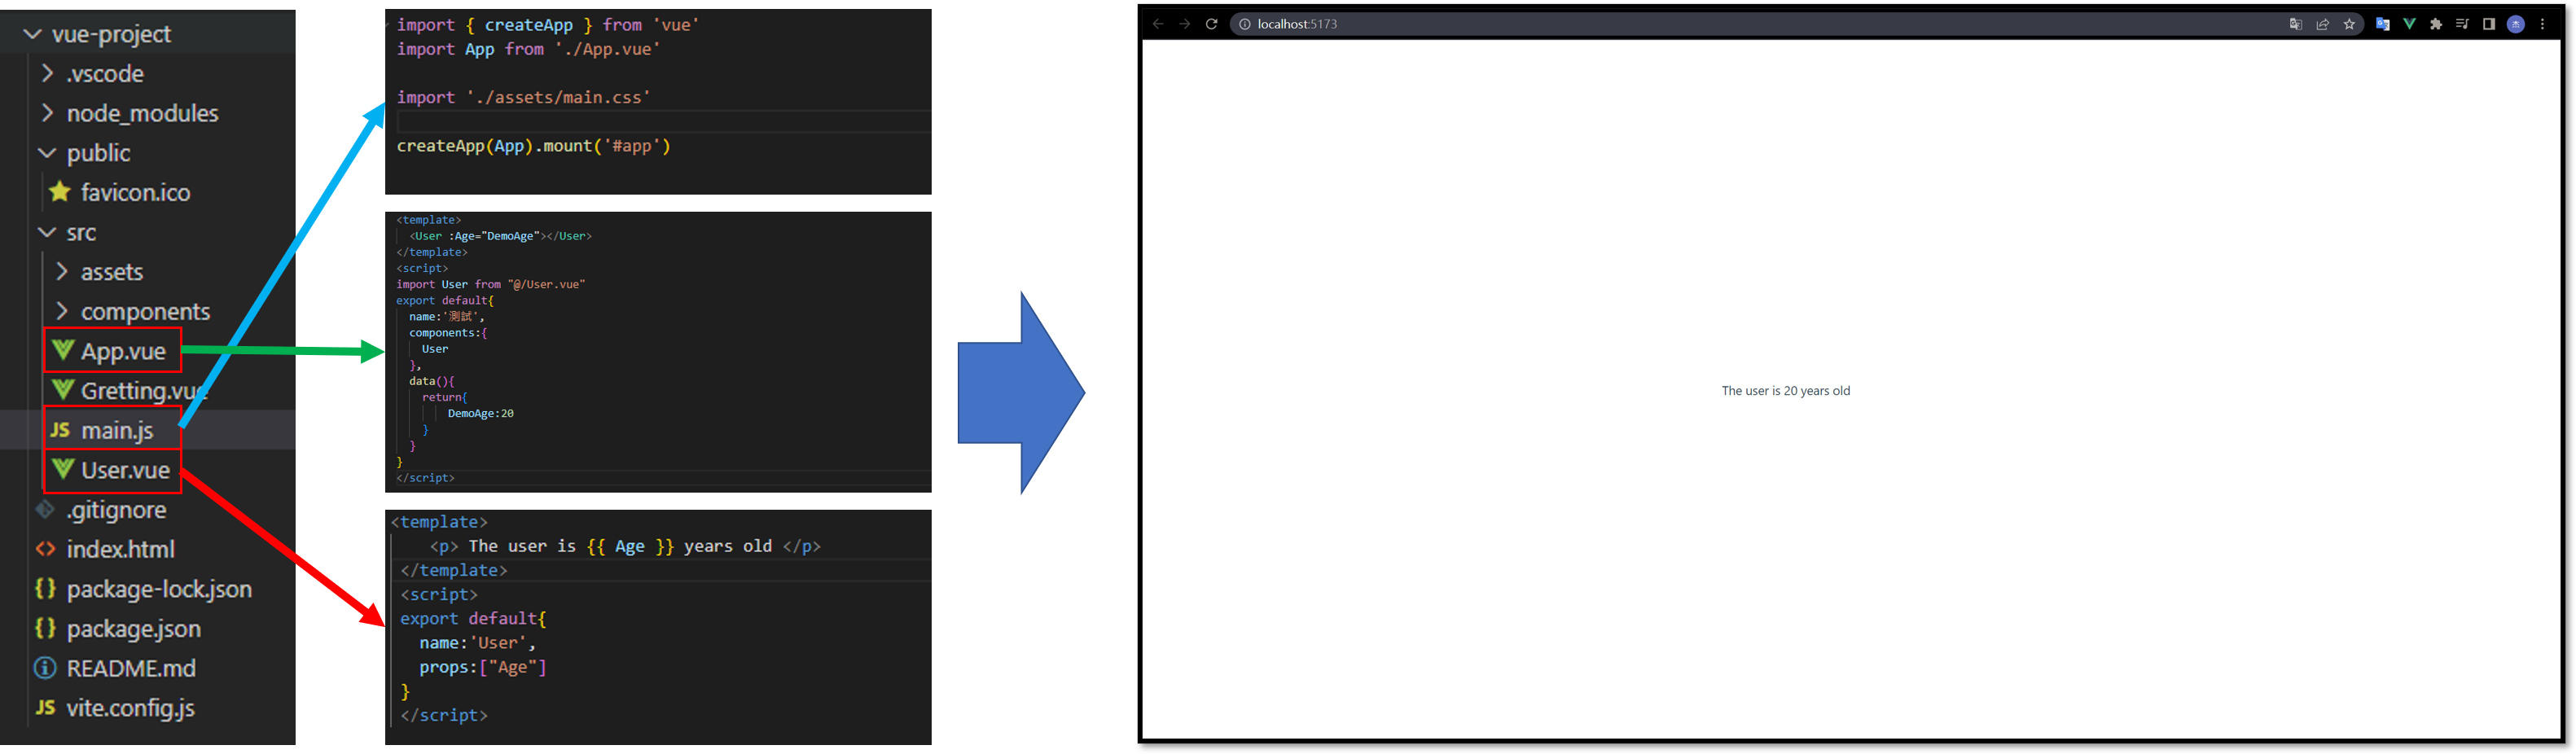
App.vue的component傳遞事件